


Build a Daylight Drift Tool in Less Than 20 Minutes
Goal
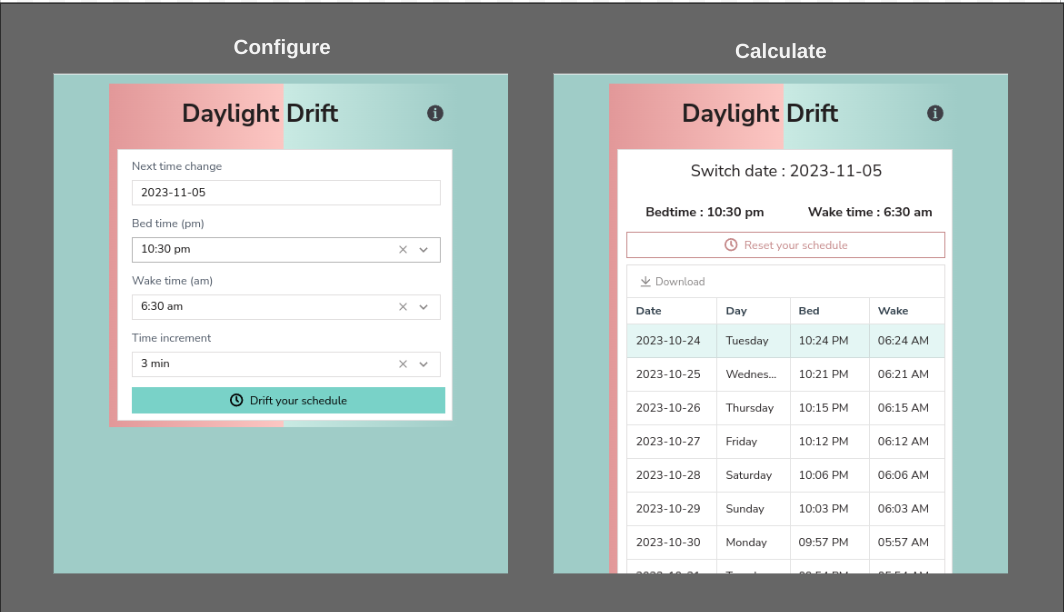
Create a user-friendly app that systematically adjusts sleep schedules for daylight savings transitions. By the end, you'll have a functional tool ready to help users seamlessly adapt to time changes, enhancing their overall well-being.
Shortcut : 20 minutes is quick and easy, but if you want to see, use, or fork my version, here it is.
Prerequisites
Basic Javascript abilities
The need (or interest) in avoiding the worst aspects of the time change
Overview
Some of you may not be aware of Daylight Savings Time (DST), or just have a passing familiarity. Others of you are painfully aware of this phenomenon. Let's dive into what it is, why that sudden time jolt can mess with our bodies, and how we can save the day (or at least our sleep) with a nifty app we'll call "Daylight Drift."
The Lowdown on DST
Daylight Savings Time is a bit like a time traveler’s hiccup. Twice a year, many places around the world adjust their clocks. In the spring, they "spring forward" an hour. Come fall, they "fall back" an hour. Originally, DST was cooked up to save energy by making the most of the sunlight we get. More sunlight in the evenings meant fewer lights on, saving power. Sounds cool, right?
But here's the kicker: our bodies don’t come with a built-in clock-adjusting feature. Nope. When the time suddenly jumps forward or backward, our internal rhythms (often called our circadian rhythms) get thrown for a loop. It's like our body's built-in alarm clock gets set off, and we're left scratching our heads.
Note: Some studies show that DST doesn't save energy and may increase energy usage. Regardless, the health impact is widely understood and accepted. So, lets minimize that damage.
Why the Sudden Time Change is Not Healthy
Our bodies LOVE routines, especially when it comes to sleep. That’s why you might get super sleepy at about the same time each night and wake up bright-eyed and bushy-tailed without an alarm some mornings. But when DST hits, it's like someone sneakily reset your alarm. It's no wonder many of us end up feeling groggy, cranky, or just plain "off."
Research shows this isn't just a feeling. That one-hour change can affect our sleep, mood, and even heart health. Yeah, seriously! Messing with our sleep can have ripple effects that touch different parts of our lives. It's not just about being grumpy because you missed the last episode of your favorite show. Our bodies really do feel that hour's difference.
Enter the Solution: A Gradual Shift
Imagine if, instead of a sudden jolt, we eased into the time change. Like dipping your toes into a pool before diving in. If we could gradually shift our sleep over a few days, our bodies would have an easier time adjusting. No more sleep-shock from the sudden change. And that's where our hero, "Daylight Drift," comes into play.
The Daylight Drift Magic
"Daylight Drift" is our answer to the DST blues. This simple app will help users slowly transition their bedtime and wake-up time in the days leading up to the big time change. So, by the time DST rolls around, they've already adjusted. No drama, no fuss, just a gentle drift into the new schedule.
Now, you might be thinking, "An app? Sounds complicated." But here’s the super cool part: it's not! We've designed this guide so that even if you're a total newbie to app creation, you can whip up "Daylight Drift" with Appsmith in about 20 minutes. Yup, just 20 minutes to build an app that'll save countless hours of sleep woes. Even better, you can use Appsmith for free - fast, fun, and free.... whats not to love?
Let’s Get Building!
Ready to roll up those sleeves and create something awesome? With "Daylight Drift," you'll be helping folks everywhere adapt to DST like pros. It's like giving the world a comfier, cozier blanket of good sleep vibes.
Create the wireframe
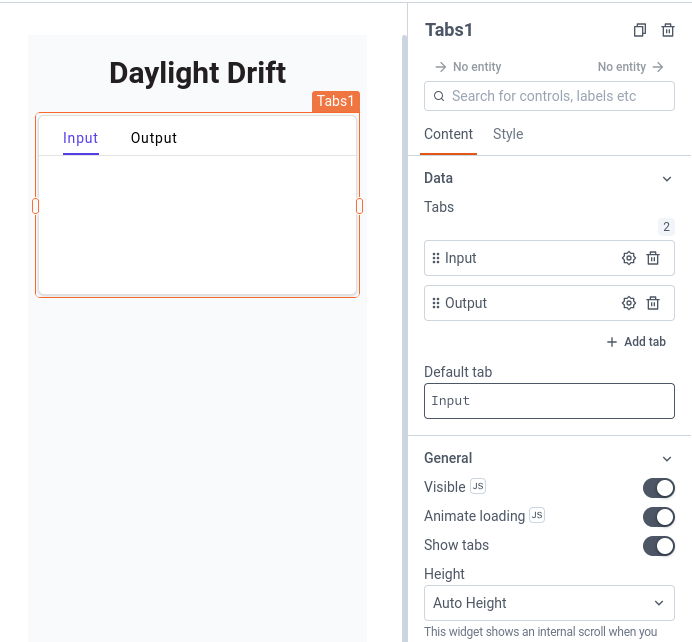
To start with, lets create a simple UI in Appsmith. We will use the Tabs widget to let us switch between the "Input" screen and the "Output"screen. Don't worry to much about theming now, we can adjust that later.
Protip: use the mobile screen size to make the app mobile responsive OOTB.
Add the Tabs widget, call tab 1 "Input" and tab 2 "Output". Later, we will hide the tabs to make it more applike, but keep them visible for now to make it easy to edit.
Create the input form
Now, lets create the input form in the first tab. This should provide some basic options:
- Datefield - next daylight savings change
- Select - bedtime
- Select - awake time
Datefield - next change
Add the datefield widget and configure. I suggest just using a date format, and choosing the next default date. Call this field
switchDate.Select - bedtime & awake time
Add two select widgets for bedtime and waking time. Call these fields
bedTimeandwakeTime. Don't worry about the values yet - we will take care of that in the next step. At this point your basic app should look like this: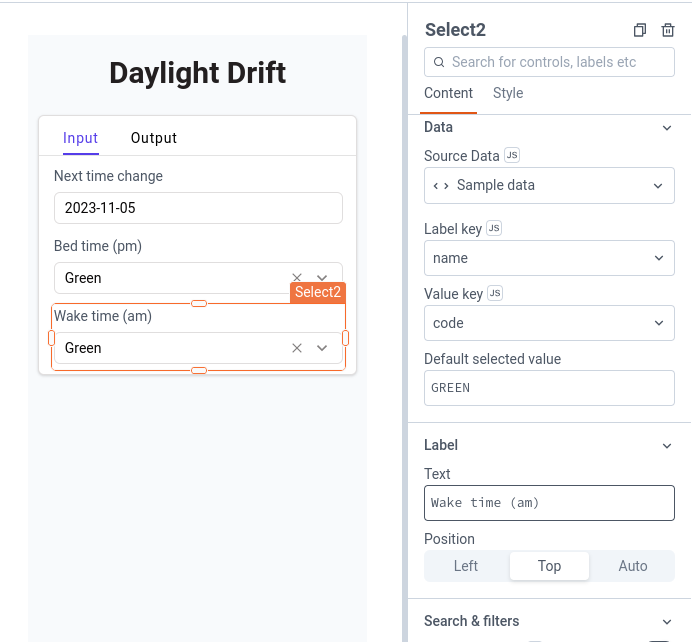
JS - provide default options for time select
Ok - now, lets generate the time select options using some simple Javascript. We could write these by hand, but what a pain that would be. Plus, this lets us make it easier to modify the time output from hour to minute or even second. For now, we will keep it simple. Looking at the select widget, we can see that the format we need is an array of items each with a value & label (or code & name in the default).
To keep it flexible, we will create a function that lets pass in two parameters - the time of day (am/pm) and the number of increments per hour. Go ahead and create a new JSObject called
selectConfigwith the following code:export default { /** * Generates a list of times based on provided timeOfDay and increments. * * @param {string} [timeOfDay] - The part of the day, can be either 'am' or 'pm'. * @param {number} [increments] - Number of increments per hour. * For instance, 1 for hourly, 2 for every 30 minutes, 4 for every 15 minutes, etc. * * @returns {Array} An array of time objects formatted for the select widget * */ generateTimes(timeOfDay = 'am', increments = 2) { let results = []; let incrementValue = 60 / increments; for (let hour = 1; hour <= 12; hour++) { for (let increment = 0; increment < 60; increment += incrementValue) { let time = hour + ":" + String(increment).padStart(2, '0'); let value = hour + increment / 60; let label = time + " " + timeOfDay; results.push({ "value": value, "label" : label }); } } return results; } }Update the select widgets
Now, all we have to do is set the time select widgets to use this method:
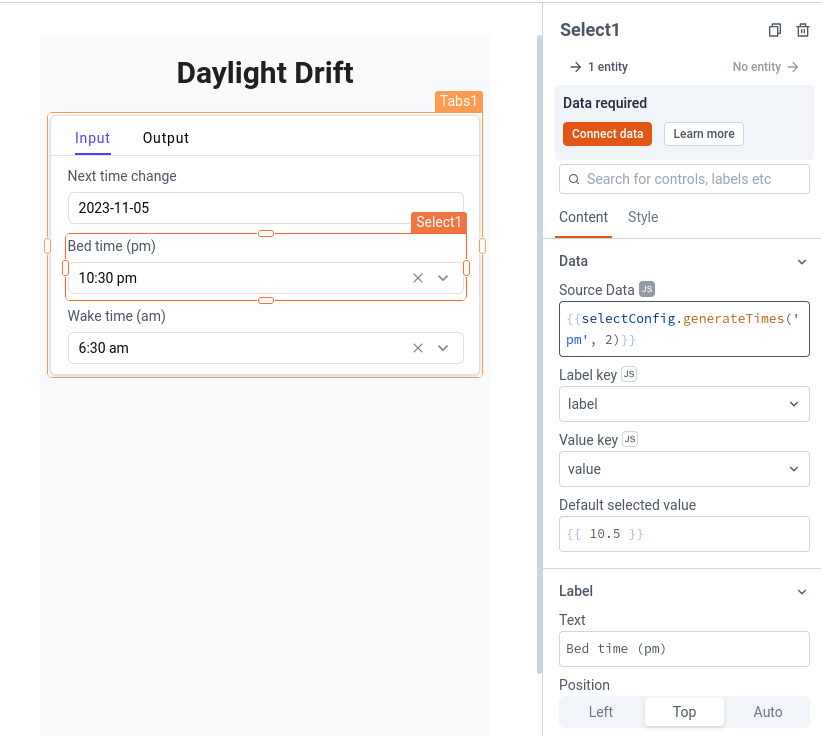
- For "Source data", click the JS button so you can enter the inline JS method like this:
{{selectConfig.generateTimes('pm', 2)}} - For "Label", choose "label"
- For "Value, choose "value"
- For "Default selected value", enter the integer for the value with curly brackets (since its not a string) like
{{ 10.5 }} - Repeat this process for the wake time, but use "am" instead and a different default value
Note: this is assuming that you will go to bed before midnight and wake up before noon. If you need to change it, feel free. Your app, your rules.
Now you should have some nicely formatted select lists! Best of all, you can easily modify them if needed
- For "Source data", click the JS button so you can enter the inline JS method like this:
Create the output UI
Input is done, so lets move on to the output. Click on the "Output" tab. Lets just do some simple text fields to show the input data, and a table with the required outputs for each day
Text fields for inputs
Add the text fields and use the selected values from the first tab:
- Textfield called
switchDateOutput- value =Switch date : {{ switchDate.formattedDate}} - Textfield called
bedtimeOutput- value =Bedtime : {{bedTime.selectedOptionLabel}} - Textfield called waketimeOutput - value =
Wake time : {{wakeTime.selectedOptionLabel}}
Table for results
Add a table widget called
timeDriftTable. Don't worry about configuring the table yet - we will create the Javascript to calculate the results and then bind them to the table in the next step.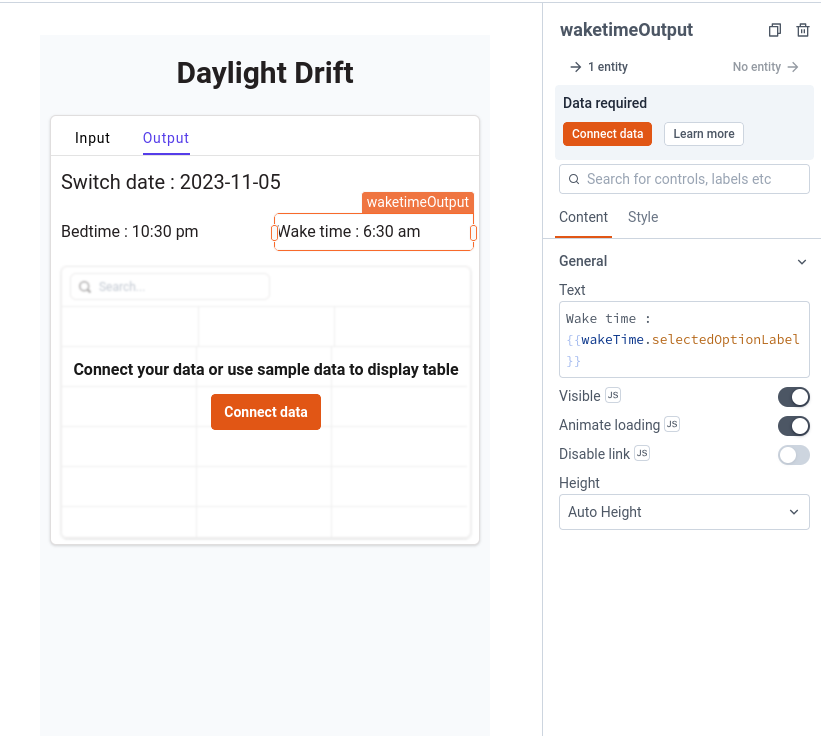
- Textfield called
Calculate the results
Now the fun part. We need to calculate the results based on all of the information we have available. Luckily, its pretty simple to do:
- Calculate the number of days between the current date and the switchDate.
- Determine if we are "springing forward" or "falling back" based on the month of switchDate.
- Calculate the time drift per day based on the number of days.
- Adjust bedtime and waketime accordingly, rounding to the nearest increment.
- Output an array of objects with each date, adjusted bedtime, and waketime.
One thing to note is that our default time output will be in decimal form - so, "11.5" will equal "11:30". Lets go ahead and create that method first so we can use it in our main calculation method:
 /**
   * Converts a time in decimal format to a regular time format.
   *
   * @param {number} decimal - Time represented as a decimal.
   * @returns {string} The formatted time, e.g., "10:30" for 10.5
   */
  decimalToTime(decimal) {
     let hours = Math.floor(decimal);
    let minutes = Math.round((decimal - hours) * 60);

    // Ensure minutes and hours are 2 digits, padding with zeros if necessary
    hours = String(hours).padStart(2, '0');
    minutes = String(minutes).padStart(2, '0');

    return hours + ':' + minutes;
  }
Great! Now that we have that, we can generate the results. Note that instead of passing through the switchDate, bedtime, and waketime parameters to the function, instead we can use the ones stored in the app. This makes everything cleaner and simpler! This is one of the reasons its a good idea to name your widgets well.
	/**
   * Computes a plan for adjusting to Daylight Saving Time by shifting bedtime and waketime.
   *
   * @param {number} increment - Number of increments per hour.
   * @returns {Array} An array of time adjustment with the date, day, bedtime, and waketime.
   */
  getTimeDriftPlan(increment=6) {
		let currentDate = new Date();
		let switchDateObj = new Date(switchDate.selectedDate);

		// Calculate the number of days till switchDate
		let diffTime = Math.abs(switchDateObj - currentDate);
		let diffDays = Math.ceil(diffTime / (1000 * 60 * 60 * 24));

		// Determine direction of drift based on month
		let driftDirection = switchDateObj.getMonth() < 6 ? 1 : -1;

		// Calculate daily drift
		let dailyDrift = (1 / diffDays) * driftDirection;

		// Initialize result array
		let result = [];

        // Loop through each of the days between now and the switchover, and calculate the drift.
		for (let i = 0; i <= diffDays; i++) {

			// Determine the date and day.
			let dateObj = new Date(currentDate);
			dateObj.setDate(currentDate.getDate() + i);
			let dateString = dateObj.toISOString().slice(0, 10); // Format YYYY-MM-DD
			let locale = 'en-US';
			let day = dateObj.toLocaleDateString(locale, {weekday: 'long'});

			// Apply the drift for this day and round to the nearest increment.
			let adjustedBedtime = bedTime.selectedOptionValue + (dailyDrift * (i + 1));
			let adjustedWaketime = wakeTime.selectedOptionValue + (dailyDrift * (i + 1));
			let roundedBedtime = Math.round(adjustedBedtime * increment) / increment;
			let roundedWaketime = Math.round(adjustedWaketime * increment) / increment;

			// If this is the last item, then make sure to set the waeup time properly.
			if (diffDays === i) {
				roundedWaketime = wakeTime.selectedOptionValue;
			}

            // Add this day's info to the results for the table.
			result.push({
				date: dateString,
				day: day,
				bedtime: this.decimalToTime(roundedBedtime) + " PM",
				waketime: this.decimalToTime(roundedWaketime) + " AM"
			});
		}

		return result;
	}
We can test the results in the Javascript IDE to confirm things work well. Its great!
Add buttons and display results
At this point, we are nearly done. We want this to be applike, so we need to do a few things:
- Create our controller code.
- Hide the tabs and set the default to the mutable variable.
- Add a "Submit" button on the input tab. When clicked, this should run the calculations and switch to the output tab.
- Add a "Reset" button on the output tab. When clicked, this should empty the calculations and swtich to the input tab.
- Bind the results of the calculations to the table.
- Apply final theming and adjustments.
Create JS controller
To make it easy to manage the tabs and adjustments, lets create a new JSObject called
appController. This will provide the basic controls we need for the functioning of the app. This is super simple code (note that we are outputting the whole object code here):export default { // Variable holds the current value for the default tab defaultTab: 'Input', /** * Submits the input form data, generates the results, and changes to the output tab. */ submit() { output.getTimeDriftPlan(); this.defaultTab = 'Output'; }, /** * Empties the results, and changes to the input tab. */ reset() { this.defaultTab = 'Input'; } }Hide tabs
Ok, so now we can hide the tabs, and set the default tab to
{{ appController.defaultTab }}. Now, as we change that variable, it will navigate the tabs for us. Pretty neat, huh?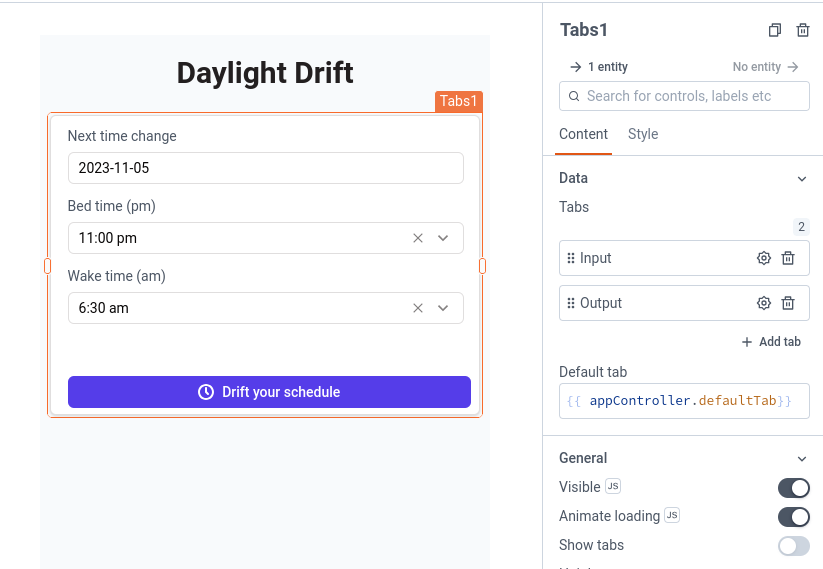
Add submit/reset buttons
You will notice above that we already added the submit button to the input tab. All we need to do is change the "onClick" config to use the
submitmethod on theappController. I won't show that here, but I think you are clever enough to figure it out.Now, you can click on the submit button, and it will take you to the output tab! From here, you can add a reset button and change it's "onClick" config to use the
resetmethod on theappController.Bind the table data
The only thing left to do is to bind the data to the table. This is very easy, and very satisfying. We just need to click the JS button on the Table data, and set it to
{{output.getTimeDriftPlan.data}}. Go ahead and adjust the table columns, the table height, and other settings as you see fit. It should look something like this: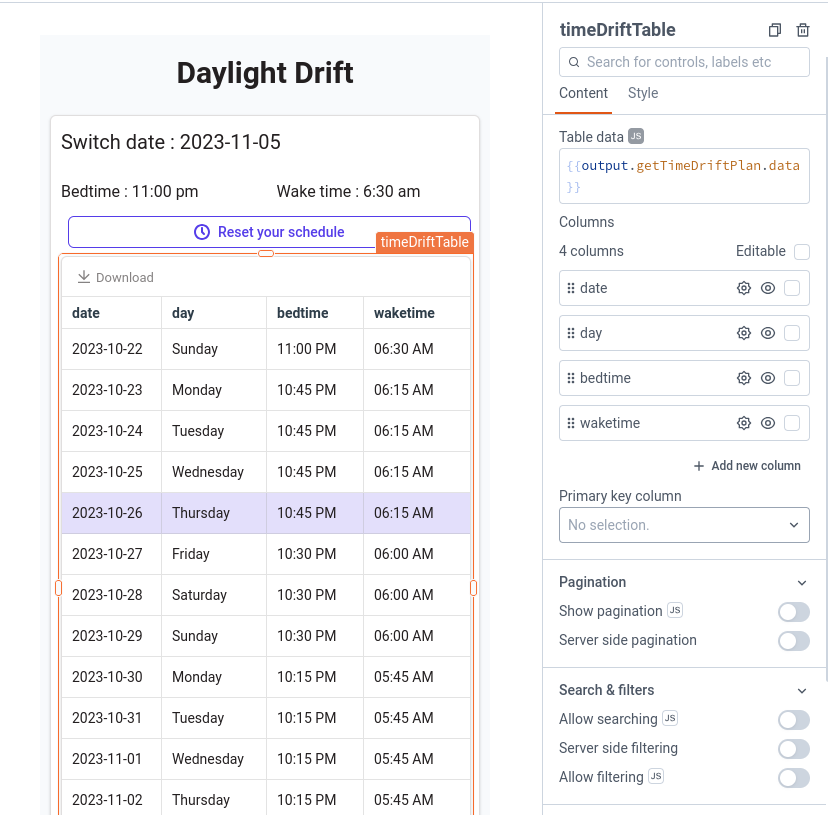
The table widget provides a download option OOTB, so you can get an easy export without any extra work. I do love it when smart tools make my life easier.
Customize
At this point, you can customize the app however you like. For example, I added a background container with a CSS gradient for the color. I also added a modal with information, and another option to choose the output increment.
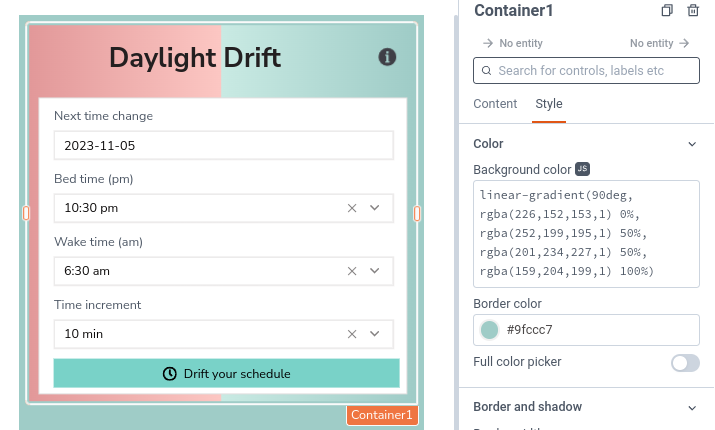
Protip: you can use CSS in the background color fields if you click the JS button. You can also create a function to dynamically change the colors!
Conclusion
That's about it! You should be able to create this basic app in 20 minutes or less. Of course, don't stop there... there are plenty of things that you can do to customize or extend this app:
- Change colors, styles, text, or images
- Create an input option to let the user determine the output interval
- Create different options to get the data out - print to PDF, email to a friend, download as image, output to ical, etc.
- Program with the different DST dates for different countries
- Add more information on how to sleep better
Hopefully this tutorial inspires you to create your own Daylight Drift tool, and other simple apps using Appsmith.