

How to Stream Real-Time Kafka Data On Confluent Cloud
Goal
This guide shows how to stream and display real-time Kafka data using Confluent Cloud and WebSockets. You'll learn how to set up a WebSocket server that connects to Kafka topics, listens for messages, and streams live data to client applications for instant updates—ideal for building real-time dashboards or applications.
We'll set up a WebSocket server that connects to Kafka, listens for new messages, and sends them to clients in real time. This allows you to receive live data updates instantly, making it ideal for real-time applications.
Prerequisites
Ensure you have an active Kafka account with access to create and manage clusters and topics.
A configured Kafka cluster with at least one topic set up to stream data. See Topics in Confluent Cloud.
Familiarity with Kafka (producers, topics, consumers) and WebSocket protocols.
Retrieve Kafka Credentials
Follow these steps to fetch cluster and API credentials from Kafka:
- Go to Confluent Cloud, navigate to the dashboard, and open your Cluster.
- Click on Cluster settings and copy the server endpoint. Save it for future use.
Example:
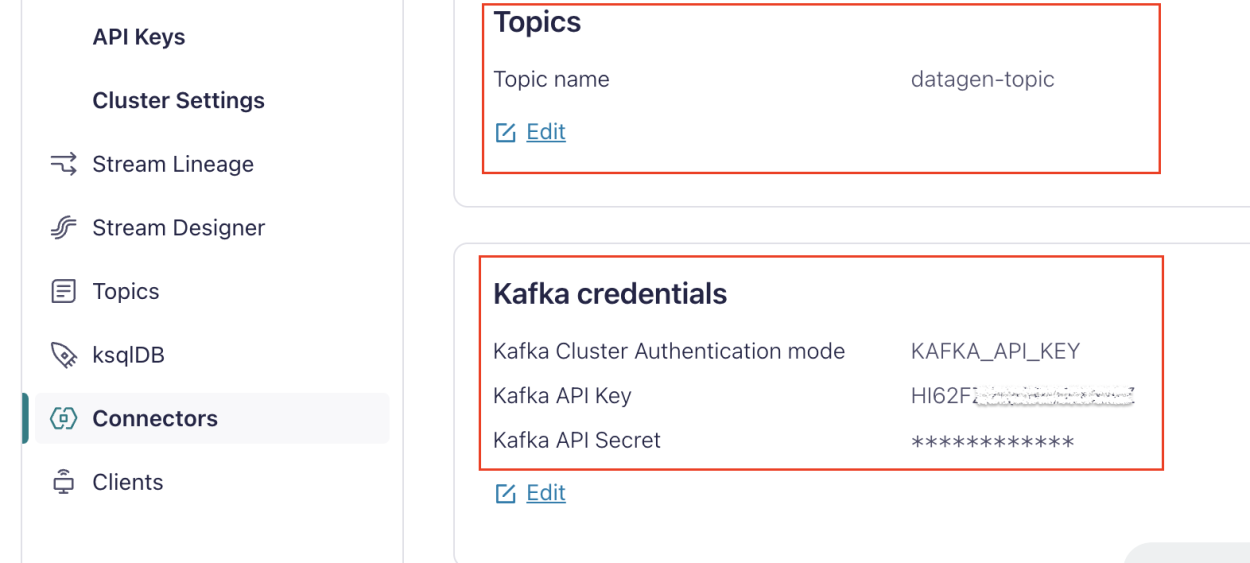
pkc-11ab.us-east-2.aws.confluent.cloud:1010- Navigate to the Connector page, and select the connector associated with your desired data streaming topic.
- Inside the Connector settings, find the API Key, Kafka API Secret, and Topic Name.
Configure WebSocket Server
Follow these steps to set up a WebSocket server, either locally or on your preferred platform. This server will act as a bridge to stream real-time data from your Kafka topic to your Appsmith application.
- Select a WebSocket library or framework based on your preferred programming language, and decide whether to set up the WebSocket server locally or on a cloud platform (e.g., AWS, Azure, Google Cloud).
- Install a Kafka client library and a WebSocket server library in your local development environment or on your cloud server.
Example: If you want to set up locally using Node.js, install:
npm install kafkajs ws- Write a WebSocket server script that listens for connections and handles data streaming. Ensure the server can communicate with your Kafka cluster using the credentials and broker URL you retrieved earlier.
Example: If you want to create a script locally using Node.js, use the following code.
const { Kafka } = require('kafkajs');
const WebSocket = require('ws');

// Kafka setup
const Kafka = new Kafka({
  clientId: 'Kafka-websocket-bridge',
  brokers: ['pkc-11ab.us-east-2.aws.confluent.cloud:1010'], // Replace with your Kafka broker URL
  ssl: true,
  sasl: {
    mechanism: 'plain',
    username: 'your-Kafka-api-key', // Replace with your Kafka API key
    password: 'your-Kafka-api-secret', // Replace with your Kafka API secret
  },
});

const consumer = Kafka.consumer({ groupId: 'websocket-group' });

// WebSocket server setup
const wss = new WebSocket.Server({ port: 8080 });

async function run() {
  await consumer.connect();
  await consumer.subscribe({ topic: 'your-topic-name', fromBeginning: true }); // Replace with your Kafka topic name

  await consumer.run({
    eachMessage: async ({ topic, partition, message }) => {
      const messageValue = message.value.toString();
      console.log(`Received message: ${messageValue}`);

      // Send message to all connected WebSocket clients
      wss.clients.forEach((client) => {
        if (client.readyState === WebSocket.OPEN) {
          client.send(messageValue);
        }
      });
    },
  });
}

wss.on('connection', (ws) => {
  console.log('New WebSocket client connected');

  ws.on('close', () => {
    console.log('WebSocket client disconnected');
  });
});

run().catch(console.error);

console.log('Kafka to WebSocket bridge is running on port 8080');
This Node.js script sets up a WebSocket server that listens on port
8080and a Kafka consumer to read messages from a specified Kafka topic. It streams incoming Kafka messages to all connected WebSocket clients in real-time.If you're setting up a secure WebSocket server (WSS), you'll need to generate a self-signed certificate or obtain one from a Certificate Authority. You can use OpenSSL to generate a self-signed certificate.
- Run and test the WebSocket server script.
If you are using a local server setup and want to make your WebSocket server public, you can consider using platforms like Ngrok, Heroku, DigitalOcean, or AWS EC2.
Set Up WebSocket in Appsmith
Follow these steps to integrate and use the WebSocket server you set up with your Appsmith application:
- In Appsmith, create a new JSObject and configure your WebSocket connection. Define
socketfor the WebSocket instance, like:
Example:
export default {
  // WebSocket URL (change this URL based on your WebSocket server)
  socketURL: 'ws://localhost:8080',

  // For local development: ws://localhost:8080
  // If the server is hosted: wss://your-domain.ngrok.io

  // WebSocket instance
  socket: null,

  // Function to initialize the WebSocket connection
  initWebSocket() {
    this.socket = new WebSocket(this.socketURL);

	// Event handler for successful connection
		this.socket.onopen = () => {
			console.log('WebSocket connection established successfully');
		};

		// Event handler for incoming messages
		this.socket.onmessage = (event) => {
			// Parse the incoming data
			const responseData = JSON.parse(event.data);

			// Log the raw data for reference
			console.log('Received data:', event.data);

			// Add the new data to the top of the receivedData array
			this.receivedData.unshift(responseData);

			// Log the updated array
			console.log('Updated Data:', this.receivedData);
		};

		// Event handler for errors
		this.socket.onerror = (error) => {
			console.error('WebSocket error:', error);
		};

		// Event handler for connection closure
		this.socket.onclose = (event) => {
			console.log('WebSocket connection closed:', event);
		};
	}
};
This code sets up a WebSocket connection to the specified server URL and handles different events such as successful connection, incoming messages, errors, and connection closures. It logs the received data and manages the WebSocket lifecycle.
- Bind response data with widgets as needed.
Example: To display data in the Table widget, set the Table data property to:
{{WebsocketUtils.receivedData}}Format the data and bind it to widgets according to your requirements. For more information on WebSockets, see WebSockets for real-time updates.
- In Appsmith, create a new JSObject and configure your WebSocket connection. Define
Conclusion
Next steps could include exploring more advanced WebSocket features, such as handling reconnections and managing different message types, or integrating this setup with more complex frontend logic.