

Track Your Swiggy Expenses with This App
Goal
In this tutorial, I will guide you on how to fork an app that tracks Swiggy expenses and customize it to track your own spending. This will enable you to manage and analyze your Swiggy, Instamart, and Dineout expenses effortlessly.
Prerequisites
An Appsmith account.
A swiggy account you use actively
Overview
Have you ever wondered what your expenses look like with Swiggy? Don't you wish there was an app that allowed you to track your expenditure on a monthly or yearly basis?
I used to face the same issue, constantly questioning how much I was spending on groceries, how often I was eating out, and whether cooking at home was cheaper than ordering daily. These questions led me to create a solution that could provide clear insights into my spending habits. Using Appsmith, I developed an app that lets me, and now you, track orders across Swiggy, Instamart, and Dineout.
Sign up or Log in to Appsmith
Sign up on our Appsmith Cloud or log in to your account from here: https://app.appsmith.com.
Post this, head to the Swiggy Expense Tracker template and click on Preview to play around with the App. It currently uses mock data under the hood, but in this tutorial I will show you how easily you can plugin with your account and see your data.
Next step would be to click on the Fork button on the top-right, and to import into your workspace on Appsmith.
Configure Appsmith Datasource
Once your import, you will see a Modal pop up that asks you to reconnect the datasource.
Fill in the details as seen in the image below. You can keep the Headers as it is which is pre-configured for you.
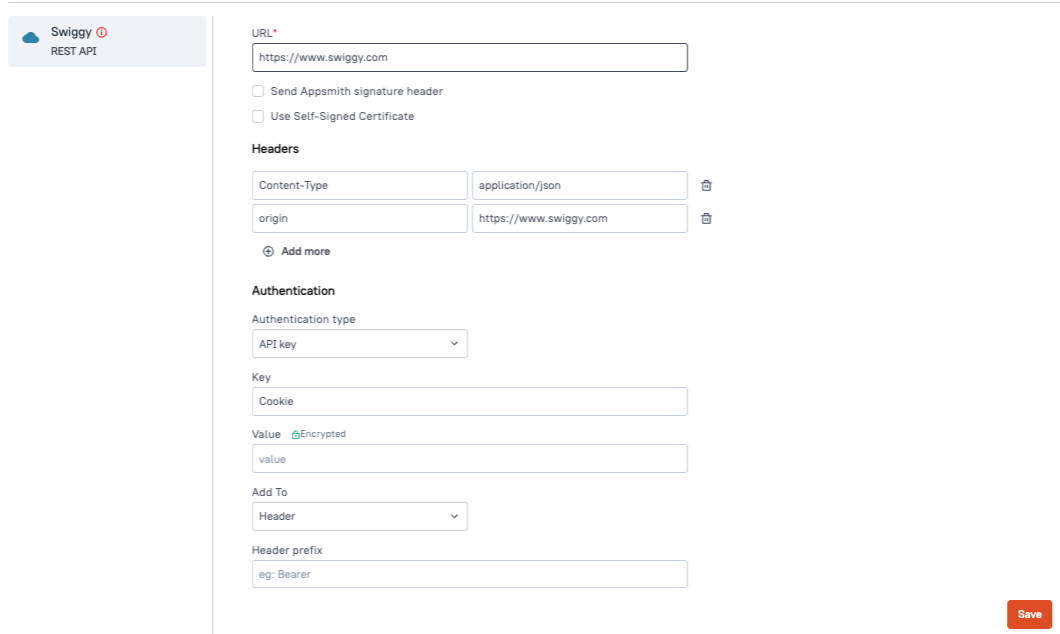
In the template the URL is pointing to our mock database for Preview purpose. You need to replace that as well to use https://swiggy.com. All the required configurations are listed here below.
URL: https://swiggy.com
 Authentication Type: API key
 Key: Cookie
 *Value: __________
 Add To: Header
*In the next step I will show how to retrieve the value for the Cookie. So hold on to this while we open a new tab to retrieve the value.
Retrieving Swiggy Credentials for configuring your App
- Sign In to Swiggy:
- Open the Swiggy website https://swiggy.in in a new tab.
- Sign in using your phone number or email.
- Inspect Element:
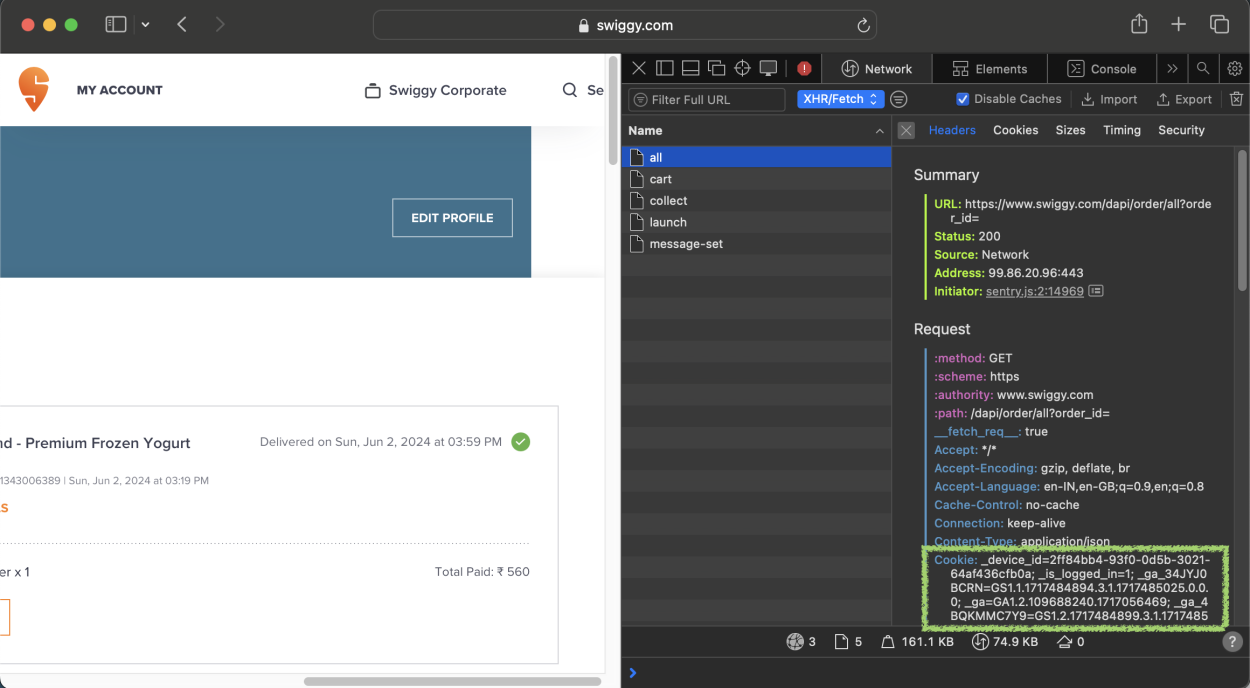
- Once logged in and on the homepage, click on your account name at the top right of the Swiggy homepage to go to the orders page.
- Now right-click the page and open the Inspect Element tool in your browser. This is supported for Chrome, Firefox, and Safari.
- Navigate to the Network tab in the Inspect Element tool.
- Retrieve Cookie Value:
- In the Network tab, look for an API call labeled all.
- Click on this API call and go to the Headers section on the right side of it.
- Find and copy the entire Cookie value.
- Sign In to Swiggy:
Save the Datasource and Deploy the App
- Configure Appsmith Datasource:
- Return to the Appsmith tab.
- Paste the copied Cookie value into the Value field.
- Save the Datasource:
- Click on the Save button to complete the configuration of the Swiggy Datasource.
- Rest assured, your credentials are encrypted and securely stored in Appsmith. For more information on data and API security, refer to Appsmith's Data Security Guide.
- Deploy the App:
- After saving, you will be taken to the app with all pre-configured logic and queries connected to the widgets.
- Click on the Deploy button to launch the app.
- Refresh and View Data:
- Once deployed, click the Refresh button.
- The app will start fetching data from your Swiggy account, categorizing it based on Dineout, Swiggy, or Instamart.
- Configure Appsmith Datasource:
Customizations and More
Upon forking the App, it empowers you to delve deeper into the API response, unveiling a plethora of additional details and metrics. This includes but is not limited to Payment Type, Discount Availed, Coupon Codes, Order Items, and more. This analytical capability opens avenues for profound insights into your orders on the Swiggy platform.
Furthermore, you have the freedom to personalize the App's appearance and functionality. This means you can streamline the interface by removing unnecessary tabs, introduce new visual elements like graphs, and fine-tune it to cater perfectly to your needs. It's like having a toolkit to mold the App into exactly what you envision, making it seamlessly align with your unique requirements and preferences.
Conclusion
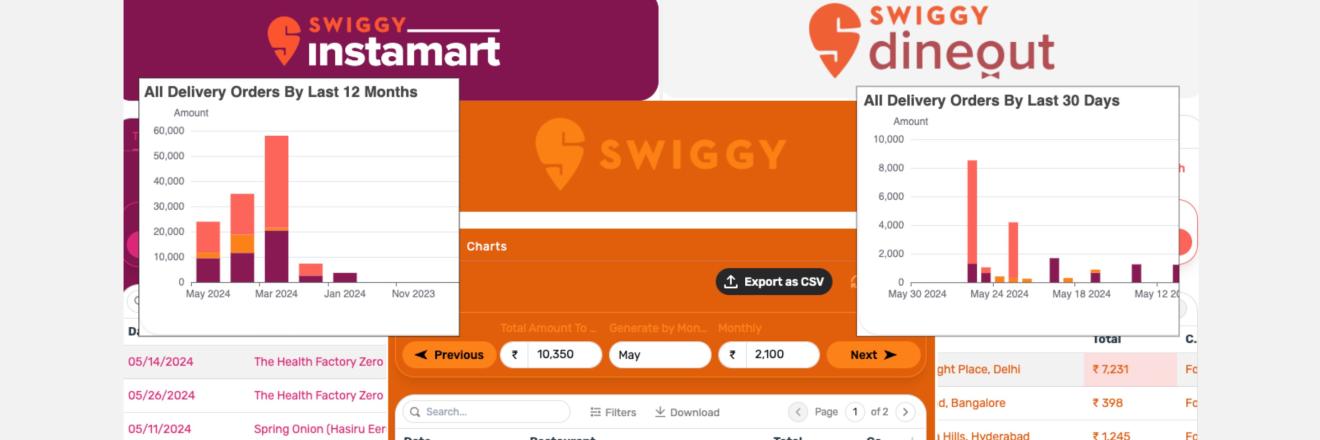
Key Features of the App
1. Comprehensive Expense Tracking:
- Monthly and Yearly Summaries: View detailed summaries of your expenses on a monthly and yearly basis.
- Category Breakdown: See how much you spend on different categories like groceries, dining out, and takeaways.
2. Insightful Analytics:
- Spending Patterns: Monitor your buying habits and identify trends in your spending.
- Restaurant Preferences: Discover your favorite restaurants for takeaways and dining out.
- Cost Comparison: Compare the cost of cooking at home versus ordering from Swiggy.
3. Export Data:
- Data Export: Easily export your expense data in CSV format for your records.
4. User-Friendly Interface:
- Interactive Dashboard: Navigate through an intuitive and interactive dashboard that makes tracking your expenses a breeze.
- Visual Representations: Utilize graphs and charts to get a visual representation of your spending patterns.
- Customizable: Since it's built using Appsmith, you can easily make changes and tweak the app to suit your specific needs.


Hey Tom,
This one is really helpful and clean tracker!
Just wish to understand if i can use address filter in this API? Coz sometimes i have my brother as well order stuff using same account, using address will really help with precision tracking