

Retrieval-Augmented Generation (RAG) improves LLM responses by providing the model with extra context, usually in the form of company or customer data. The easiest way to use RAG is to upload data in an AI chat app like ChatGPT, but this can have serious security and privacy implications. For enterprises and large organizations, it's best to use a vector store that you control, so you can maintain oversight and compliance.
In this guide, we'll cover how to build a chat app that searches your own customer or company data, using Weaviate for the vector store, and Cohere as the model provider. Weaviate is open source and can be self-hosted, or you can use their cloud hosted version. This provides a secure stack to build internal tools that leverage AI and can safely access your data. For this guide, we'll be using a few sample pages from the Appsmith documentation to build an AI docs assistant chat.
To show the true power of semantic search, I'll be using several pages of the Appsmith documentation that all contain the word 'embed', but in completely different contexts. This will include vector embeddings, embedding an iframe into an Appsmith app, and embedding Appsmith into a 3rd party website.
This guide will cover:
- Creating a Cluster
- Creating a Collection
- Uploading Files for RAG
- Performing RAG Search
- Building a UI with Appsmith
Let's get to it!
Creating a Cluster
Start out by creating a free Weaviate account and go to the Weaviate Cloud Dashboard. Then select Clusters on the left sidebar, and create a new Cluster.
The cluster is like a database instance, and contains one or more collections, or tables. Give the cluster a name, change the region if desired, then click Create.
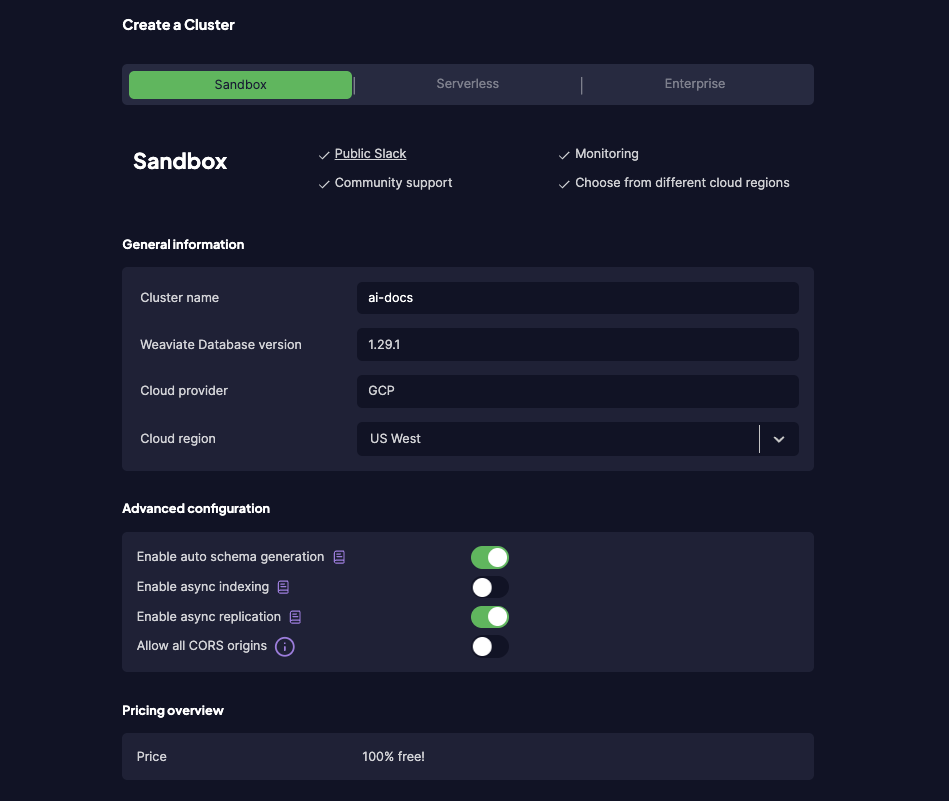
This will create a free sandbox cluster that will expire in 14 days.
Note: It will take a few minutes for the cluster to be created and ready to use in the next step. You should see the dashboard update once it's ready, and also get a notification email.
Creating a Collection
Now that the cluster is created, we'll be creating a collection to store our documents. In the collection configuration, we can specify to use the Cohere embed and generation models.
Sign up for a free Cohere account and go to the API Keys section of your dashboard.
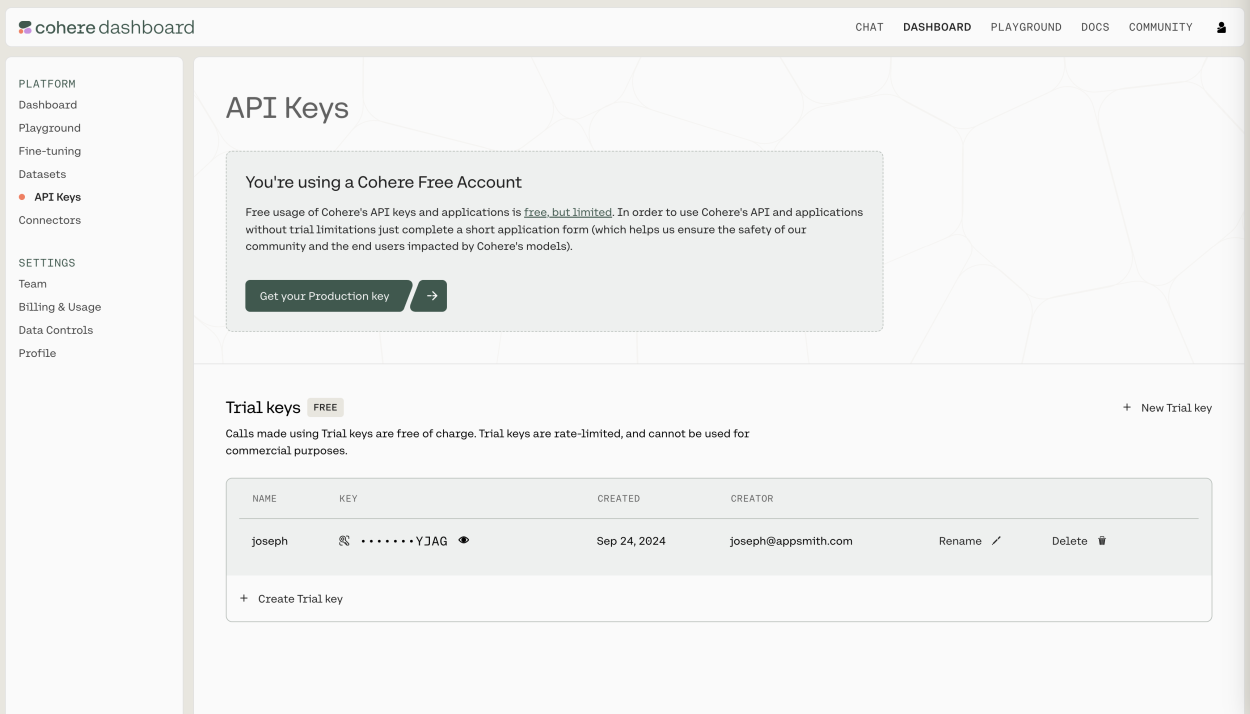
Leave this page open to copy the API key in the next step.
Next, create a new Google Colab notebook (or run the following Python locally, if desired).
Note: You can also create a collection via the Weaviate Cloud Dashboard (WDC), but the UI lacks a few of the options that we'll need to set the generation model.
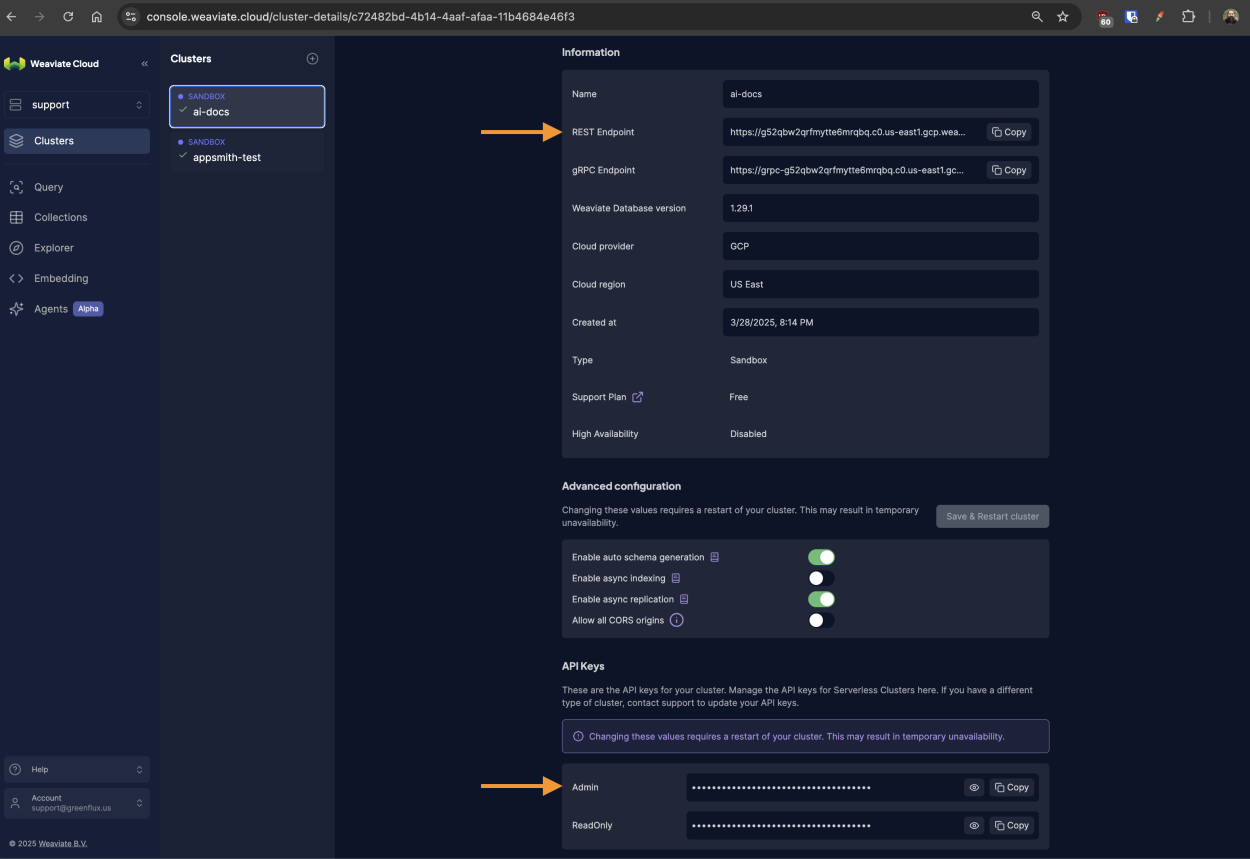
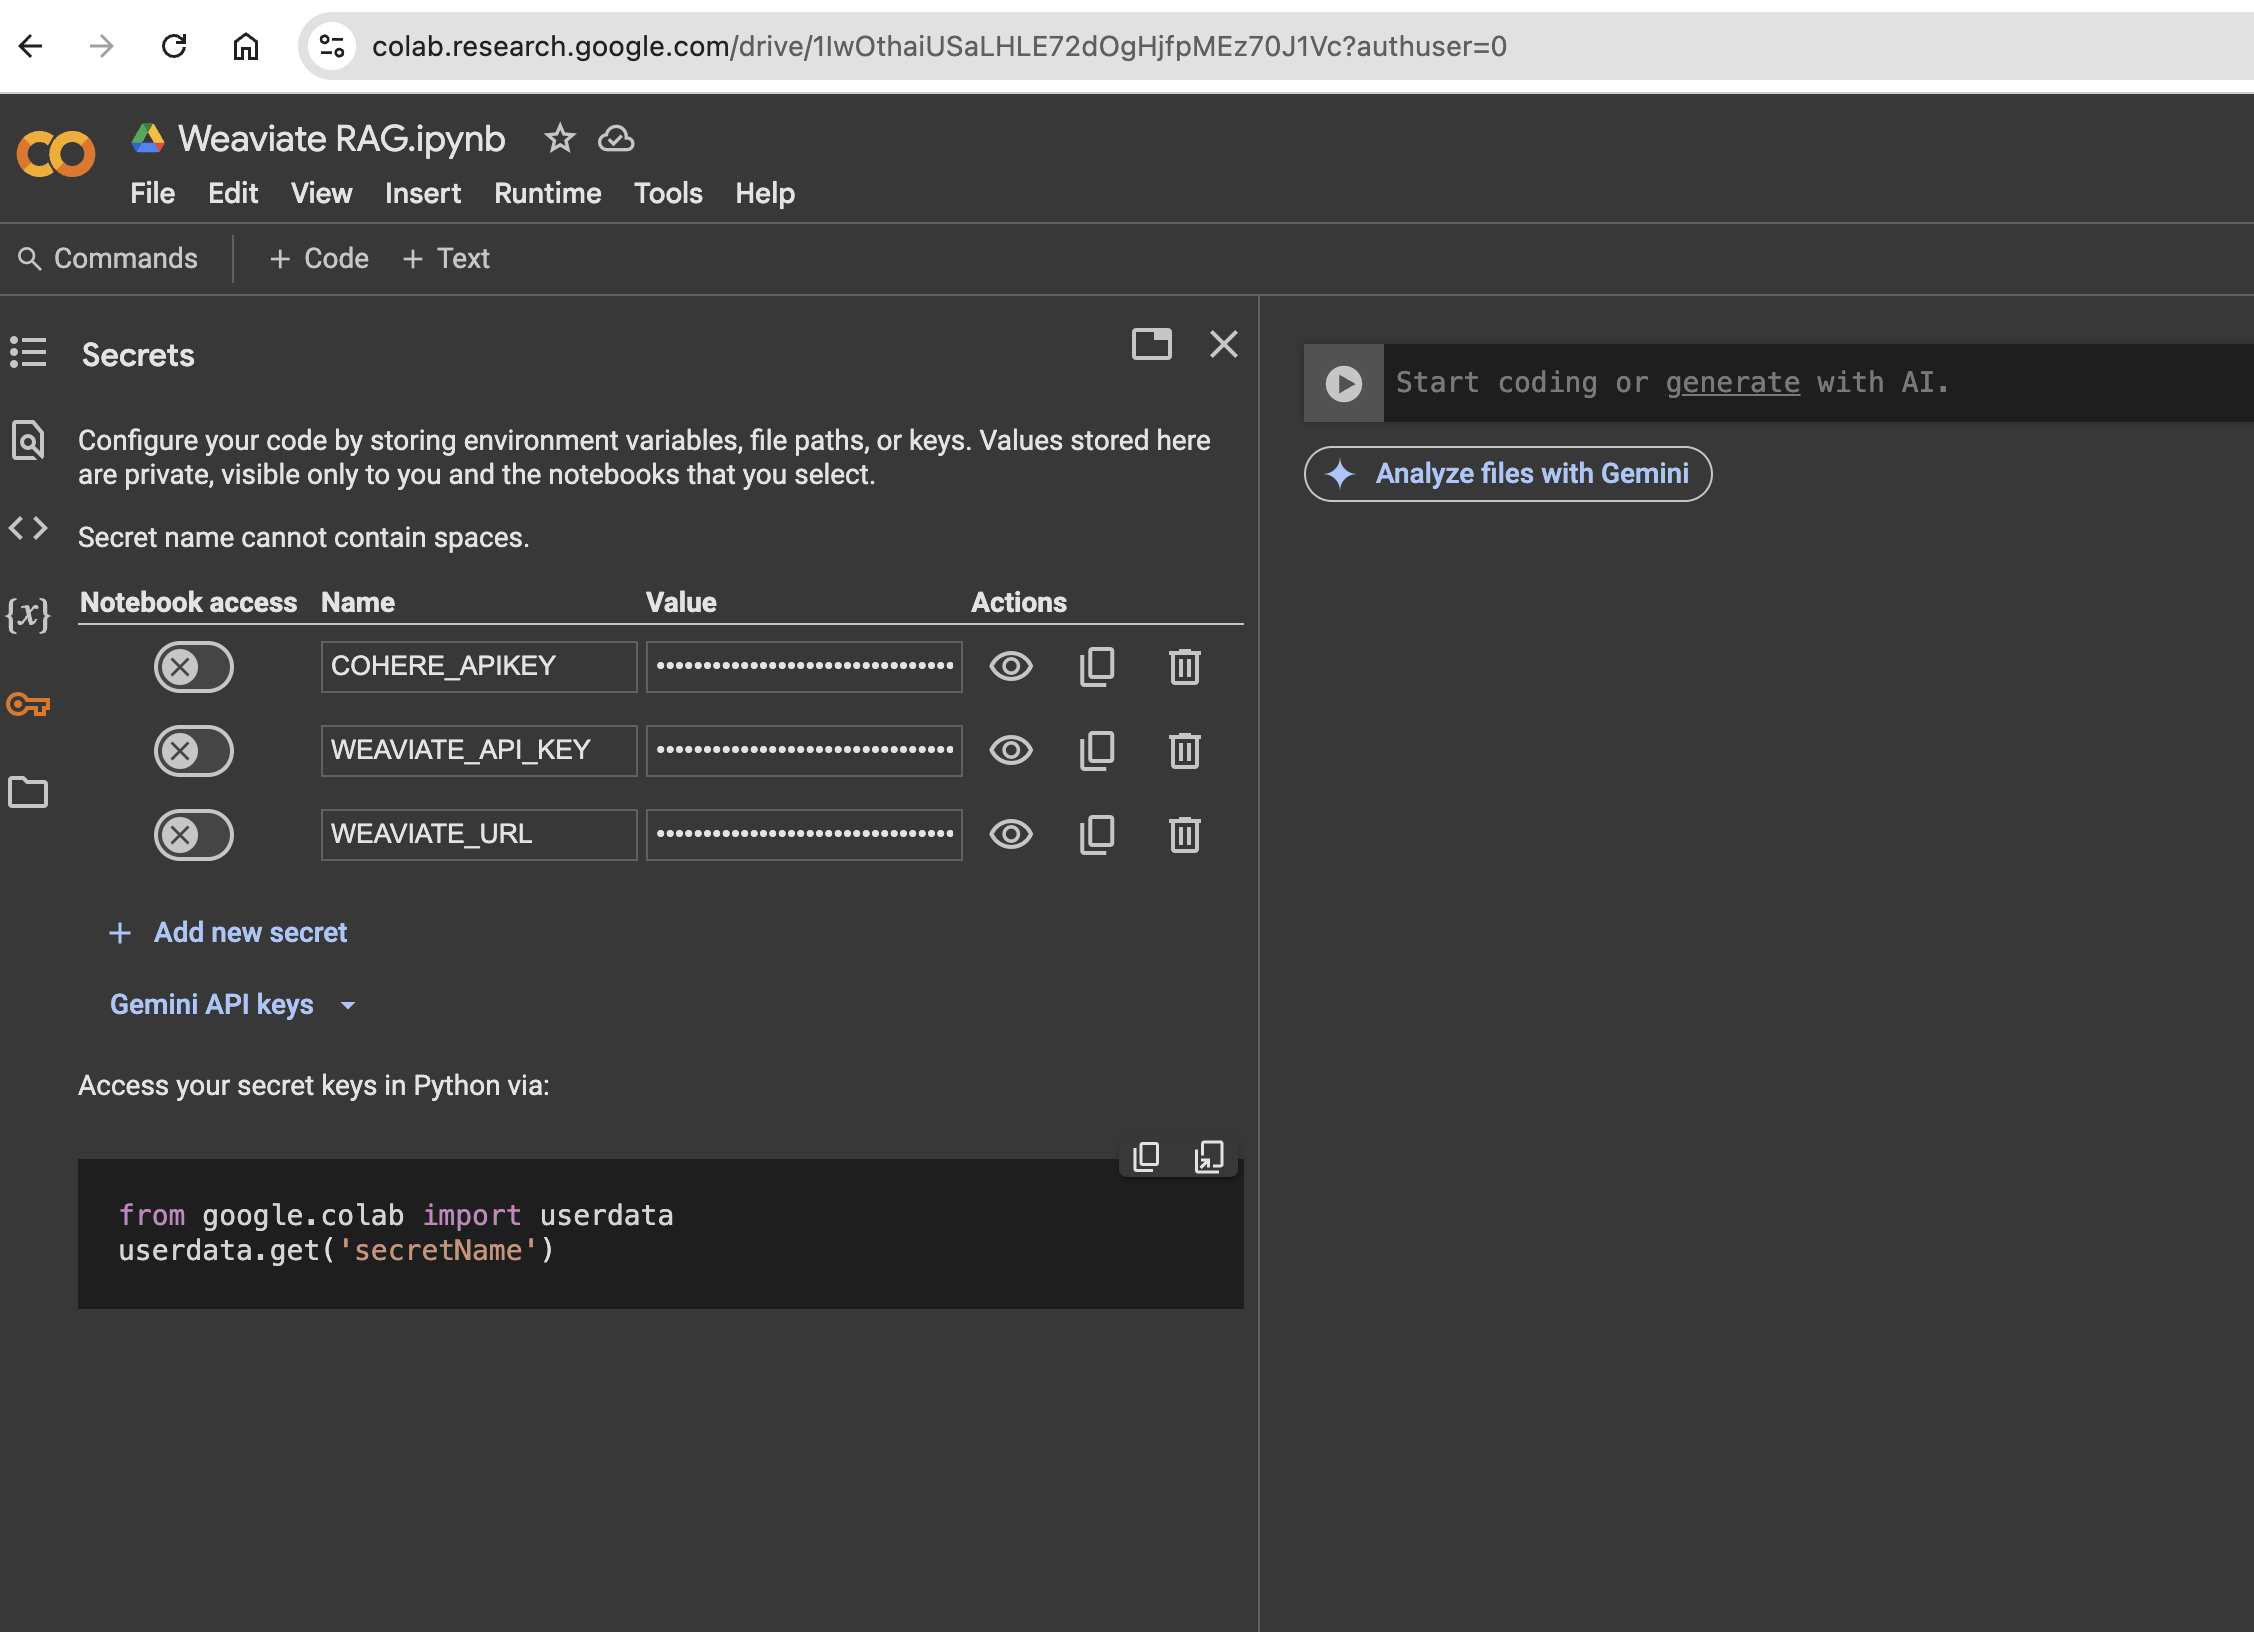
In the new Colab notebook, start out by clicking the key icon to open the secrets section. Add a new secret for the Cohere API key. Then, head back to the WCD and select your new Cluster to view the connection info. Copy the REST API URL and API Key, and save them as new secrets as well.
Close the secrets manager, and return to the main editor for the notebook. Then install the Weaviate client:
pip install -U weaviate-client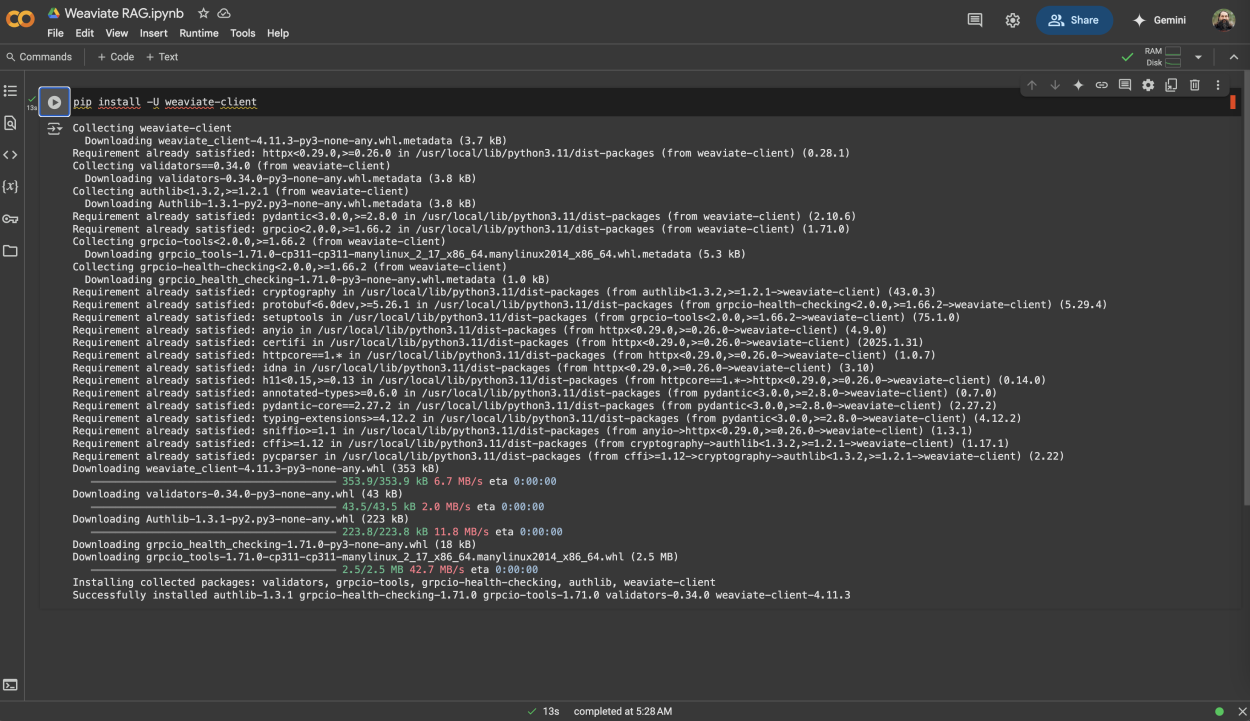
You should see a few new packages downloaded and installed, and then a success message. Next, we can set up the new collection using the API keys that were just entered. Add a new code block and run the following:
import weaviate
from weaviate.classes.init import Auth
from weaviate.classes.config import Configure
from google.colab import userdata

weaviate_url = userdata.get('WEAVIATE_URL')
weaviate_api_key = userdata.get('WEAVIATE_API_KEY')
cohere_key = userdata.get("COHERE_APIKEY")

headers = {
    "X-Cohere-Api-Key": cohere_key,
}

client = weaviate.connect_to_weaviate_cloud(
    cluster_url=weaviate_url,
    auth_credentials=Auth.api_key(weaviate_api_key),
    headers=headers
)

docs = client.collections.create(
    name="docs",
    vectorizer_config=Configure.Vectorizer.text2vec_cohere(),
    generative_config=Configure.Generative.cohere(model="command-r-plus")
)

client.close()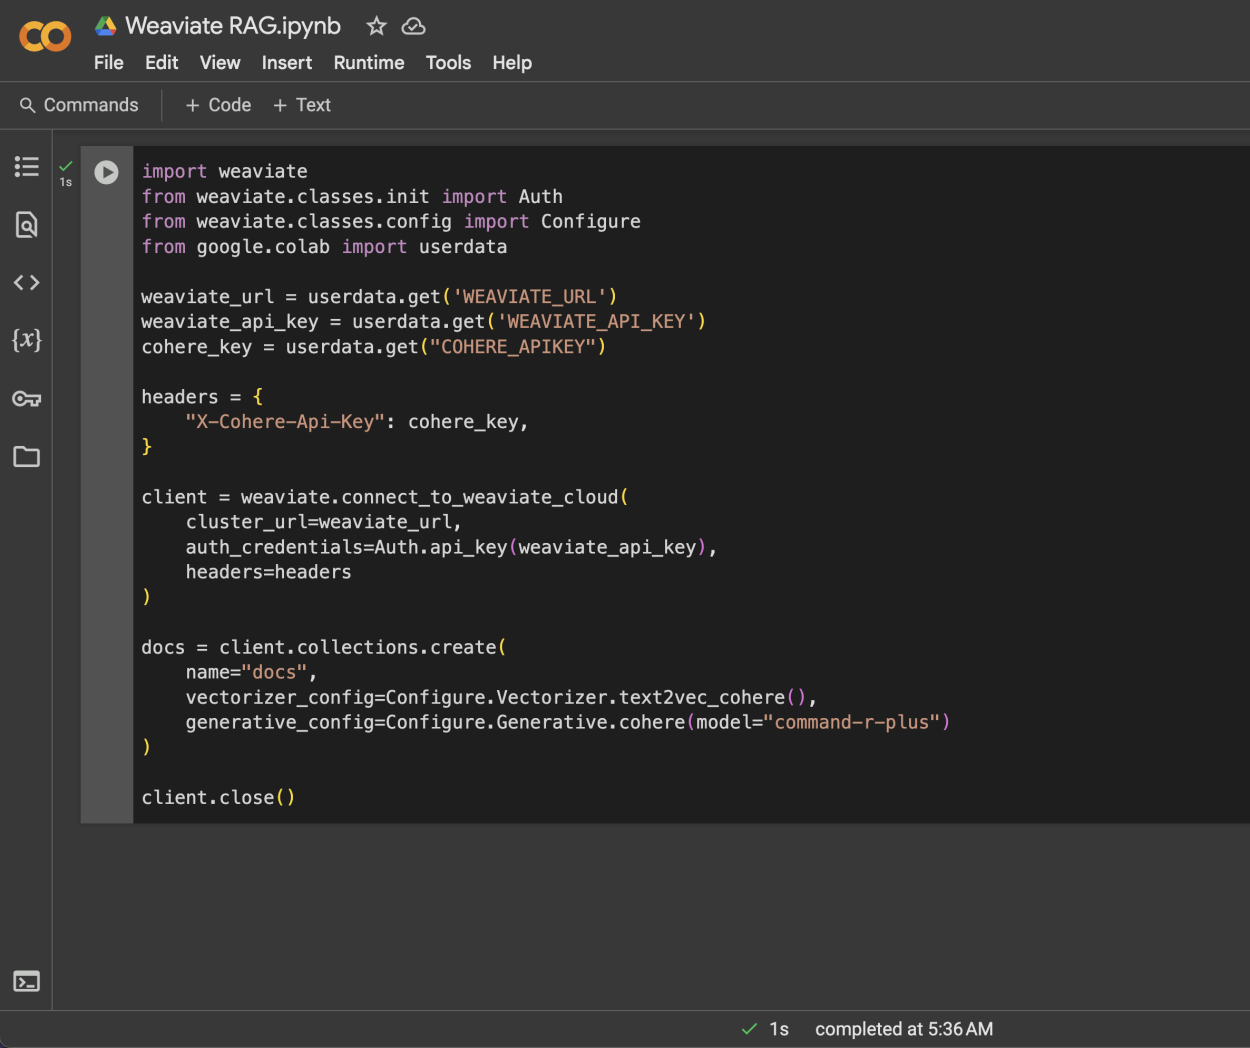
Head back to the WCD and select Collection from the left sidebar. You should see the new collection created inside the Cluster.
The collection is now ready to upload files using Cohere's text2vec embedding model, and perform generative search with the Cohere command-r-plus model.
Uploading Files for RAG
Open the Appsmith editor and select the UI tab. Then drag in a FilePicker widget. Be sure to set the Data format to text.
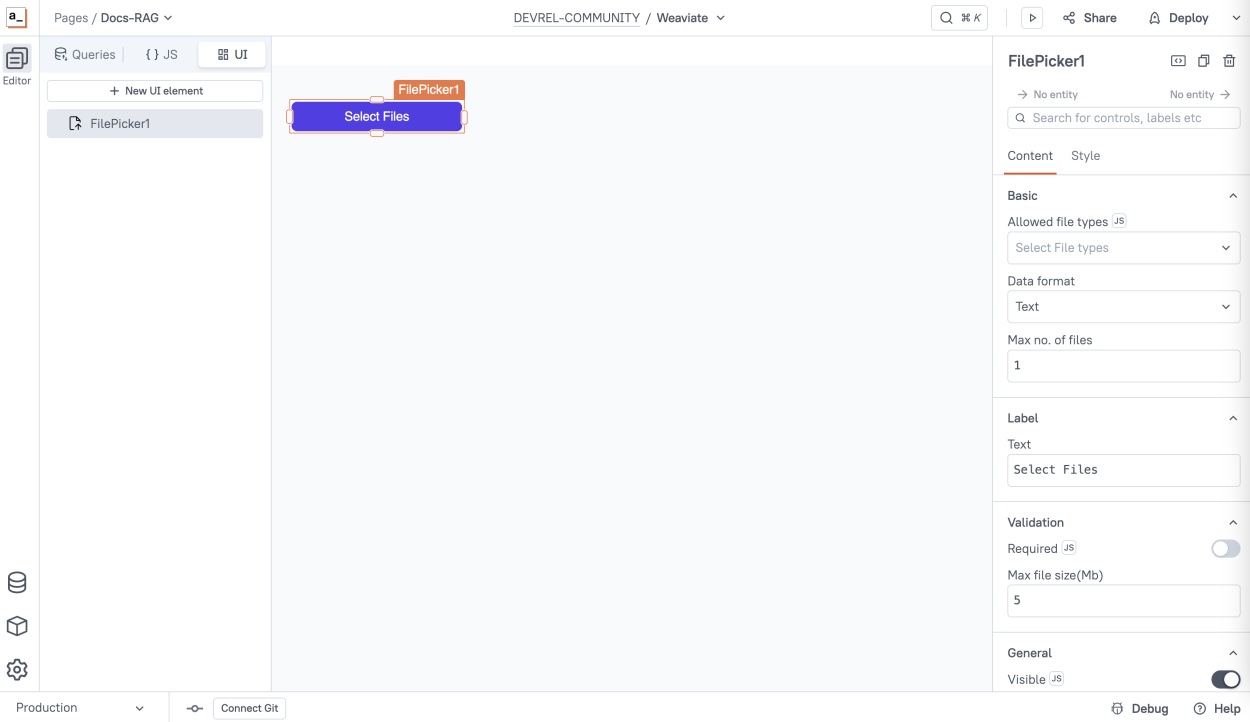
Refresh the page to ensure the FilePicker is in text mode, then click it and upload a text file. This just captures the file locally so that we can reference it in an API to upload to Weaviate.
Next, select the Query tab and create a new REST API. Configure the API as follows:
| Name | CreateObject |
|---|---|
| Method | POST |
| URL | YOUR_WEAVIATE_CLUSTER_URL/v1/objects |
| Header 1 | Authorization: Bearer YOUR_WEAVIATE_API_KEY |
| Header 2 | X-Cohere-Api-Key: YOUR_COHERE_API_KEY |
| Body type | JSON |
| Body |
|
If the FilePicker is properly loaded with a text file and has the Data format set to text, you should see a preview of the content in the API body.
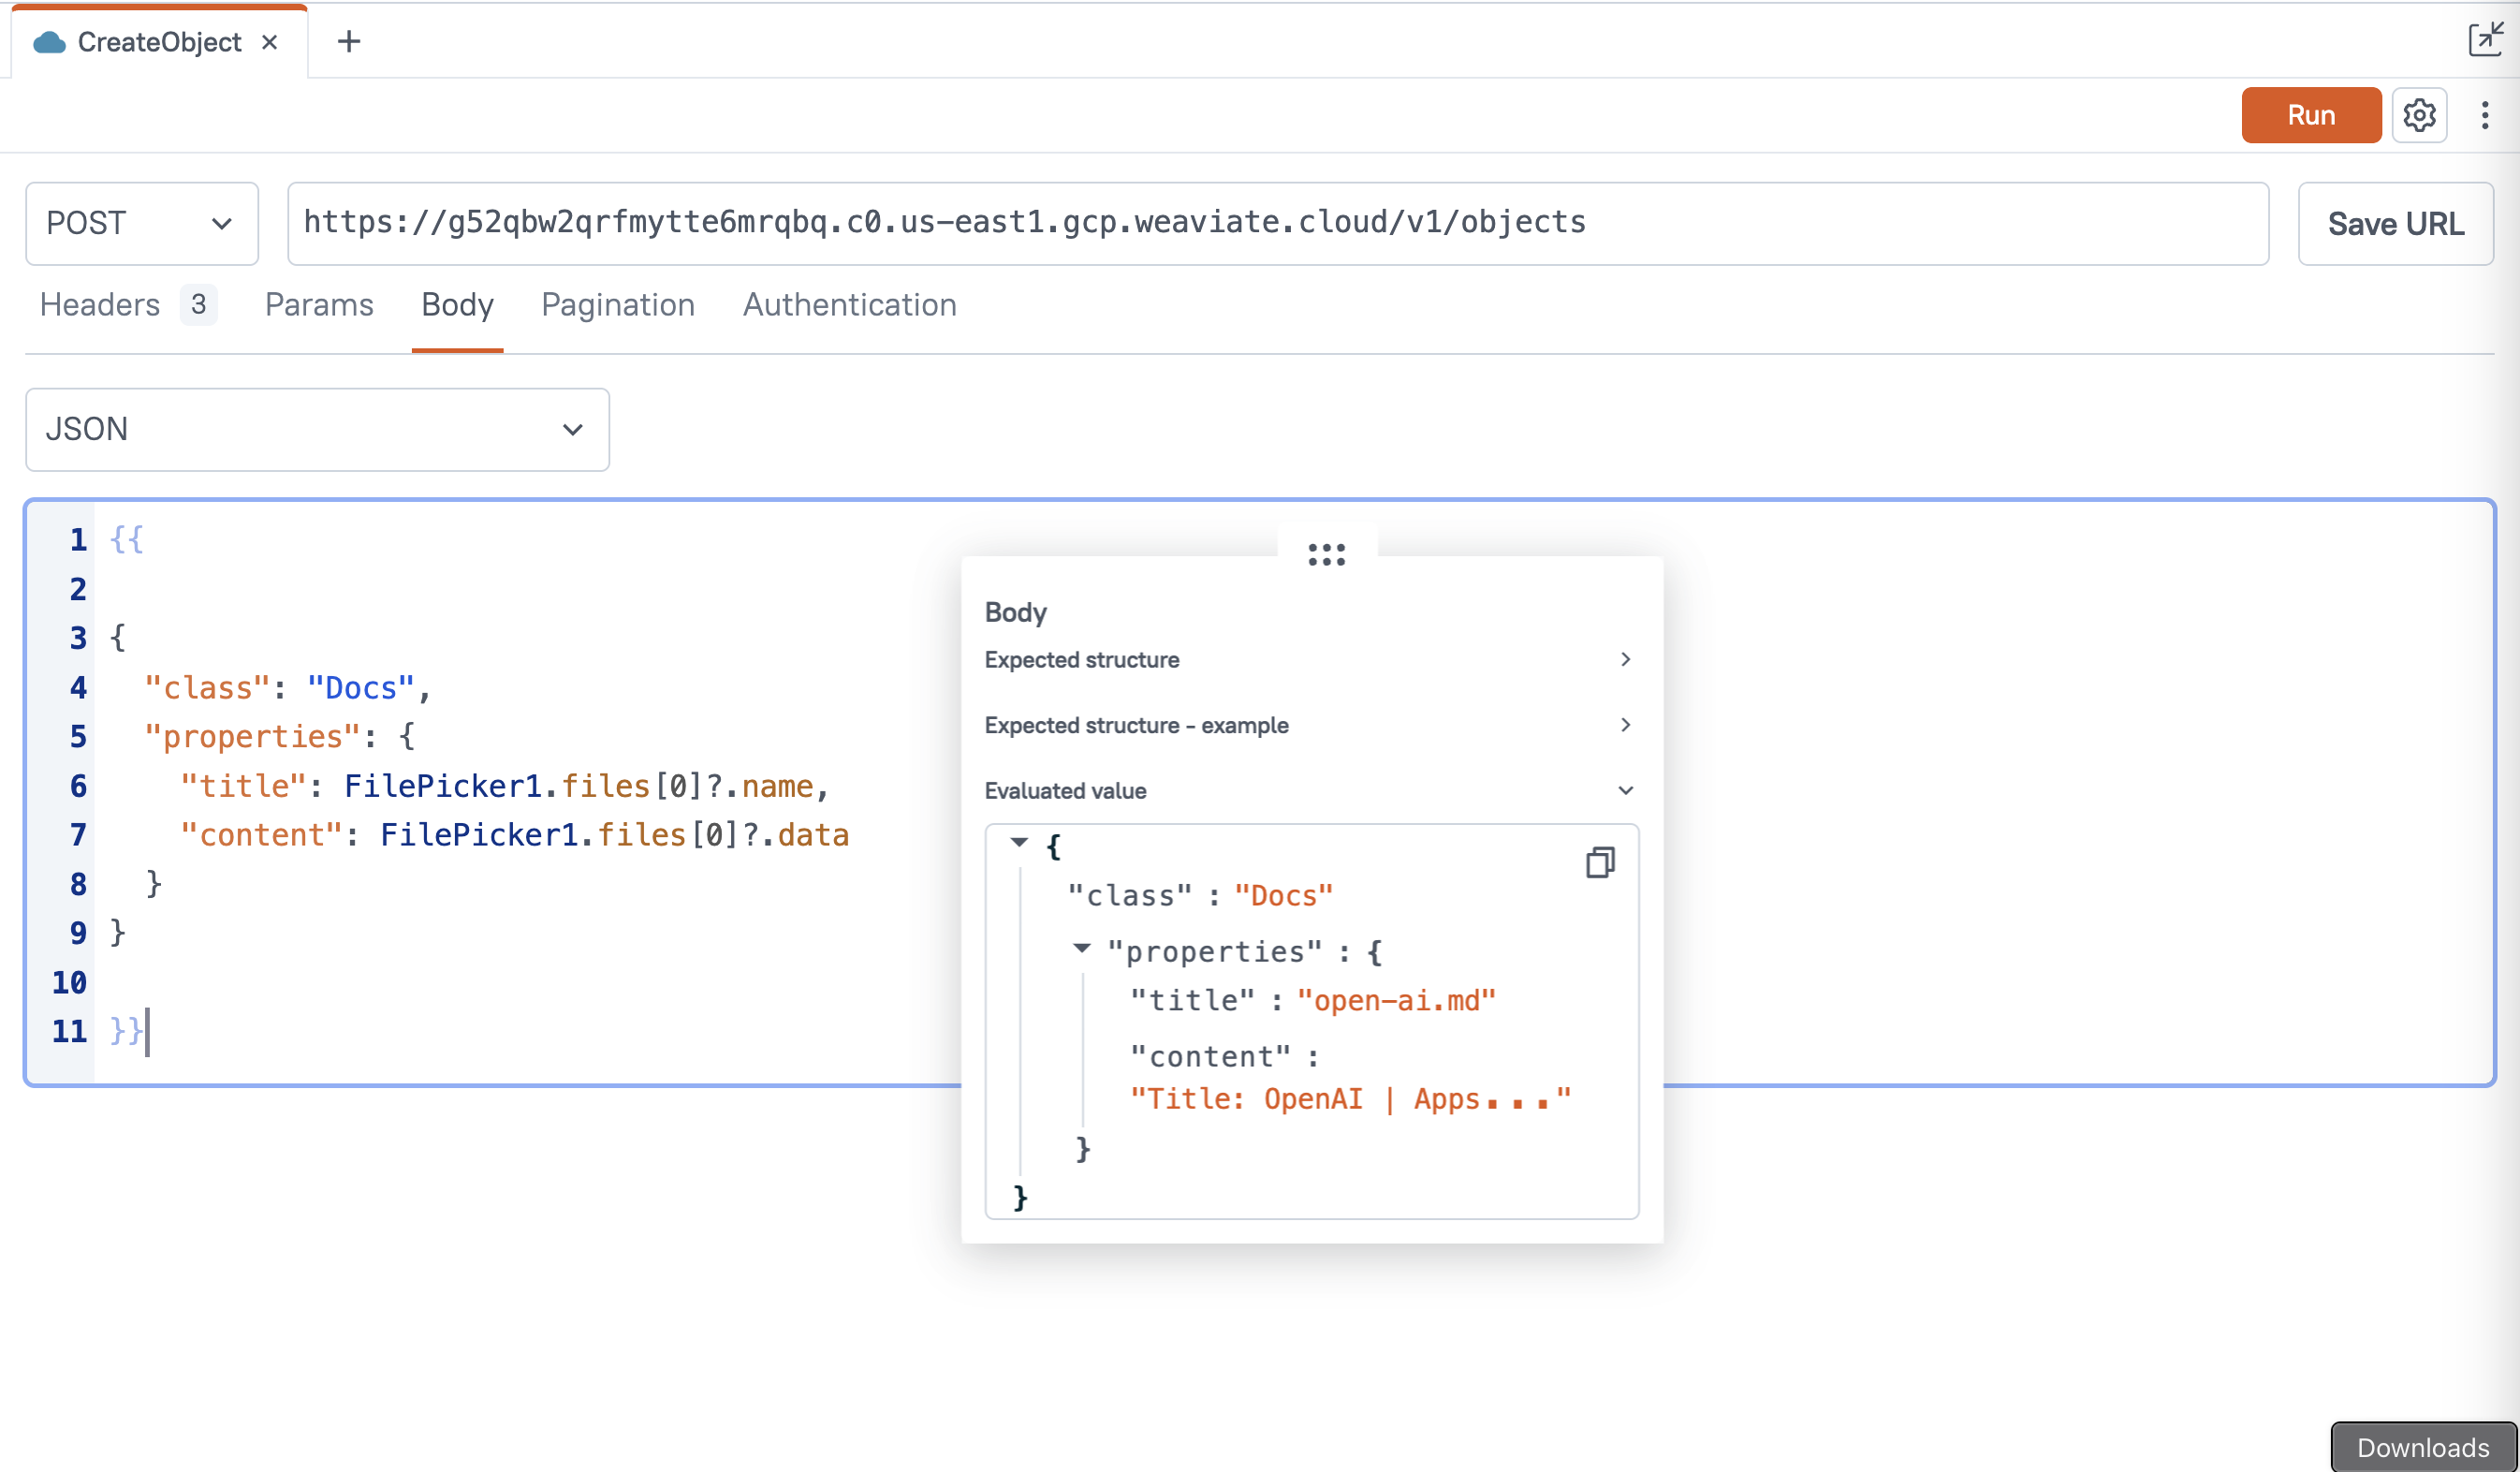
Run the API to upload your first file. You'll see a confirmation in the Response pane below.
Creating a Datasource
Ok, the API is working now, but the API keys are stored in plain text in the app editor. Next, we want to save these credentials to a secure datasource. Click the Save URL button to the right of the URL.
In the new Datasource form, set the Authentication type to Bearer token. Then copy the token (without the word Bearer) into the new Bearer token field. Lastly, delete the original Authorization header from the top section. You can leave the Cohere API key as is. Name the Datasource, then click Save.

The credentials are now securely stored on your self-hosted Appsmith server (or our free cloud), and will never be exposed to end users.
Retest the API by uploading a few more documents. In this case, I'll be uploading a few pages from the Appsmith documentation.
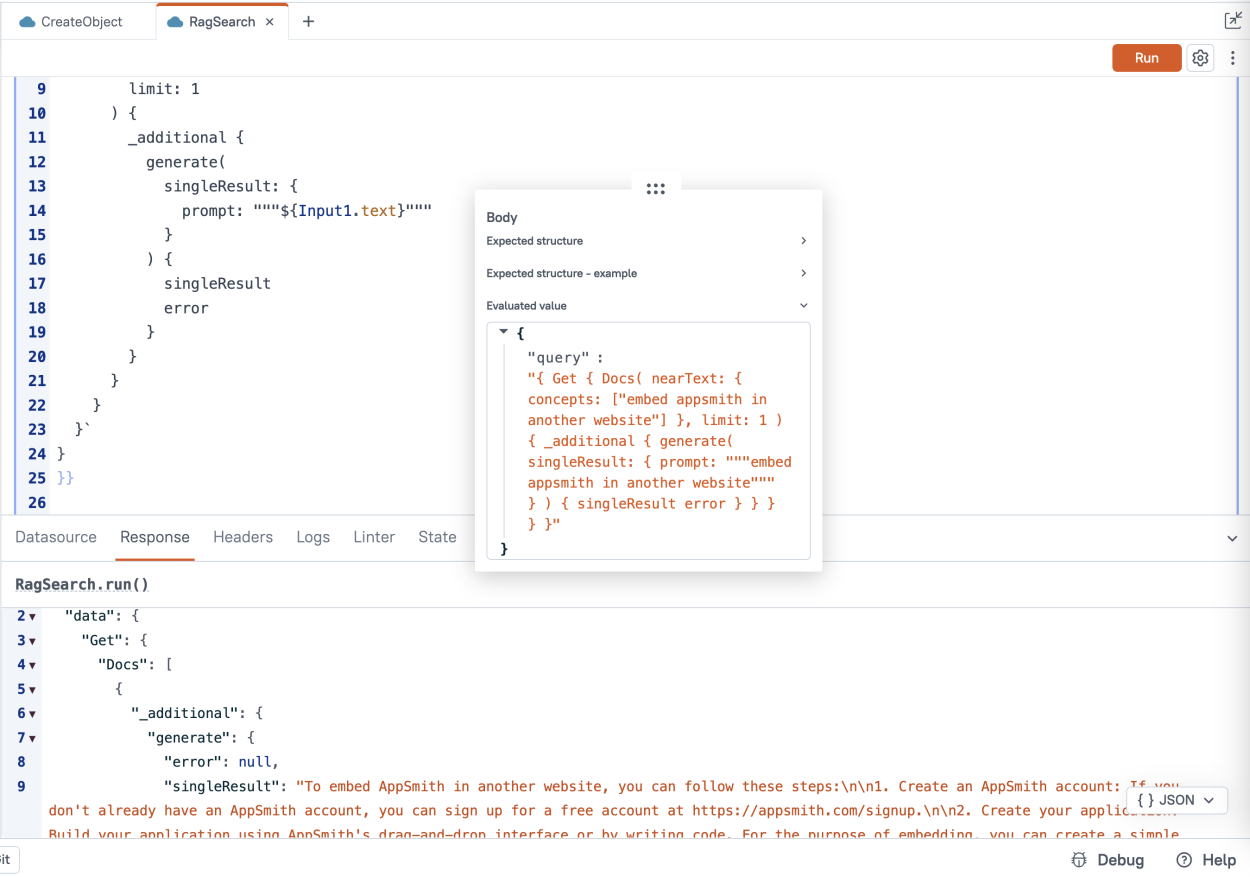
Performing RAG Search
With the files uploaded, we are now ready to begin performing RAG search. Start out by adding a new API under the Weaviate datasource. Be sure to create the API under the datasource this time so it inherits the credentials.
Configure the API as follows:
| Name | RagSearch |
|---|---|
| Method | POST |
| Body tpye | JSON |
| Body |
|
Next, click the Gear icon (next to Run button) and set the API timeout to 60,000 (60 seconds).
Now go back to the UI tab and enter a search query based on the docs you have uploaded. You should see the text inserted into the API body. Run the API to perform your first search.
Note: In this guide, we're using the same REST API datasource for both uploading objects, and performing RAG search. You can also use a GraphQL Datasource for the search, but not for uploading docs. If you're more familiar with GraphQL, you many prefer the body format of the GraphQL API, but that would require creating two different datasources with the same credentials.
Finishing the UI
Lastly, we'll add a widget to run the RagSearch API and display the search results. Drag in an icon button widget and set its onClick action to run the RagSearch API. Then add a Text widget and set its content to display {{RagSearch.data.data.Get.Docs[0]._additional.generate.singleResult}}.
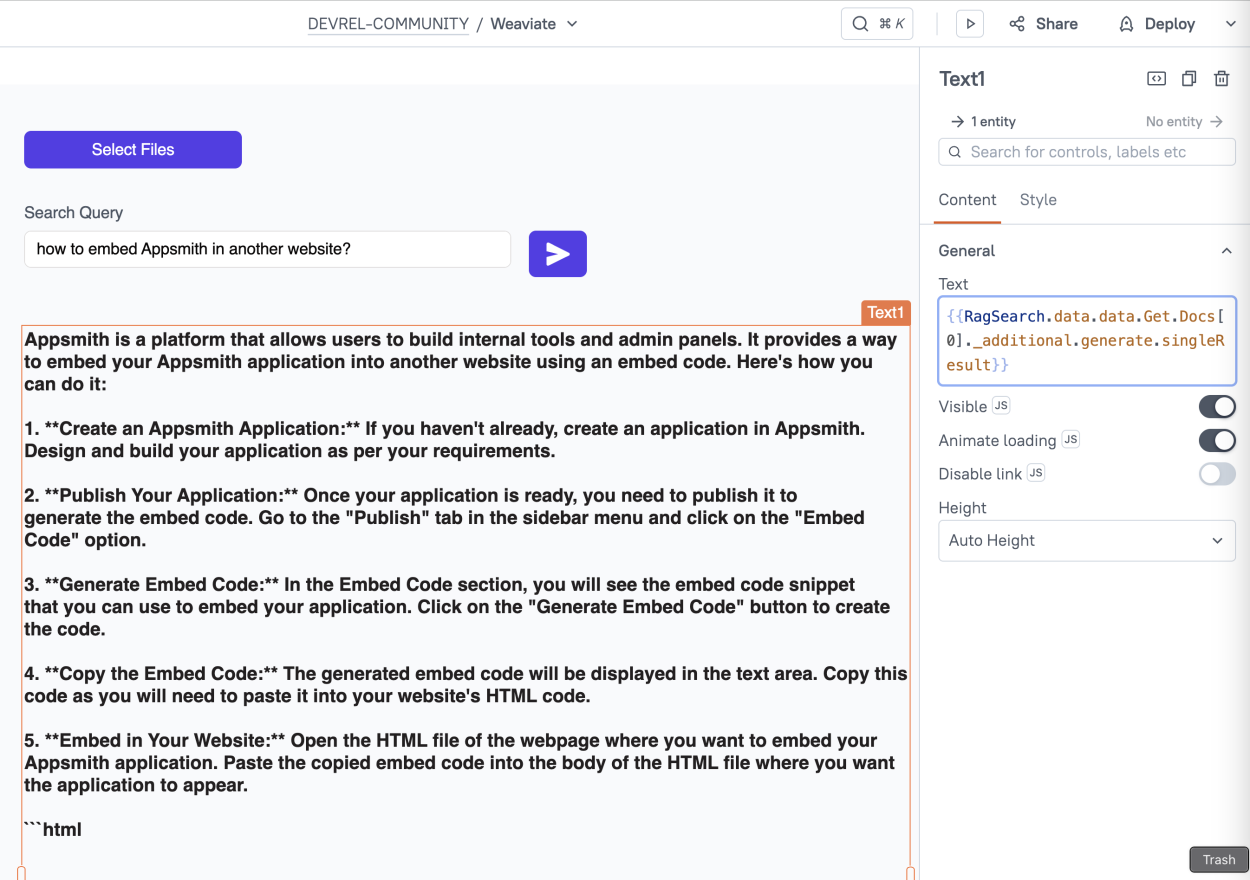
That's it! You now have a complete RAG pipeline to begin using generative search on your own documents.
Conclusion
Weaviate's cloud platform makes it easy to set up a vector store and add RAG search to your own apps. They support using Cohere, OpenAI, and several other models, with just a few simple API calls. From here you can build your own internal apps connected to any API or database using Appsmith as a UI. This enables you to pull info from other sources to upload documents, or use data from other sources in your query string.