


When it comes to displaying an array of records in Appsmith, there are two main options: the table widget, and the list widget. The table widget is super-powerful, with built-in search, filters, and pagination, but its UI is very structured. Whereas, the list widget is extremely flexible on the UI side, but lacks the extra search, filter and pagination tools. Together these cover most use cases, but one option missing is a grid view.
In this guide, we'll build a mobile responsive grid widget using Vue 3's Composition API. Ideally, this would be just like the list widget, with a drag and drop canvas to add other widgets. Unfortunately that wouldn't be possible because custom widgets run in an isolated sandbox and are not able to interact with the rest of the app editor in that way. This means leaving drag and drop behind, and coding every text, input, and button by hand, just like they did in the old days.
This guide will cover:
- Using Vue in a custom widget
- Passing in data from an API
- Generating a list of HTML elements from data
- Making a mobile responsive grid
- Triggering Appsmith events from a grid item
Let's get to it!
Check out the finished app here, or the video tutorial here
Custom Widget with Vue
Drag in a new custom widget and click the Edit source button. Then click the Template dropdown and select Vue. This will provide a boiler plate custom widget using Vue 2 with the Options API. Let's start out by upgrading it to Vue 3 and use the Composition API.
Click the HTML tab and paste in this basic Vue 3 example:
<script src="https://unpkg.com/vue@3.0.0/dist/vue.global.prod.js"></script>
<div id="app">
{{ message }}
</div>
Then paste this in the the JavaScript tab:
const { createApp, ref } = Vue;

appsmith.onReady(() => {
    const App = {
        setup() {
            const message = ref('Hello, Appsmith with Vue 3!');
            return { message };
        }
    };
    createApp(App).mount('#app');

});//end onReady
You should now see the message variable from the JS tab merged in with the HTML. This is the most basic example using Vue 3.
Passing In API Data
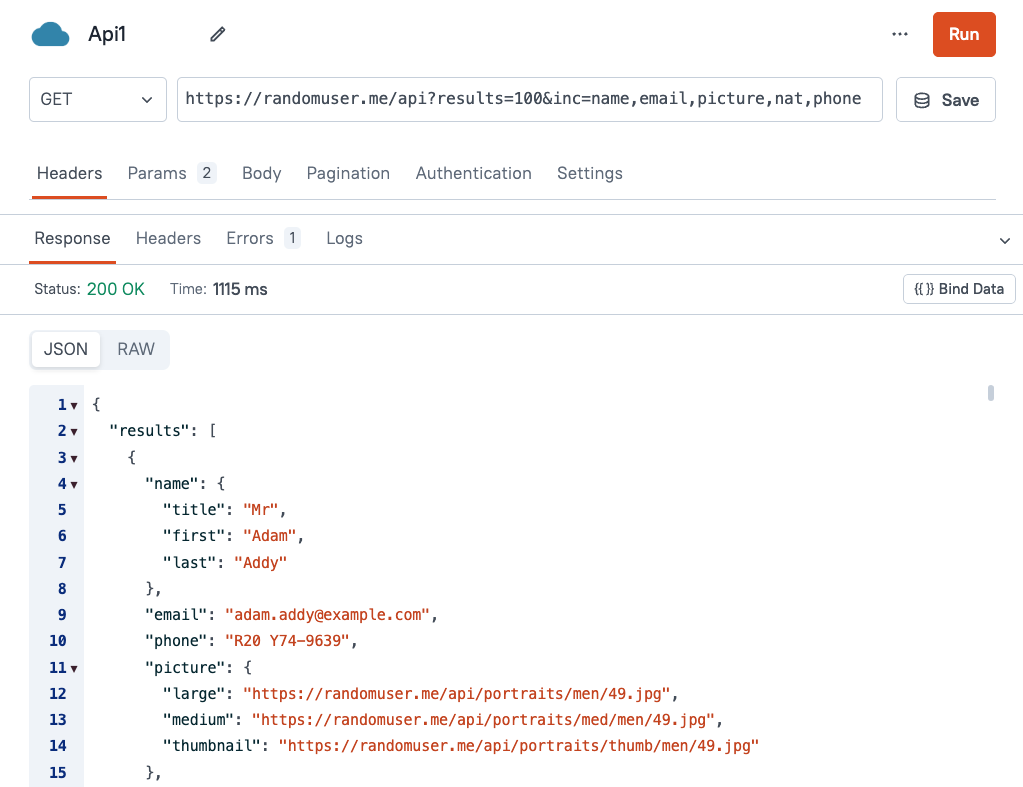
Next, go back to the main app editor, click the Query tab and add a new REST API. You can also use cmd-shift-+ (Mac) or ctrl-shift-+ (Windows/Linux) to bring up the "Create New" menu, and select New Blank API.
Enter the URL:
https://randomuser.me/api?results=100&inc=name,email,picture,nat,phoneThen click Run. You should get back a 200 response with a object containing a results array.
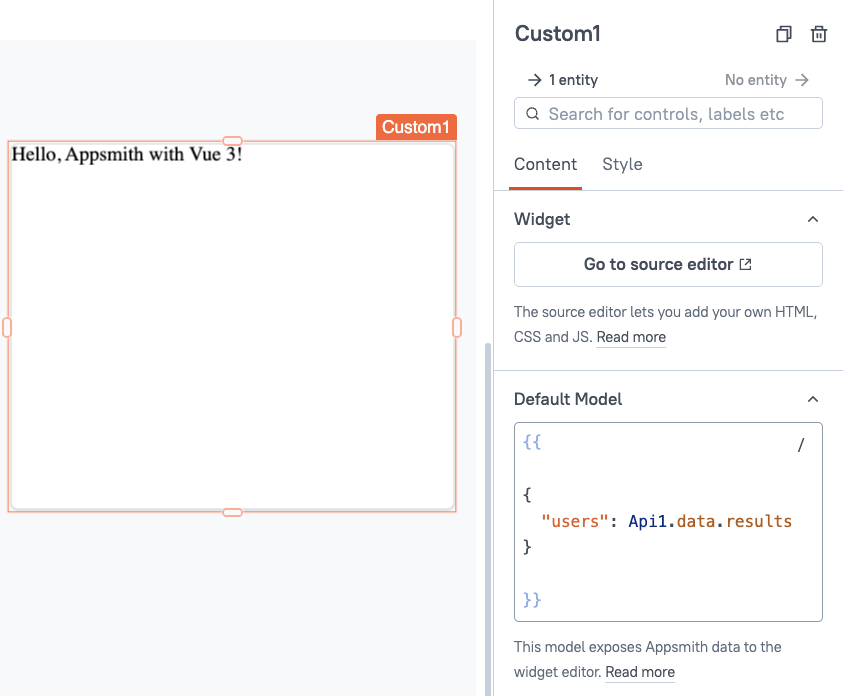
Head back to the UI tab and select the custom widget. Then set its Default model to an object containing the results array.
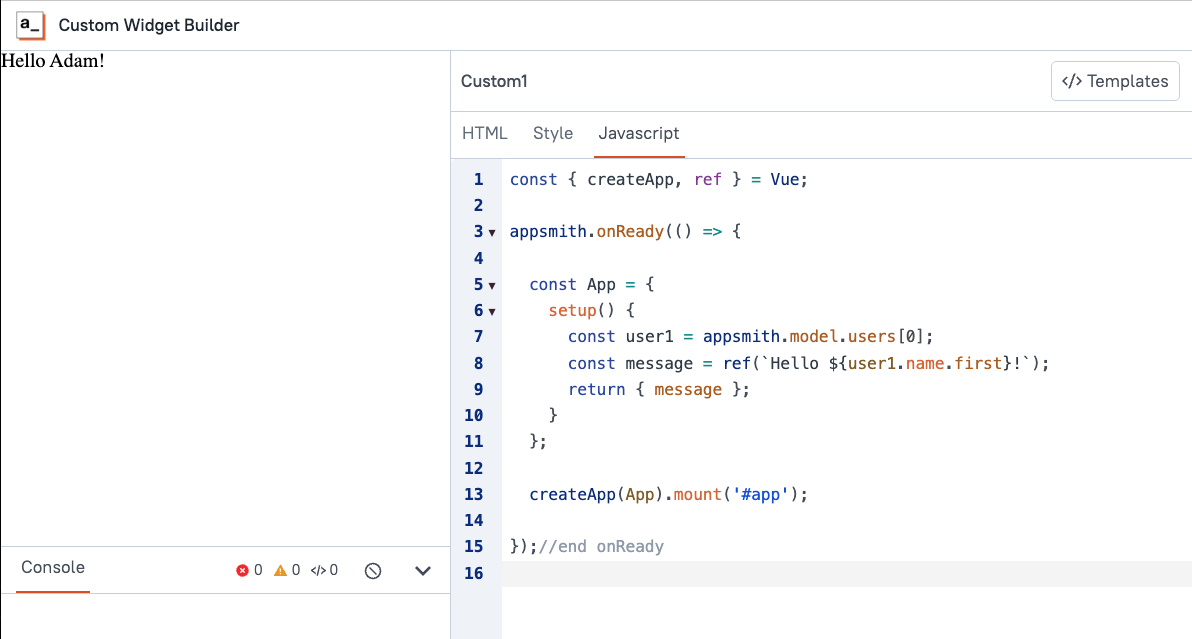
Then, back in the Edit source page of the custom widget, update the JavaScript tab with:
const { createApp, ref } = Vue;
appsmith.onReady(() => {
    const App = {
        setup() {
            const user1 = appsmith.model.users[0];
            const message = ref(`Hello ${user1.name.first}!`);
            return { message };
        }
    };
    createApp(App).mount('#app');

});//end onReady
You should now see a dynamic message, inserting the name from the first user.
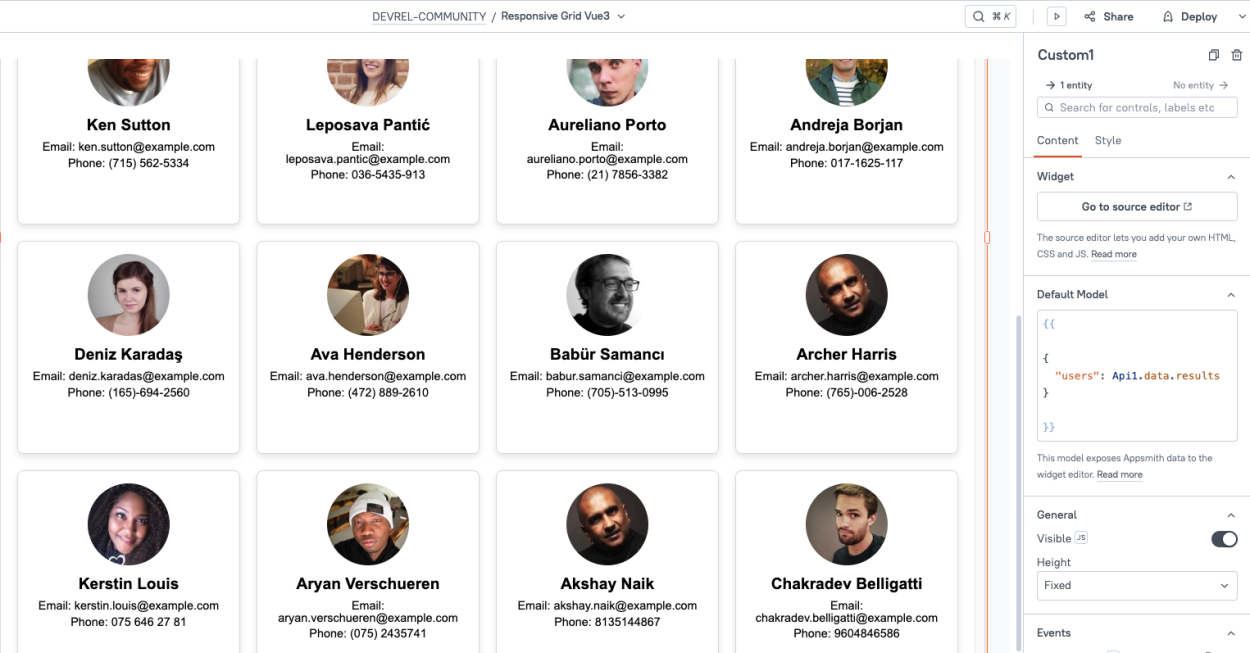
Creating a List of Elements
Next, we'll create a card for each user using the v-for directive.
Update the HTML tab with:
<div id="app">
 <div class="grid-container">
   <div class="card" v-for="user in users" :key="user.email">
     <img :src="user.picture.large">
     <h2>{{ user.name.first }} {{ user.name.last }}</h2>
     <p>Email: {{ user.email }}</p>
     <p>Phone: {{ user.phone }}</p>
   </div>
 </div>
</div>
<script src="https://unpkg.com/vue@3.0.0/dist/vue.global.prod.js"></script>
Then update the JavaScript tab with:
appsmith.onReady(() => {
 const { createApp } = Vue;
 // Initialize Vue app
 const app = createApp({
   data() {
     return {
       users: appsmith.model.users || [] // Initialize with the available 'users' array
     };
   },
   methods: {
     updateUsers(newUsers) {
       this.users = newUsers; // Update the users array reactively
     }
   }
 });
 // Mount the Vue app
 const vm = app.mount('#app');

 // Listen for model changes to update users dynamically
 appsmith.onModelChange( () => {
   vm.updateUsers(appsmith.model.users); // Call the method to update data reactively
 });
});
You should now have a list of the user cards rendering in a single column. Next, add some CSS to turn it into a responsive grid by pasting this in the Style tab:
* {
     box-sizing: border-box;
     margin: 0;
     padding: 0;
   }
   body {
     font-family: Arial, sans-serif;
     padding: 20px;
   }
   .grid-container {
     display: grid;
     grid-template-columns: repeat(auto-fill, minmax(250px, 1fr));
     gap: 20px;
   }
   .card {
     border: 1px solid #ddd;
     border-radius: 8px;
     padding: 15px;
     box-shadow: 0 4px 8px rgba(0, 0, 0, 0.1);
     text-align: center;
            position: relative;
            min-height: 260px;
   }
   .card img {
     border-radius: 50%;
     width: 100px;
     height: 100px;
   }
   .card h2 {
     font-size: 1.2em;
     margin: 10px 0;
   }
   .card p {
     margin: 5px 0;
     font-size: 0.9em;
   }
   @media (max-width: 600px) {
     .grid-container {
       grid-template-columns: 1fr;
     }
   }
At this point, you should have a mobile responsive, data-driven grid. Try resizing the window to test it out.
Triggering Events
Lastly, let's look at how to trigger an event from one of the cards and pass in the email. We'll add a button to each card to open a draft email to that user.
First, add a button tag to the user card:
<button @click="triggerEmail(user.email)">Email</button>Next, add the triggerEmail() function to the methods:
const app = createApp({
   data() {
     return {
       users: appsmith.model.users || [] // Initialize with the available 'users' array
     };
   },
   methods: {
     triggerEmail(email) {
       appsmith.triggerEvent("sendEmail", { email });
     },
     updateUsers(newUsers) {
       this.users = newUsers; // Update the users array reactively
     }
   }
 })
Lastly, go back to the main app editor, and add the matching event. You'll see an onResetClick event that was part of the boilerplate Vue template from the start. Change the name to sendEmail. Then, change the event to the Navigate to action and configure as follows:
- Type: URL
- URL:
{{'mailto://?to=' + email || ''}} - Target: New window
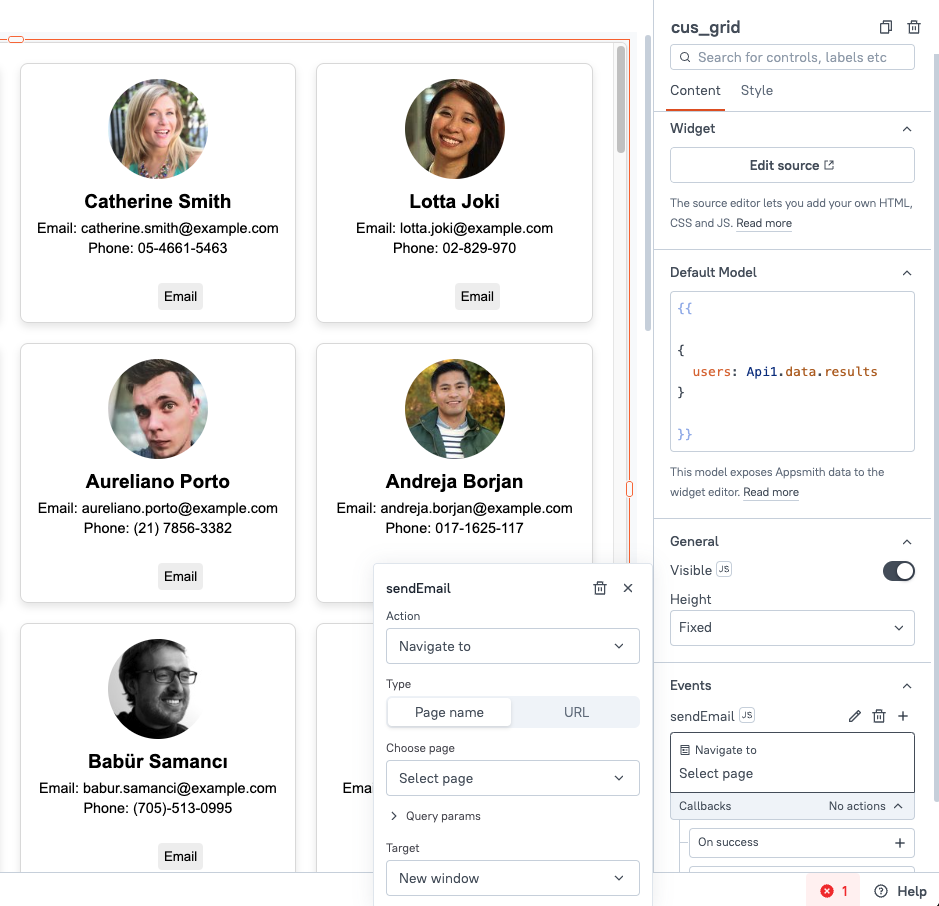
Time to test it out! Click one of the email buttons from the main editor, and it should trigger an event from the custom widget and open a draft email to the user.
Conclusion
Vue 3's Composition API is a great choice for building custom widgets in Appsmith, allowing you to build data-driven components like this grid widget, with minimal code. By leveraging the v-for directive, you can easily loop over data from any API or database query and dynamically generate elements to add to the document.
What's Next?
From here, you could add multiple buttons and functions, icons, hover effects, drag interactions, etc. Or you could add controls for sorting, filtering, and pagination for larger datasets. How would you extend this grid widget? Drop a comment below and let us know what features you'd like to see added.


Cool stuff, Joseph. That was very 'followable' !!