Data-Driven PDF Generator with JSPDF and Autotable
Goal
Build a data-driven PDF generator for customer orders, with a table for line items
Prerequisites
An Appsmith Account
Overview
In this guide, we'll be using the JSPDF library and the JSPDF-AutoTable plug-in to generate PDFs from customer order data. This method builds a PDF programmatically, one line at a time, as opposed to other methods that use a template or HTML. Using this approach, you can input data from any Appsmith datasource, and transform it with JavaScript to generate a PDF from the live data.
Install JSPDF and Auto-Table
First we'll install both JSPDF and Auto-Table. Open the app where you want to build a PDF generator, then install both libraries as follows:
JSPDF
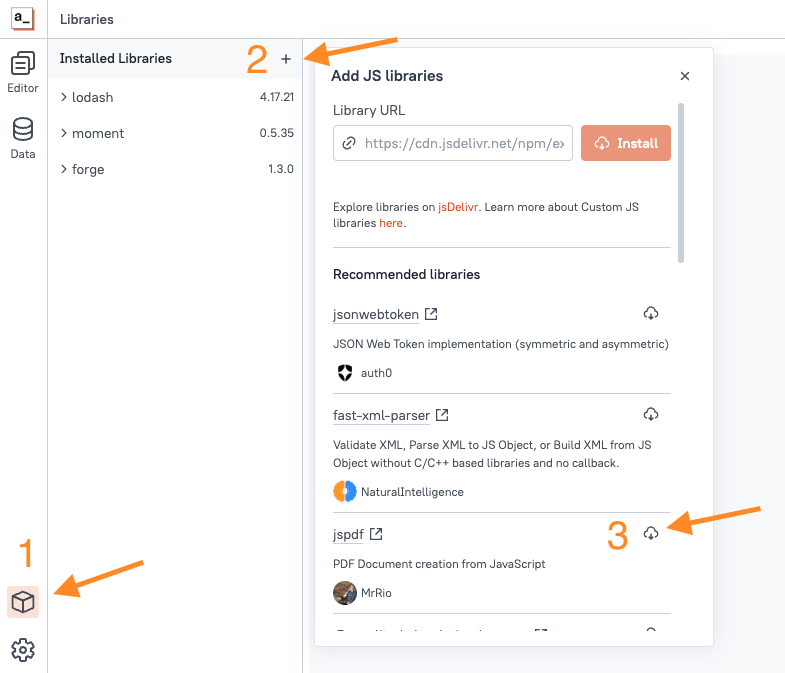
- Click the Libraries (Cube) icon on the bottom of the left sidebar
- Click + to open the Library Installer
- Scroll down and click the download arrow on JSPDF
Auto-Table
This one is not in the recommended library list, so we need a CDN link.
-
Paste in the install URL:
https://cdn.jsdelivr.net/npm/jspdf-autotable@3.8.3/dist/jspdf.plugin.autotable.min.js - Click Install
Both libraries should now be installed.
Creating a Basic PDF
Next, we'll create a basics PDF with a few lines of text.
- Click the JS tab of the left panel and add a new JSObject
- Name it
PdfUtils -
Replace with the following code
export default {

    buildPdf () {
        const doc = new jspdf.jsPDF();
        doc.text('JSPDF Test', 10, 10);
        doc.text('Testing 123', 10, 20);
        return doc.output('dataurlstring')
    }

}
The JSPDF
.text()method has 3 required parameters: the string to add, and the X and Y position. There's also an optional options object as a forth parameter. See the JSPDF docs for more details and other methods.DataURLs and Base64 Strings
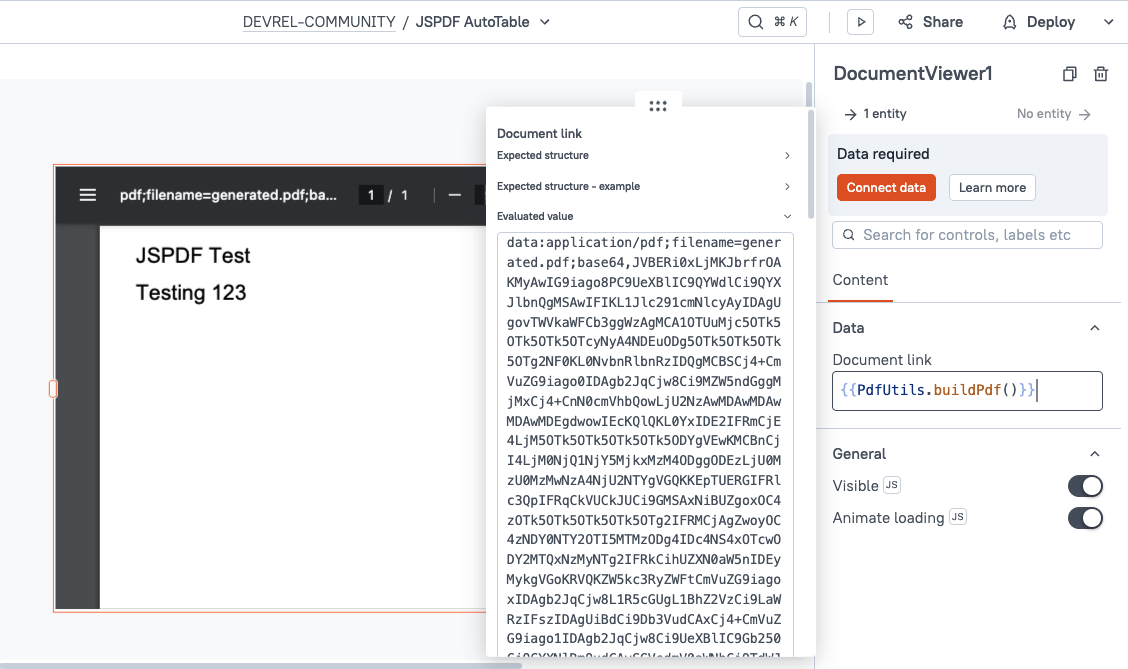
Run the function and you should get back a DataUrl. This is a base64 representation of the file, and can be used in place of a URL to display the PDF in a DocumentViewer widget.
For more info on DataUrls and Base64, check out this post.
Now display the dataURL in a widget:
- Click the UI tab and drag in a DocumentViewer widget
- Set the DocumentLink to:
{{PdfUtils.buildPdf()}}
The PDF should now be displaying in the DocumentViewer.
Using Auto-Table
Next, we need some sample data to display in a table on the PDF. For this example, we'll be using hard-coded sample data, but you can swap this out for your own datasource as needed.
- Add a new JSObject and name it
SampleData - Paste in the following:
export default {

    orders: [
 {
   "order_id": "1001",
   "customer": {
     "name": "Theron Wainwright",
     "email": "theron.wainwright@example.com",
     "address": {
       "street": "123 Alderbrook Lane",
       "city": "Haverford",
       "state": "PA",
       "zip": "19041"
     }
   },
   "items": [
     {
       "item_name": "Intel Core i9-11900K",
       "quantity": 1,
       "price": 499.99
     },
     {
       "item_name": "Corsair Vengeance LPX 32GB DDR4",
       "quantity": 2,
       "price": 159.99
     },
     {
       "item_name": "Samsung 970 EVO Plus 1TB NVMe SSD",
       "quantity": 1,
       "price": 149.99
     }
   ],
   "total_price": 969.95
 },
 {
   "order_id": "1002",
   "customer": {
     "name": "Emilia Fenswick",
     "email": "emilia.fenswick@example.com",
     "address": {
       "street": "456 Brookstone Court",
       "city": "Fairmont",
       "state": "WV",
       "zip": "26554"
     }
   },
   "items": [
     {
       "item_name": "AMD Ryzen 7 5800X",
       "quantity": 1,
       "price": 399.99
     },
     {
       "item_name": "Asus ROG Strix X570-E Gaming Motherboard",
       "quantity": 1,
       "price": 299.99
     },
     {
       "item_name": "Cooler Master Hyper 212 RGB",
       "quantity": 1,
       "price": 49.99
     }
   ],
   "total_price": 749.97
 },
 {
   "order_id": "1003",
   "customer": {
     "name": "Luther Thistleton",
     "email": "luther.thistleton@example.com",
     "address": {
       "street": "789 Maple Grove Avenue",
       "city": "Crestwood",
       "state": "KY",
       "zip": "40014"
     }
   },
   "items": [
     {
       "item_name": "NVIDIA GeForce RTX 3080",
       "quantity": 1,
       "price": 799.99
     },
     {
       "item_name": "EVGA SuperNOVA 850W Power Supply",
       "quantity": 1,
       "price": 139.99
     },
     {
       "item_name": "NZXT H510 Elite ATX Mid Tower Case",
       "quantity": 1,
       "price": 149.99
     }
   ],
   "total_price": 1089.97
 }
]
}
Then return to the PdfUtils JSObject, and update it with:
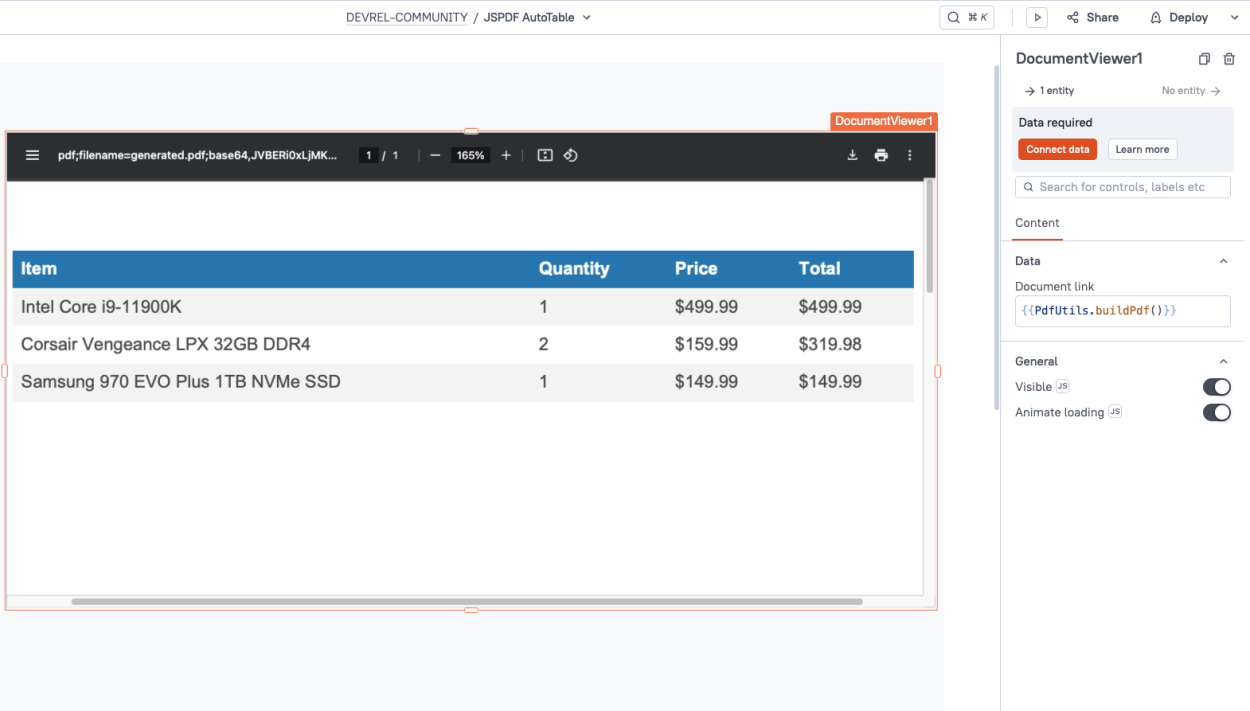
export default { buildPdf (order=SampleData.orders[0]) { const doc = new jspdf.jsPDF(); // Table Data const itemData = order.items.map(item => [ item.item_name, item.quantity, `$${item.price.toFixed(2)}`, `$${(item.quantity * item.price).toFixed(2)}` ]); // Table for Items doc.autoTable({ head: [['Item', 'Quantity', 'Price', 'Total']], body: itemData }); return doc.output('dataurlstring') } }Note: Auto-table expects the data in a 2D array
[[],[],[]], instead of a JSON array of objects.Run the function again and you should now see a table in the PDF!
For more info on styling the table, check out the examples here.
- Add a new JSObject and name it
Adding A Header And Footer
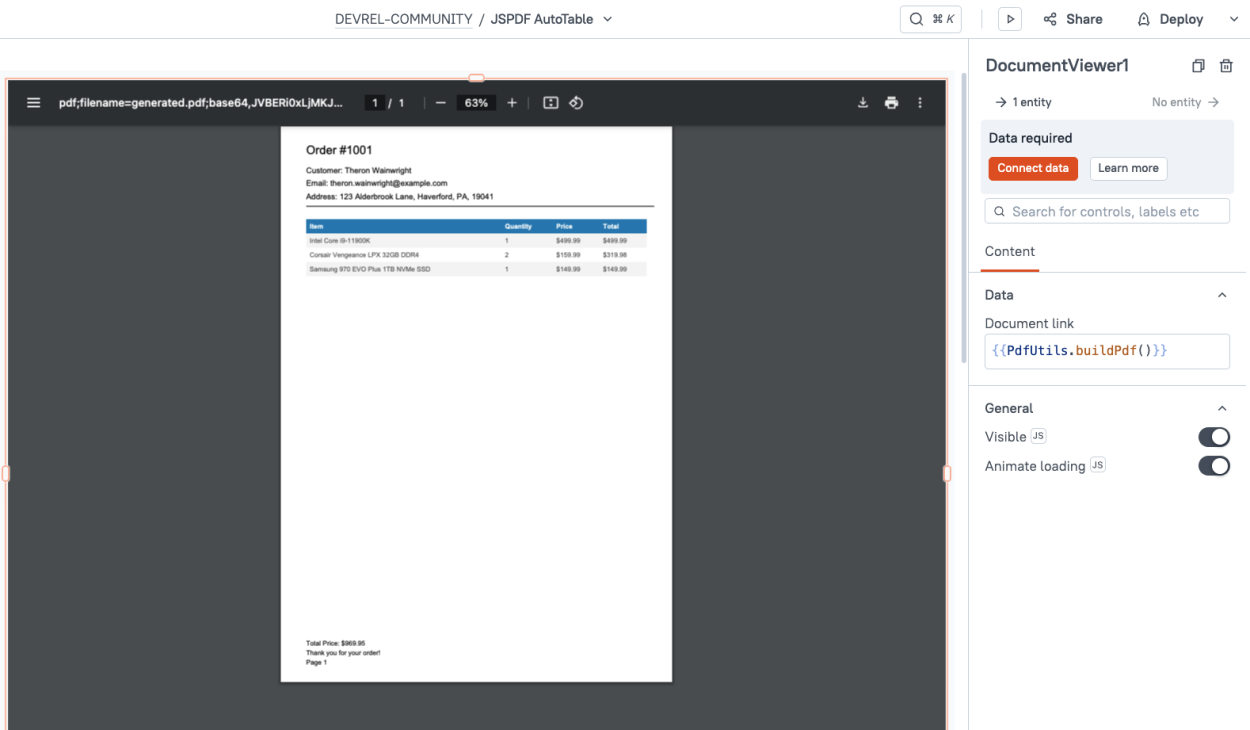
Lastly, add a header and footer using the customer data. Update the function with:
export default {
 buildPdf(order = SampleData.orders[0]) {
   const doc = new jspdf.jsPDF();
   // Add Header
   const addHeader = () => {
     doc.setFontSize(18);
     doc.text(`Order #${order.order_id}`, 14, 15); // Order number
     doc.setFontSize(12);
     doc.text(`Customer: ${order.customer.name}`, 14, 25);
     doc.text(`Email: ${order.customer.email}`, 14, 32);
     doc.text(`Address: ${order.customer.address.street}, ${order.customer.address.city}, ${order.customer.address.state}, ${order.customer.address.zip}`, 14, 39);
     doc.line(14, 43, 200, 43); // Horizontal line
   };
   // Add Footer
   const addFooter = () => {
     const pageCount = doc.internal.getNumberOfPages();
     doc.setFontSize(10);
     doc.text(`Page ${pageCount}`, 14, doc.internal.pageSize.height - 10);
     doc.text(`Total Price: $${order.total_price.toFixed(2)}`, 14, doc.internal.pageSize.height - 20); // Total price
     doc.text('Thank you for your order!', 14, doc.internal.pageSize.height - 15);
   };
   // Add the header before the content
   addHeader();
   // Table Data
   const itemData = order.items.map(item => [
     item.item_name,
     item.quantity,
     `$${item.price.toFixed(2)}`,
     `$${(item.quantity * item.price).toFixed(2)}`
   ]);
   // Table for Items
   doc.autoTable({
     head: [['Item', 'Quantity', 'Price', 'Total']],
     body: itemData,
     startY: 50 // Start after the header
   });
   // Add footer after content
   addFooter();
   // Return the PDF as a data URL
   return doc.output('dataurlstring');
 }
}
Rerun the function and you should now see the complete PDF with header and footer!
Inserting Different Data
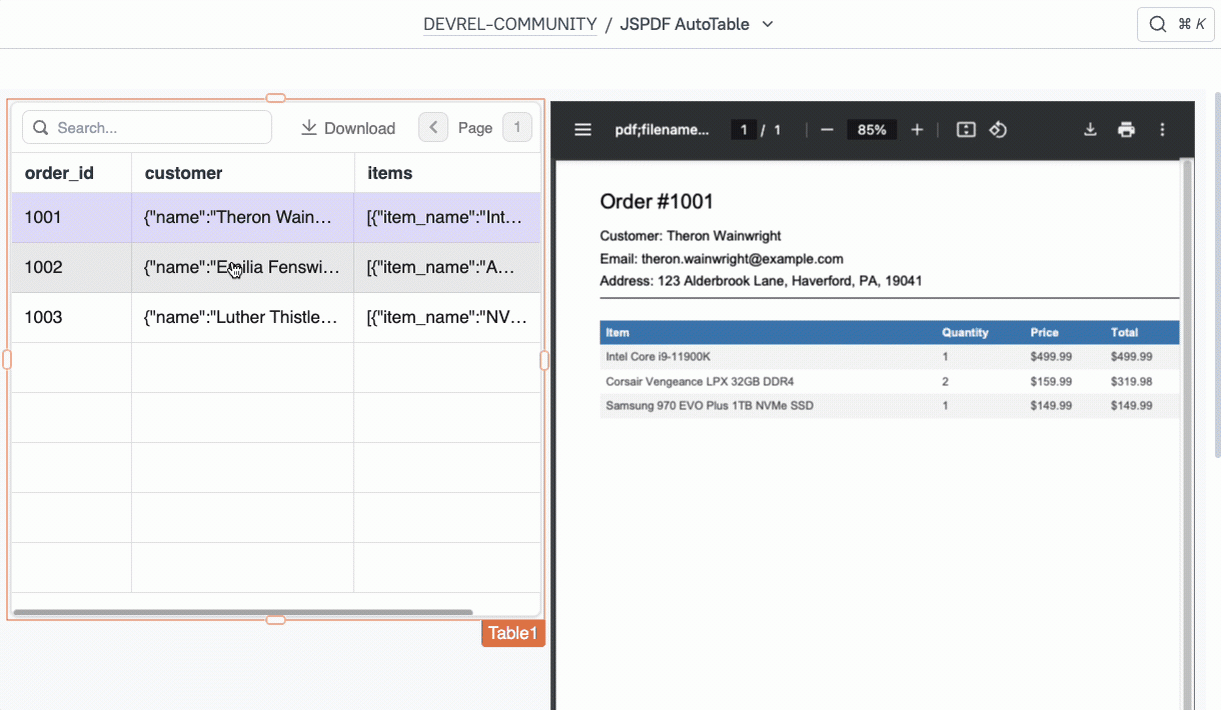
Lastly, we'll add a table widget to display the sample orders, and then connect the DocumentViewer widget to the selected row.
- Drag in a table widget, and set the Table data to
{{SampleData.orders}} - Update the function to use the selected row as the default value:
buildPdf(order = Table1.selectedRow) {
Now try selecting different rows of the table, and the PDF should update to display that order.
- Drag in a table widget, and set the Table data to
Conclusion
Generating PDFs with the JSPDF library and Auto-table can easily be set up in Appsmith in just a few minutes. You can use data from any database or API, insert tables of data, and add lines and other shapes and formatting.
