Appsmith's native FilePicker widget can easily be used to upload images from the user's device to any API or database. And if you need to limit the file size, the FilePicker widget has a Max File Size setting you can adjust, to ensure the file is within the limits of the API or database receiving the image. But what if the user wants to upload an image larger than the limit? You can leave it up to each user to resize the image on their own device before upload, but that would lead to inconsistent results and frustrated users.
A better approach would be to resize the image in the browser, and give all users the same tool for adjusting the images. This sounds like a job for the Custom Widget! In this guide, we'll be building an image resizing and compression widget using Dropzone.js, and open-source library for file uploads.
This guide will cover:
- Using Dropzone in a custom widget to upload files
- Saving the file to the custom widget model
- DataUrls and base64 strings for displaying images
- Image resizing and compression
Let's get started!
Using Dropzone in a custom widget to upload files
Dropzone is an open source library for adding drag-and-drop file upload to any website. It's built to look good out-of-the-box, and highly customizable. It doesn't actually have anything to do with image resizing though. For that, we'll be using vanilla JavaScript. So why use Dropzone, instead of the native FilePicker widget?
I initially attempted to build this using the FilePicker widget but it was slower and inefficient because I had to store the image twice. I was sending the input image into the custom widget, modifying it, and then sending the new version back out of the custom widget. So capturing the image from inside the custom widget means less writing to the custom widget model, and better performance.
Basic Dropzone Demo
Start out by dragging in a new custom widget, then click the Edit source button in the property pane. Clear out the code in each pane of the custom widget editor.
Then paste this in the HTML tab:
<div id="dropzone" class="dropzone"></div>This defines a div for the drag-and-drop 'dropzone'.
Then paste this in the JavaScript tab:
import Dropzone from 'https://cdn.jsdelivr.net/npm/dropzone@6.0.0-beta.2/+esm'

appsmith.onReady(() => {
	console.log("ready");
	dropzoneInit();
});


function dropzoneInit() {
	const dropzone = new Dropzone("#dropzone", {
		url: "/",
		autoProcessQueue: false,
		acceptedFiles: "image/*",
		maxFiles: 1,
	});
}
Here, we define an appsmith.onReady() function which calls the dropzonInit() function to initialize Dropzone.
This should give you a basic working demo of Dropzone. Test it out by clicking the button or dragging in an image.
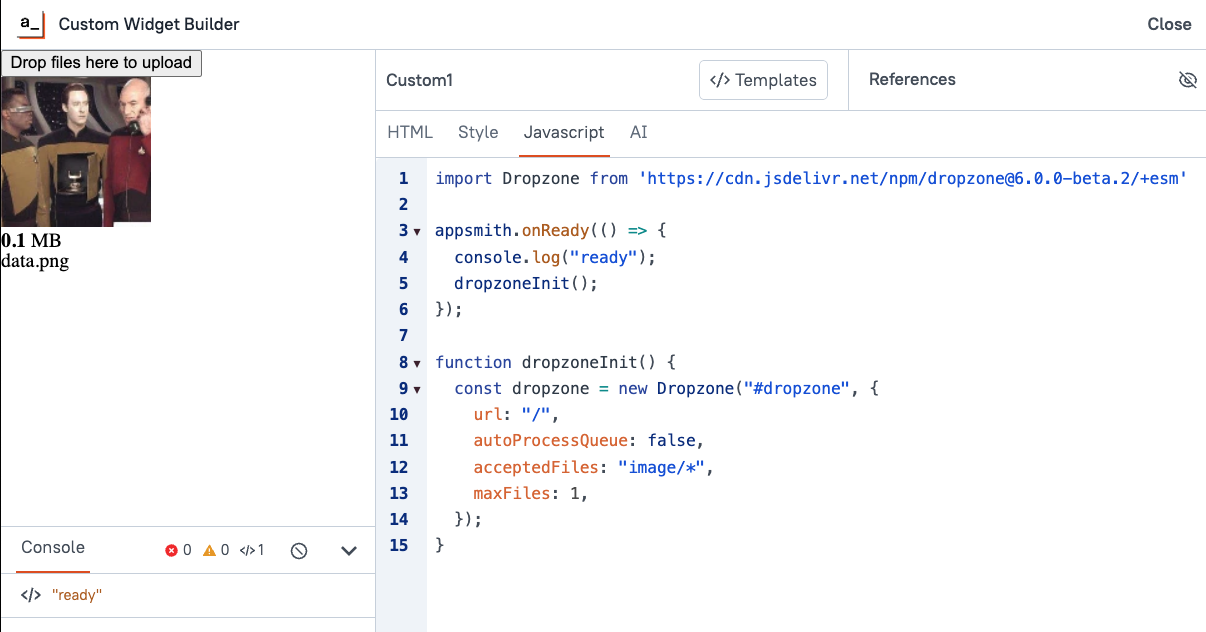
I'm setting the autoProcessQueue to false because we don't want to do anything with the file immediately after upload. Instead, I want the user to input a value for the scale factor and compression, and use those to adjust the image first. That will all be handled with vanilla JavaScript in the next section.
Image resizing and compression
First we'll add a few inputs and buttons to the UI, so the user has a way to enter the compression and scale factor. Update the HTML tab with:
<div id="inputStats" class="results"></div>

<div class="controls">
  <label for="scaleFactor">Scale Factor (%): </label>
  <input type="number" id="scaleFactor" value="100" min="10" max="100" />

  <label for="compressionQuality">Compression Quality (0.1 to 1.0): </label>
  <input type="number" step="0.1" id="compressionQuality" value="0.9" min="0.1" max="1.0" />

  <button id="compressImage">Compress & Scale</button>
  <button id="clearFile">Clear File</button>
</div>

<div id="dropzone" class="dropzone"></div>

<div class="results" id="results"></div>
Then paste this in the Style tab:
body {
	padding: 4px;
	font-family: sans-serif
}
#dropzone {
	border: 2px dashed var(--appsmith-theme-primaryColor);
	border-radius: var(--appsmith-theme-borderRadius);
	padding: 20px;
	text-align: center;
	cursor: pointer;
}

.controls {
	margin-bottom: 15px;
	display: flex;
	align-items: center;
	gap: 10px;
}

button {
	background-color: var(--appsmith-theme-primaryColor);
	border-radius: var(--appsmith-theme-borderRadius);
	padding: 8px 8px;
	border: none;
	color: var(--appsmith-theme-backgroundColor)

}

.controls { margin-bottom: 10px; }
.results { margin-top: 10px; font-family: sans-serif; }
Notice the CSS variables used to access the app's theme settings. This makes the custom widget adjust with your app theme, so you don't have to change the colors or border radius to match.
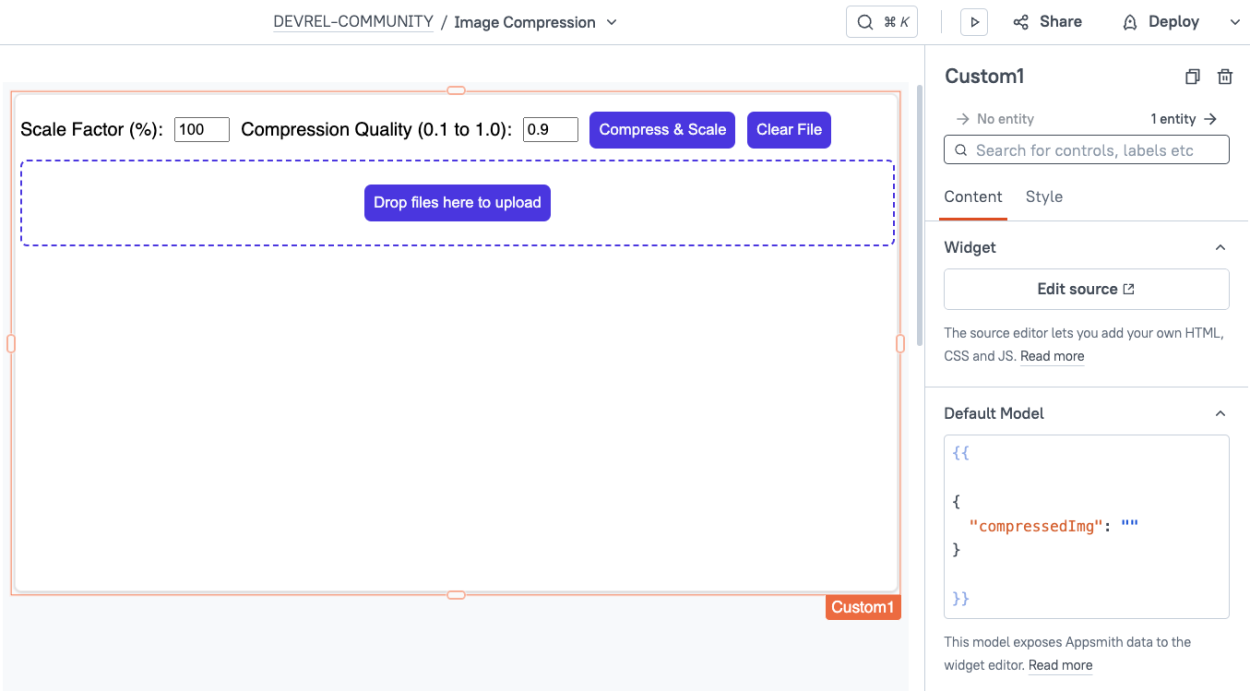
Here, I have updated the Default Model with a placeholder object for the compressed image as a dataUrl.
Dropzone Init Function
Next we need to trigger a function when a file is added to the Dropzone. This is going to be a fairly big function, and writing it inline, inside the config used to initialize Dropzone is a bit hard to read. So I'm writing this function external to the dropzoneInit() function and just referencing it. This makes the code easier to read and manage, but it also makes the use of this a little confusing.
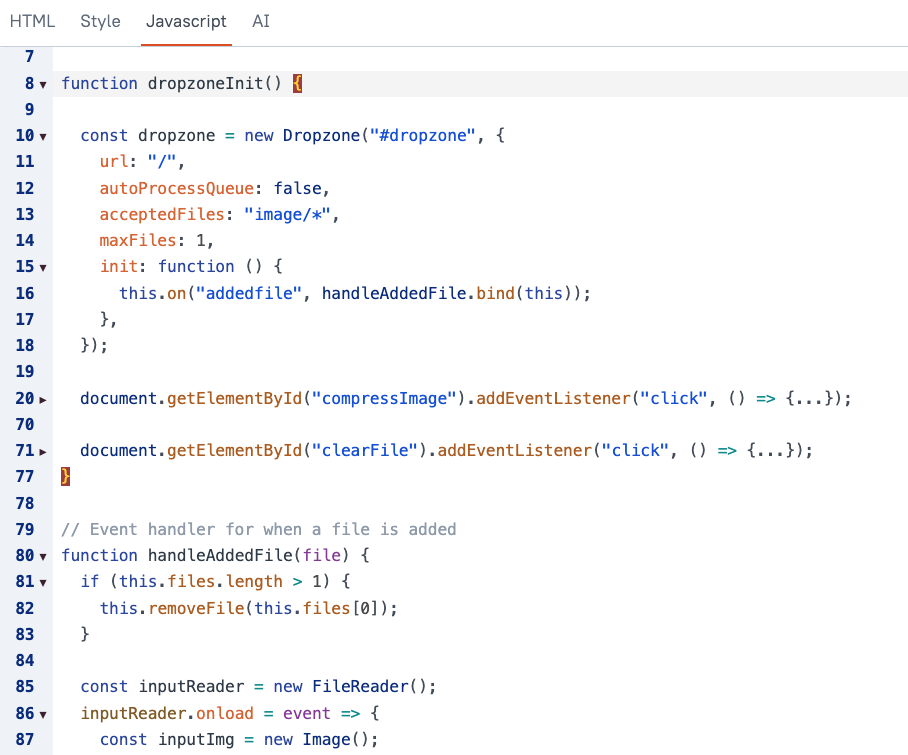
On line 15, the init property contains a function to run when Dropzone is initialize. In that function, I am binding a new handleAddedFile() function to the the 'addedfile' event of this (or the Dropzone instance).
Line 20 and 71 are functions for the Compress Image, and Clear File buttons. We'll get to those in a bit.
Next we have the handleAddedFile() function itself. This will now get called when a file is added. But remember, we don't want to do anything automatically for the user when a file is uploaded. They have to enter the scale and compression values first, and then click compress. So what does this function do?
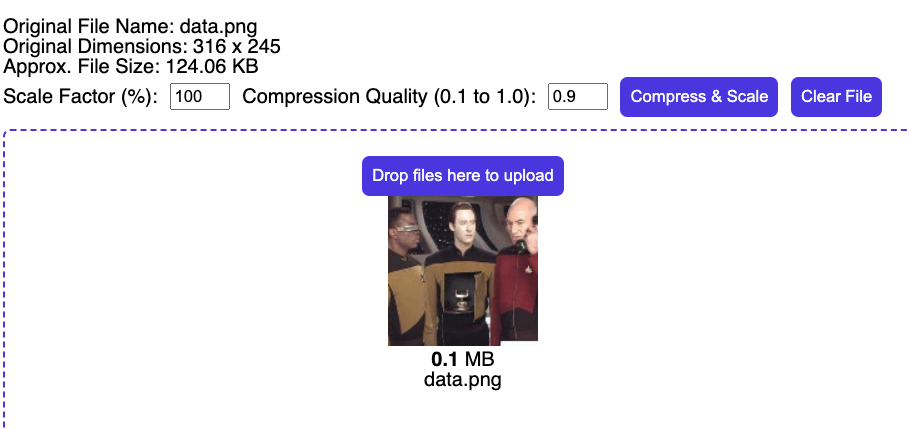
I added divs to display the before and after file size and image dimensions. This way the user can have a better idea of what compression and scale factor to choose. When an image is added, I want to display the input image file size and dimensions, which means creating a FileReader to get the data from the user's device, then creating a new Image to get the dimensions.
// Event handler for when a file is added
function handleAddedFile(file) {
	if (this.files.length > 1) {
		this.removeFile(this.files[0]);
	}

	const inputReader = new FileReader();
	inputReader.onload = event => {
		const inputImg = new Image();
		inputImg.src = event.target.result;
		inputImg.onload = () => {
			const inputWidth = inputImg.width;
			const inputHeight = inputImg.height;
			const inputFileSizeKB = (file.size / 1024).toFixed(2);

			const inputStatsDiv = document.getElementById("inputStats");
			inputStatsDiv.innerHTML = `
				<div>Original File Name: ${file.name}</div>
				<div>Original Dimensions: ${inputWidth} x ${inputHeight}</div>
				<div>Approx. File Size: ${inputFileSizeKB} KB</div>
			`;
		};
	};
	inputReader.readAsDataURL(file);
}
This shows the input image stats after a file is uploaded.
Next, we'll look at the compress image function.
	document.getElementById("compressImage").addEventListener("click", () => {
		const file = dropzone.files[0];
		if (!file) {
			alert("Please upload an image first.");
			return;
		}

		const scale = parseFloat(document.getElementById("scaleFactor").value) / 100;
		if (isNaN(scale) || scale <= 0 || scale > 1) {
			alert("Please enter a valid scale factor (10% to 100%).");
			return;
		}

		const quality = parseFloat(document.getElementById("compressionQuality").value);
		if (isNaN(quality) || quality <= 0 || quality > 1) {
			alert("Please enter a valid compression quality (0.1 to 1.0).");
			return;
		}

		const reader = new FileReader();
		reader.onload = (event) => {
			const img = new Image();
			img.src = event.target.result;

			img.onload = () => {
				const canvas = document.createElement("canvas");
				const ctx = canvas.getContext("2d");
				const scaledWidth = Math.round(img.width * scale);
				const scaledHeight = Math.round(img.height * scale);

				canvas.width = scaledWidth;
				canvas.height = scaledHeight;
				ctx.drawImage(img, 0, 0, scaledWidth, scaledHeight);

				const compressedDataUrl = canvas.toDataURL("image/jpeg", quality);
				appsmith.updateModel({ compressedImg: compressedDataUrl });

				const byteString = atob(compressedDataUrl.split(',')[1]);
				const fileSize = byteString.length;
				const fileSizeKB = (fileSize / 1024).toFixed(2);

				const resultsDiv = document.getElementById("results");
				resultsDiv.innerHTML = `
					<div>New Dimensions: ${scaledWidth} x ${scaledHeight}</div>
					<div>Approx. File Size: ${fileSizeKB} KB</div>
				`;
			};
		};
		reader.readAsDataURL(file);
	});
This function loads the image from the Dropzone instance into a new Image element, then adds it to the canvas using the scale factor from the user input. At this point, the image is scaled, but not compressed. Then, the second parameter of `canvas.toDataURL("image/jpeg", quality)` is used to set the compression quality when converting the image to a dataUrl. This value is then saved to the custom widget model, allowing access from outside the custom widget.
Here's the full JavaScript file, with the added function for clearing the image.
import Dropzone from 'https://cdn.jsdelivr.net/npm/dropzone@6.0.0-beta.2/+esm'

appsmith.onReady(() => {
	console.log("ready");
	dropzoneInit();
});

function dropzoneInit() {

	const dropzone = new Dropzone("#dropzone", {
		url: "/",
		autoProcessQueue: false,
		acceptedFiles: "image/*",
		maxFiles: 1,
		init: function () {
			this.on("addedfile", handleAddedFile.bind(this));
		},
	});

	document.getElementById("compressImage").addEventListener("click", () => {
		const file = dropzone.files[0];
		if (!file) {
			alert("Please upload an image first.");
			return;
		}

		const scale = parseFloat(document.getElementById("scaleFactor").value) / 100;
		if (isNaN(scale) || scale <= 0 || scale > 1) {
			alert("Please enter a valid scale factor (10% to 100%).");
			return;
		}

		const quality = parseFloat(document.getElementById("compressionQuality").value);
		if (isNaN(quality) || quality <= 0 || quality > 1) {
			alert("Please enter a valid compression quality (0.1 to 1.0).");
			return;
		}

		const reader = new FileReader();
		reader.onload = (event) => {
			const img = new Image();
			img.src = event.target.result;

			img.onload = () => {
				const canvas = document.createElement("canvas");
				const ctx = canvas.getContext("2d");
				const scaledWidth = Math.round(img.width * scale);
				const scaledHeight = Math.round(img.height * scale);

				canvas.width = scaledWidth;
				canvas.height = scaledHeight;
				ctx.drawImage(img, 0, 0, scaledWidth, scaledHeight);

				const compressedDataUrl = canvas.toDataURL("image/jpeg", quality);
				appsmith.updateModel({ compressedImg: compressedDataUrl });

				const byteString = atob(compressedDataUrl.split(',')[1]);
				const fileSize = byteString.length;
				const fileSizeKB = (fileSize / 1024).toFixed(2);

				const resultsDiv = document.getElementById("results");
				resultsDiv.innerHTML = `
					<div>New Dimensions: ${scaledWidth} x ${scaledHeight}</div>
					<div>Approx. File Size: ${fileSizeKB} KB</div>
				`;
			};
		};
		reader.readAsDataURL(file);
	});

	document.getElementById("clearFile").addEventListener("click", () => {
		dropzone.removeAllFiles();
		appsmith.updateModel({ compressedImg: "" });
		document.getElementById("results").innerHTML = "";
		document.getElementById("inputStats").innerHTML = "";
	});
}

// Event handler for when a file is added
function handleAddedFile(file) {
	if (this.files.length > 1) {
		this.removeFile(this.files[0]);
	}

	const inputReader = new FileReader();
	inputReader.onload = event => {
		const inputImg = new Image();
		inputImg.src = event.target.result;
		inputImg.onload = () => {
			const inputWidth = inputImg.width;
			const inputHeight = inputImg.height;
			const inputFileSizeKB = (file.size / 1024).toFixed(2);

			const inputStatsDiv = document.getElementById("inputStats");
			inputStatsDiv.innerHTML = `
				<div>Original File Name: ${file.name}</div>
				<div>Original Dimensions: ${inputWidth} x ${inputHeight}</div>
				<div>Approx. File Size: ${inputFileSizeKB} KB</div>
			`;
		};
	};
	inputReader.readAsDataURL(file);
}
Displaying the compressed image
Lastly, we need a way to view the new compressed version of the image, outside of the custom widget. The image widget has settings for auto-sizing the image, but it doesn't have a setting to display it unscaled. It always adjusts to the size of the widget. But an iframe widget can display the dataUrl directly, and won't apply any auto-resizing.
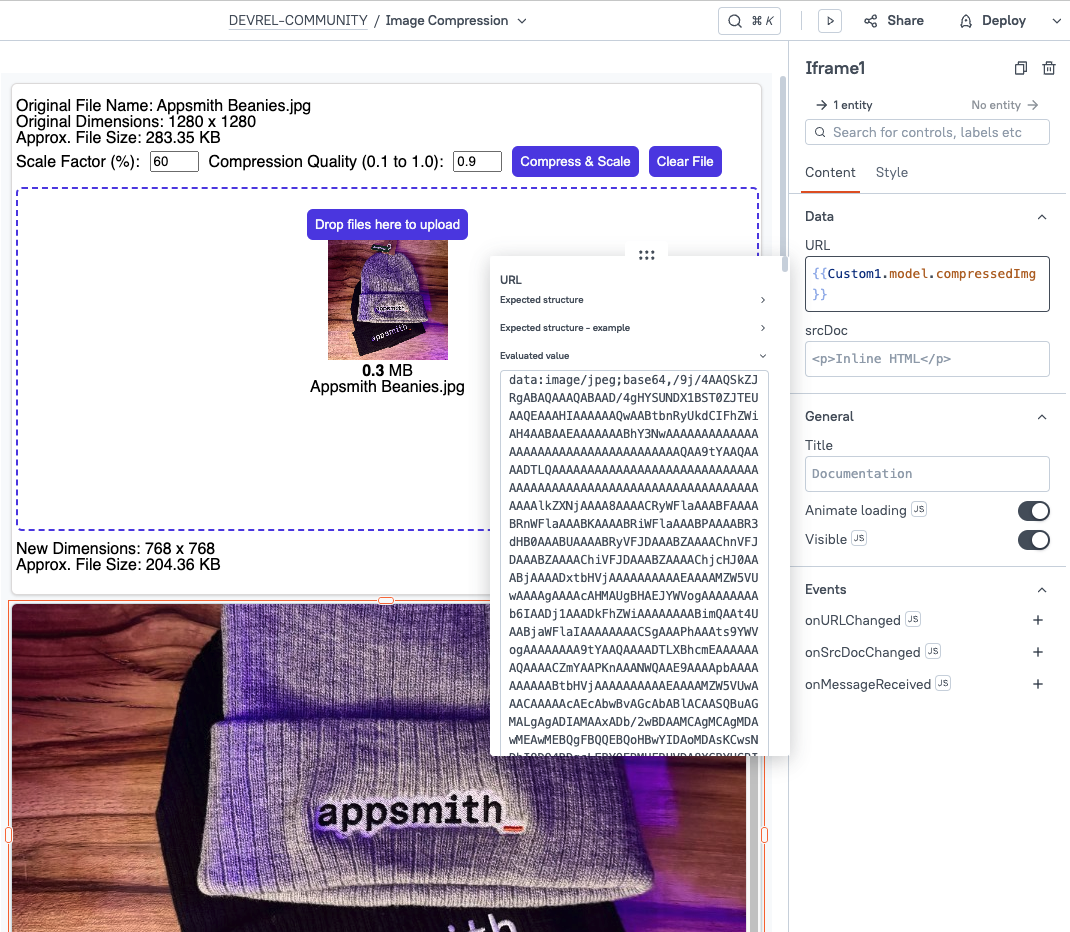
From here, you can send the image to any API or database as a base64 string, or you can use JavaScript to convert it into binary data before sending.
Conclusion
The custom widget comes through, once again. If you can't find the right widget for your use case, chances are you just need a custom widget with the right JS library. Got an idea for a new one? Drop a comment below and I'll see what I can do!
