Self-Hosted Knowledge Graph with Neo4J and Appsmith
Goal
Deploy Appsmith and Neo4j locally with Docker, create a knowledge graph, and display it in Appsmith
Prerequisites
Docker Desktop installed (Window, Mac, or Linux)
Overview
This tutorial will cover how to build your own knowledge graph running locally with Neo4j and Appsmith in Docker. Once deployed, you can use any of Appsmith's datasources and integrations to automate creating knowledge graphs from any API or database.
Deploy Neo4j in Docker
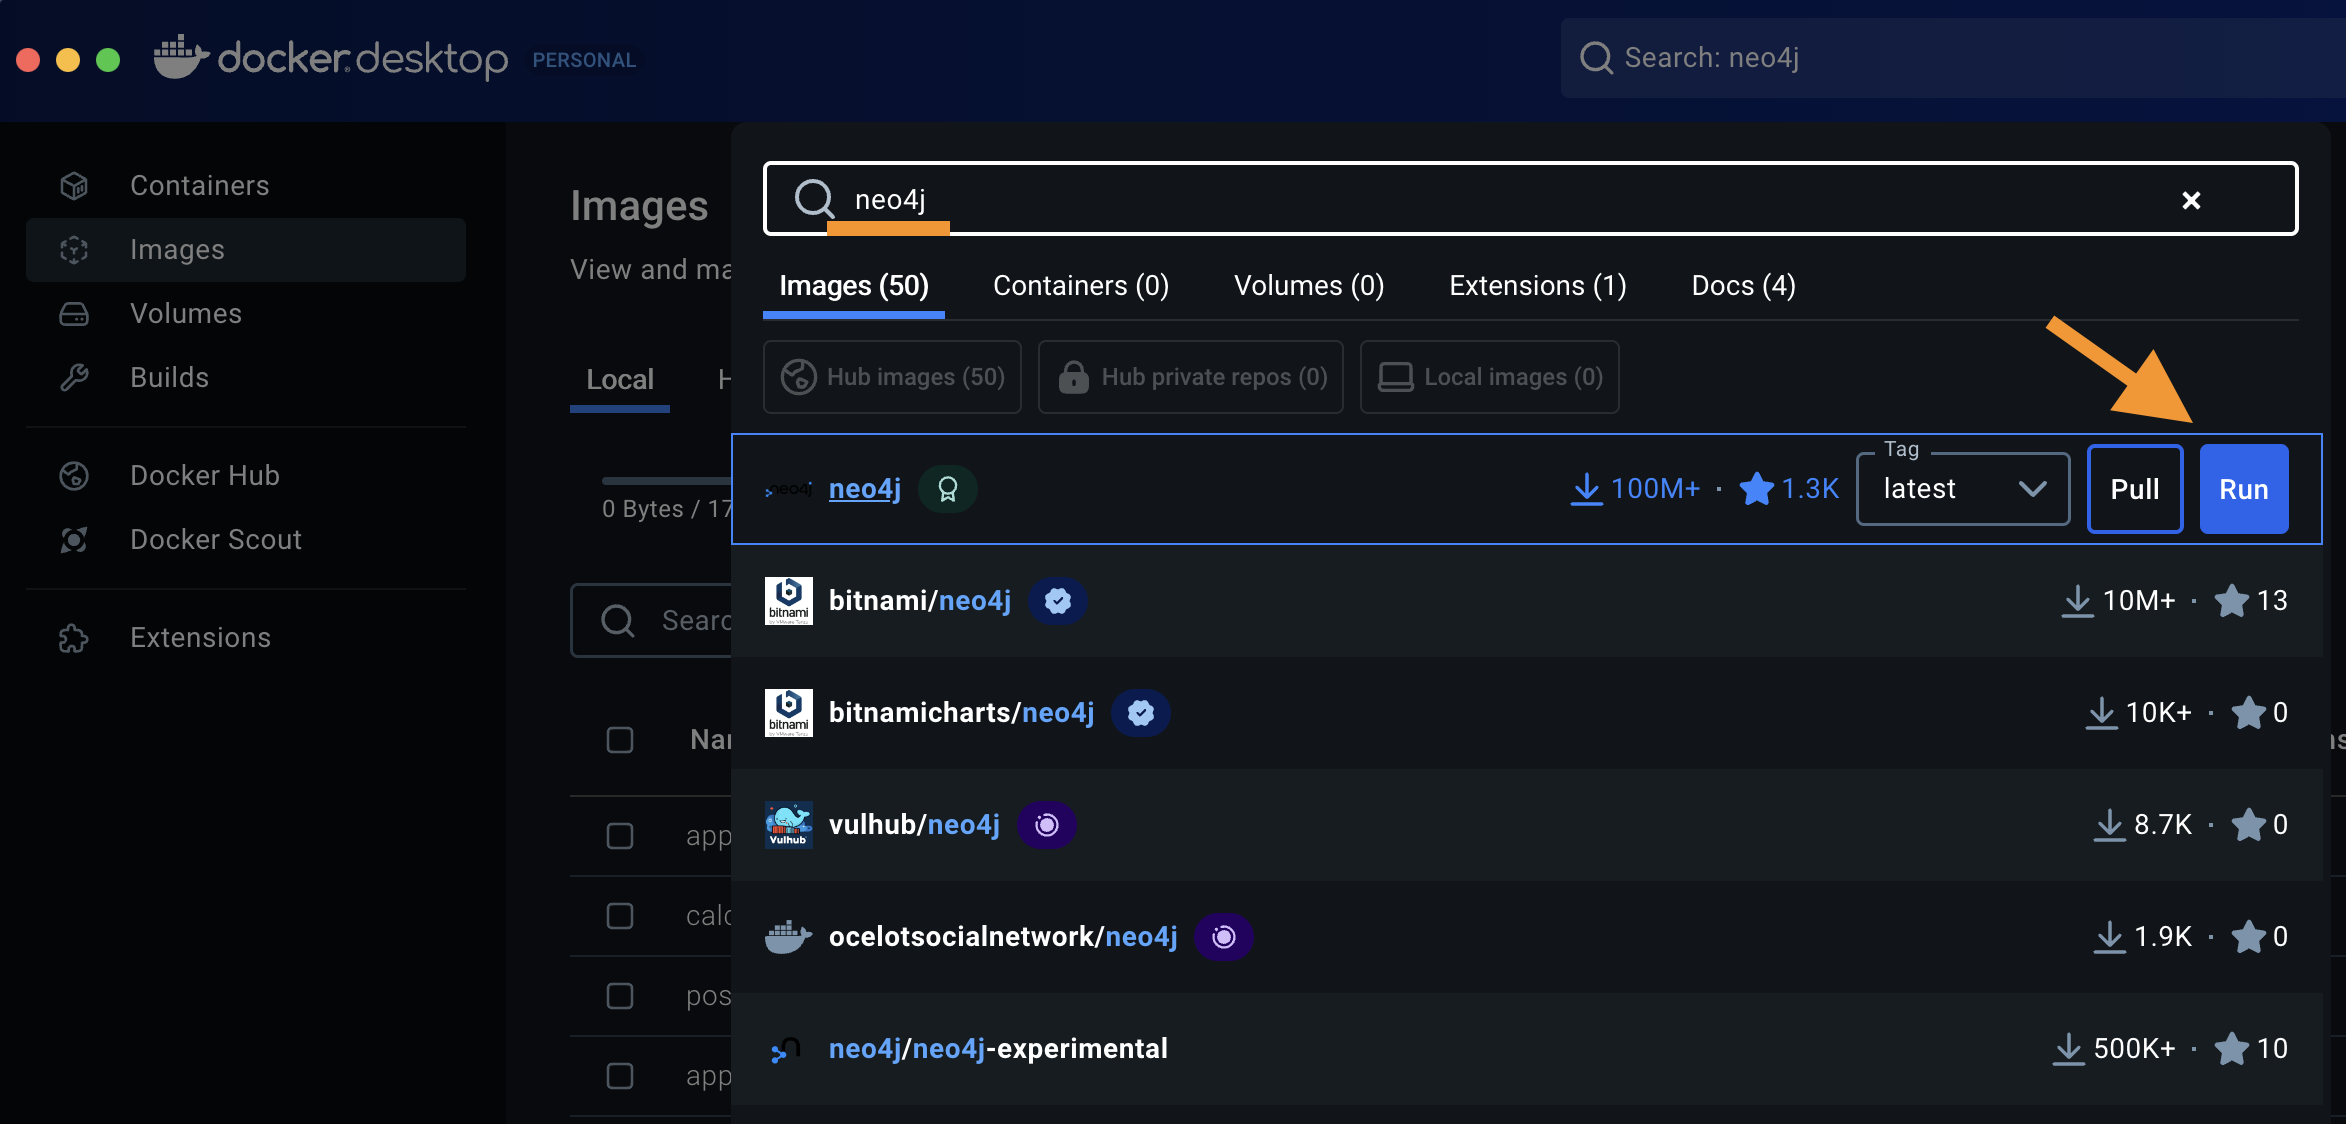
Open Docker Desktop, enter neo4j in the search bar, and click Run on the top result. After a few minutes, you should have Neo4j downloaded and ready to run on port 7474.
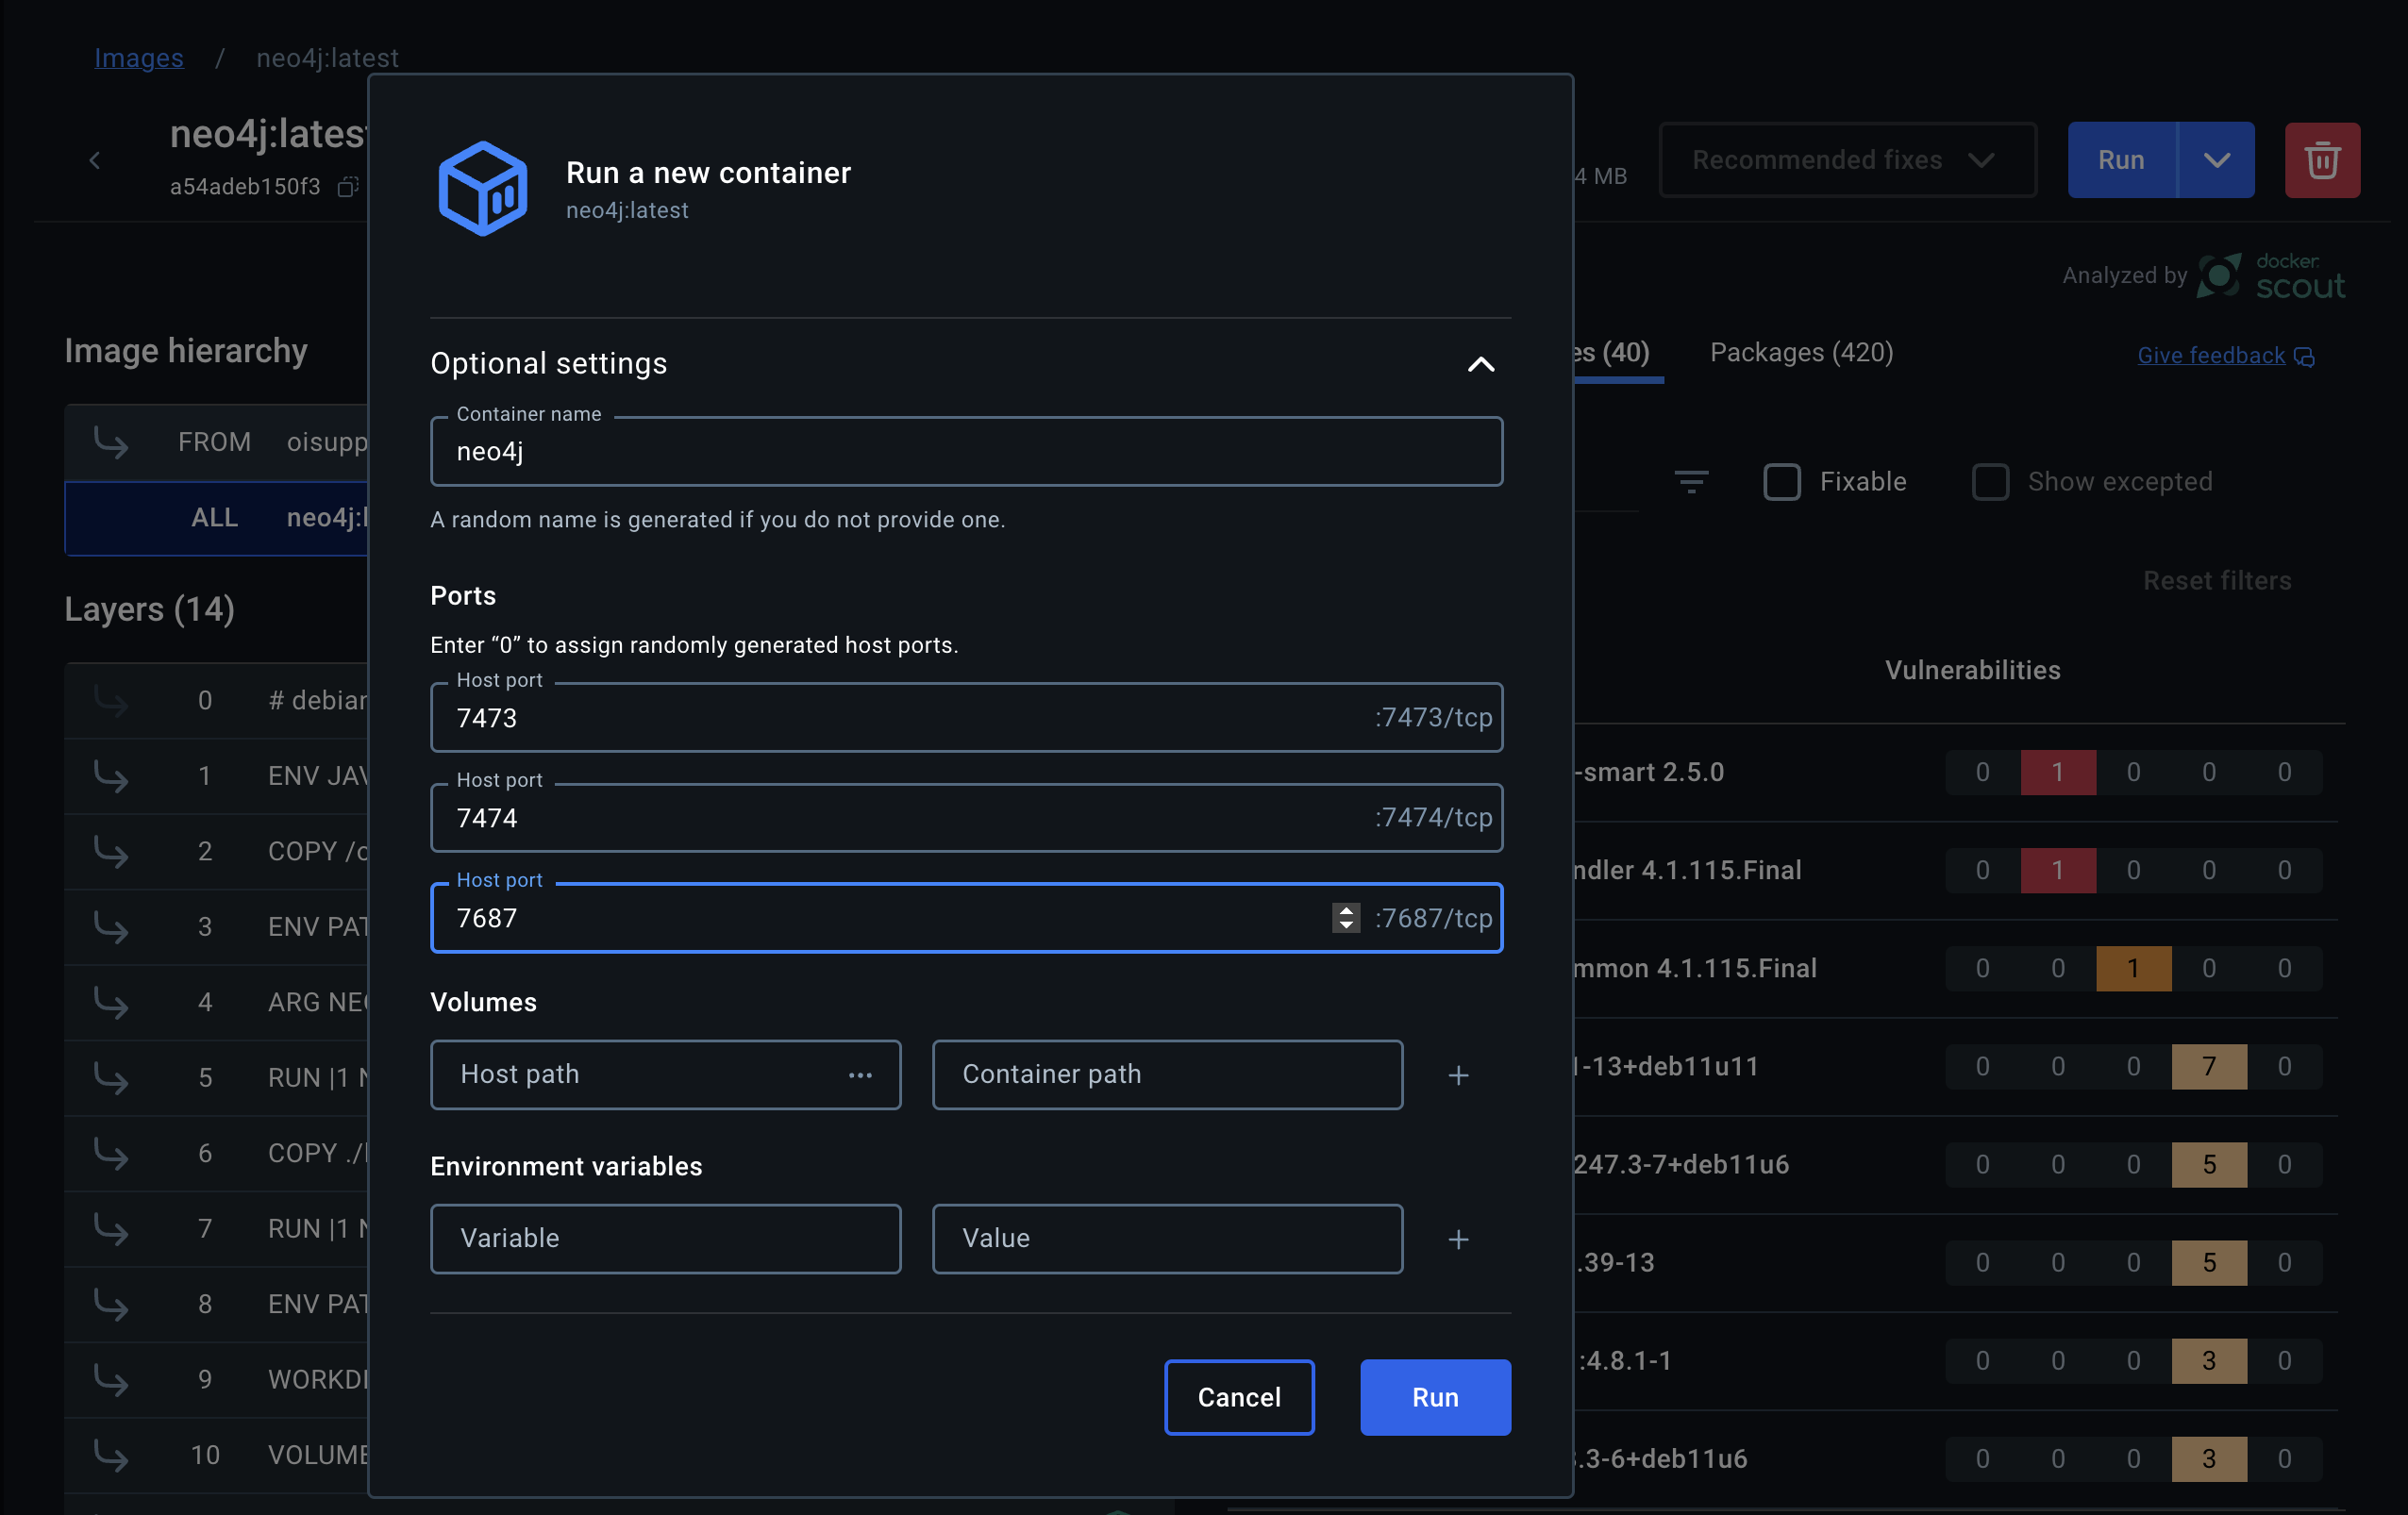
Once the download finishes, expand the Optional settings if you want to modify the default ports, or just click Run to use the defaults.
Note: Ensure the port values are not blank. Occasionally the defaults get cleared and you have to type in the default port shown in grey on the right.
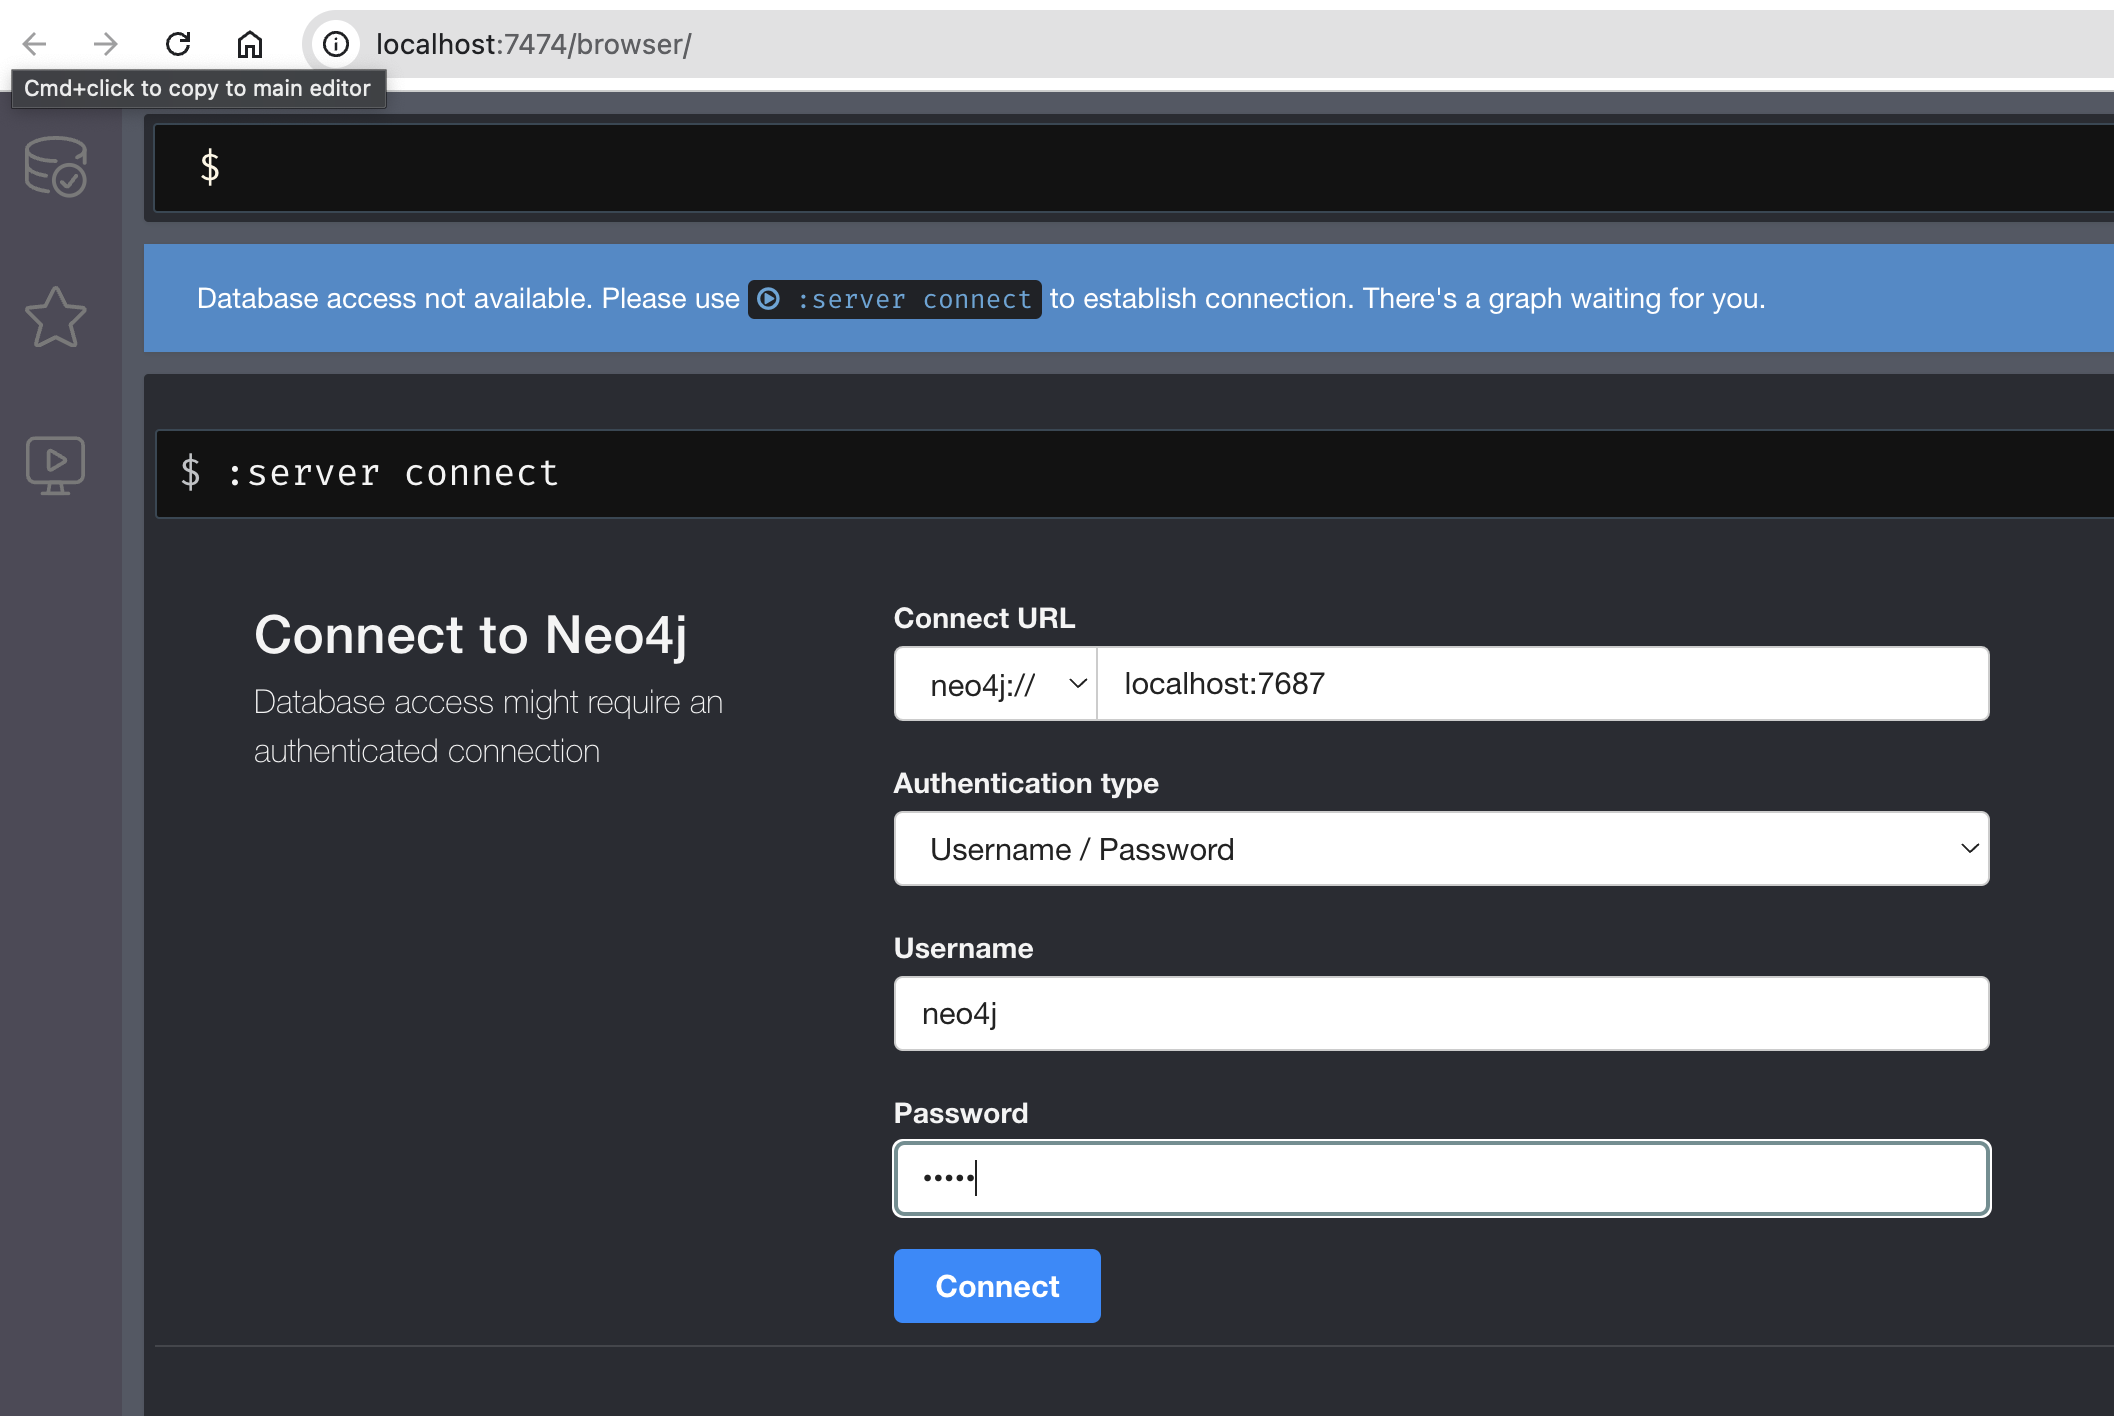
Click the link in the logs, or go to http://localhost:7474/browser/ to begin setting up a new knowledge graph.
Enter neo4j for the user name and password, and click connect. You'll be prompted to set a new password on first login.
After login, click the option to try the new Neo4j browser, or go to http://localhost:7474/browser/preview. You may be asked to login again. This will access the latest version of the database UI.
Then enter the following Cypher query and click the ► Run button in the top right.
// Create a Customer node
CREATE (c:Customer {id: 'C123', name: 'John Doe', email: 'johndoe@example.com'})

// Create a Feature node
CREATE (f:Feature {id: 'F001', name: 'New Dashboard'})

// Create a Video node
CREATE (v:Video {id: 'V001', url: 'https://example.com/video.mp4'})

// Create a Ticket node and relate it to the Customer and Feature
CREATE (t:Ticket {id: 'T1001', description: 'Ticket about New Dashboard feature'})
CREATE (c)-[:CREATED]->(t)
CREATE (t)-[:CONCERNS]->(f)

// Create relationship between Ticket and Video
CREATE (t)-[:HAS_VIDEO]->(v)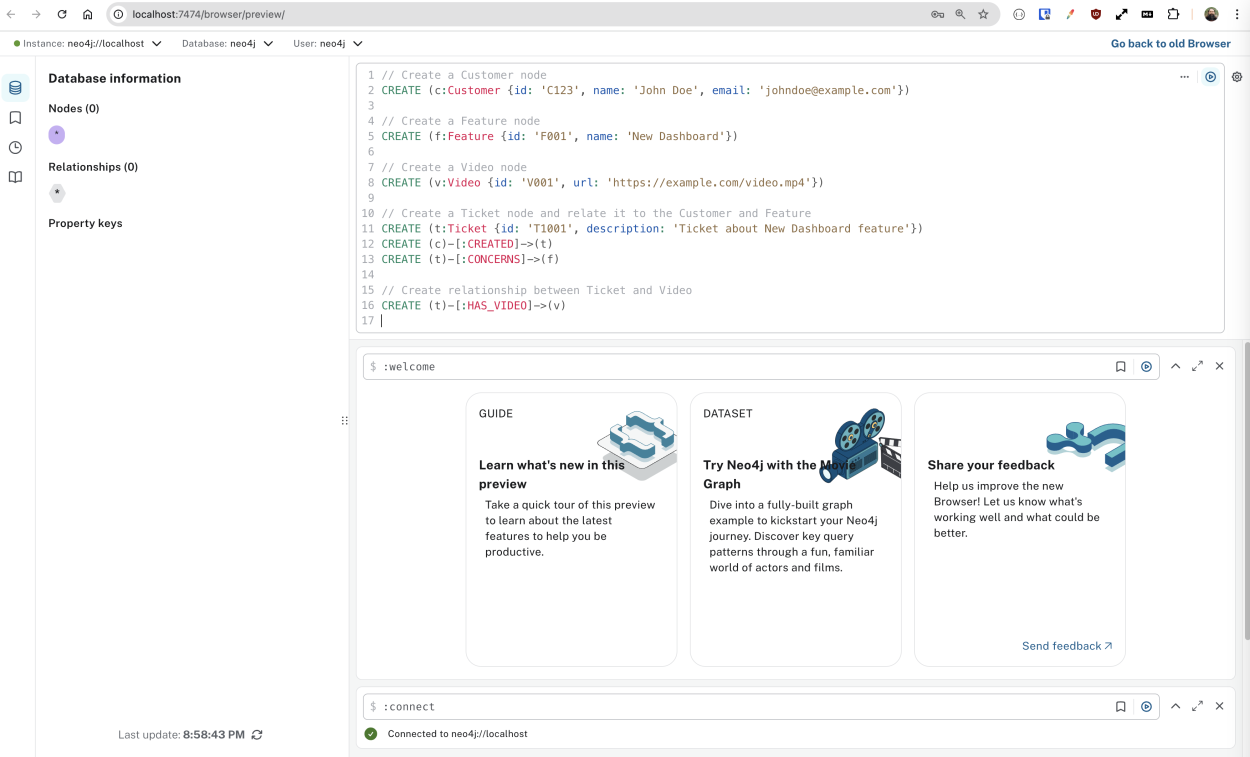
The cypher query defines the new records and their relationships.
Cypher Queries
Cypher is Neo4j’s graph query language, designed to work intuitively with graph structures by using a declarative syntax similar to SQL but optimized for traversing relationships.
Cypher allows you to create, read, update, and delete nodes, relationships, and properties in a Neo4j database efficiently. It employs pattern matching using parenthesis to represent nodes (n) and arrows and square brackets for relationships -[r]->.
Next, click the * button under relationships to view the new graph.
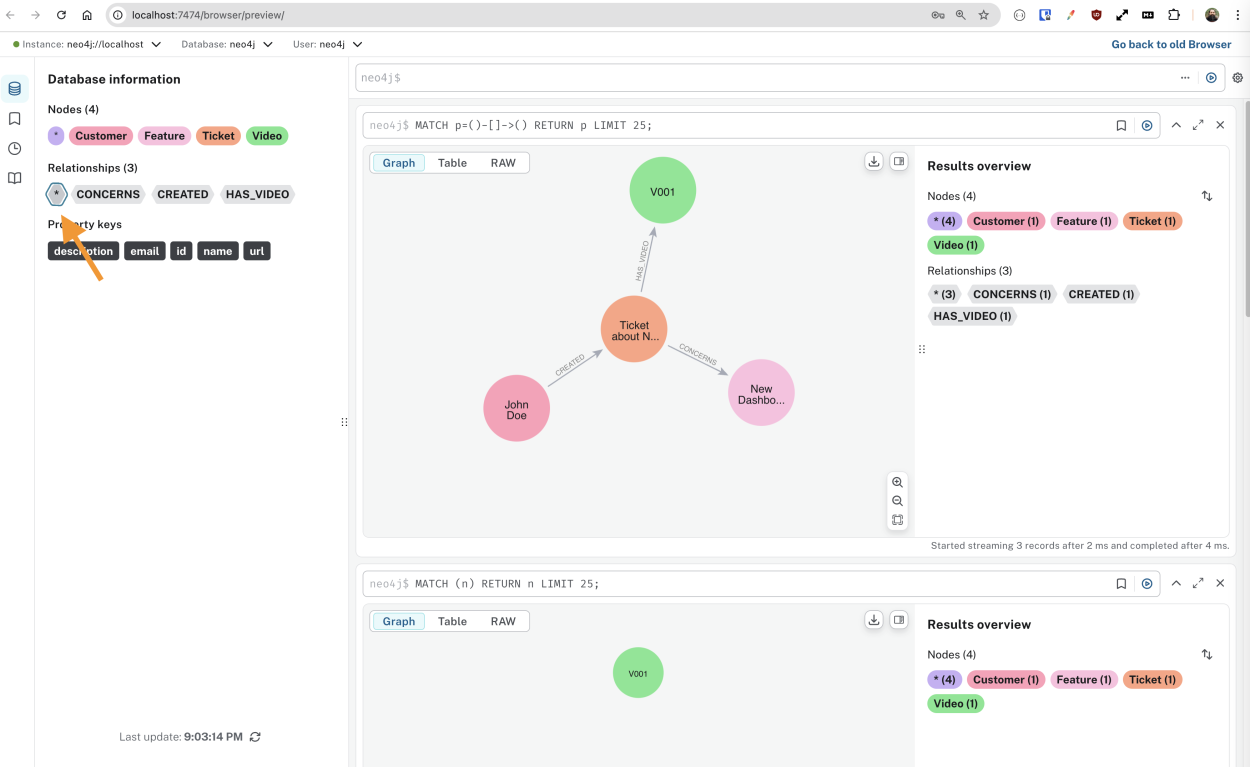
Congratulations! You just built a knowledge graph!
You can write these cypher queries manually based on your data, or use an LLM to parse unstructured data and create cypher queries automatically.
Deploy Appsmith In Docker
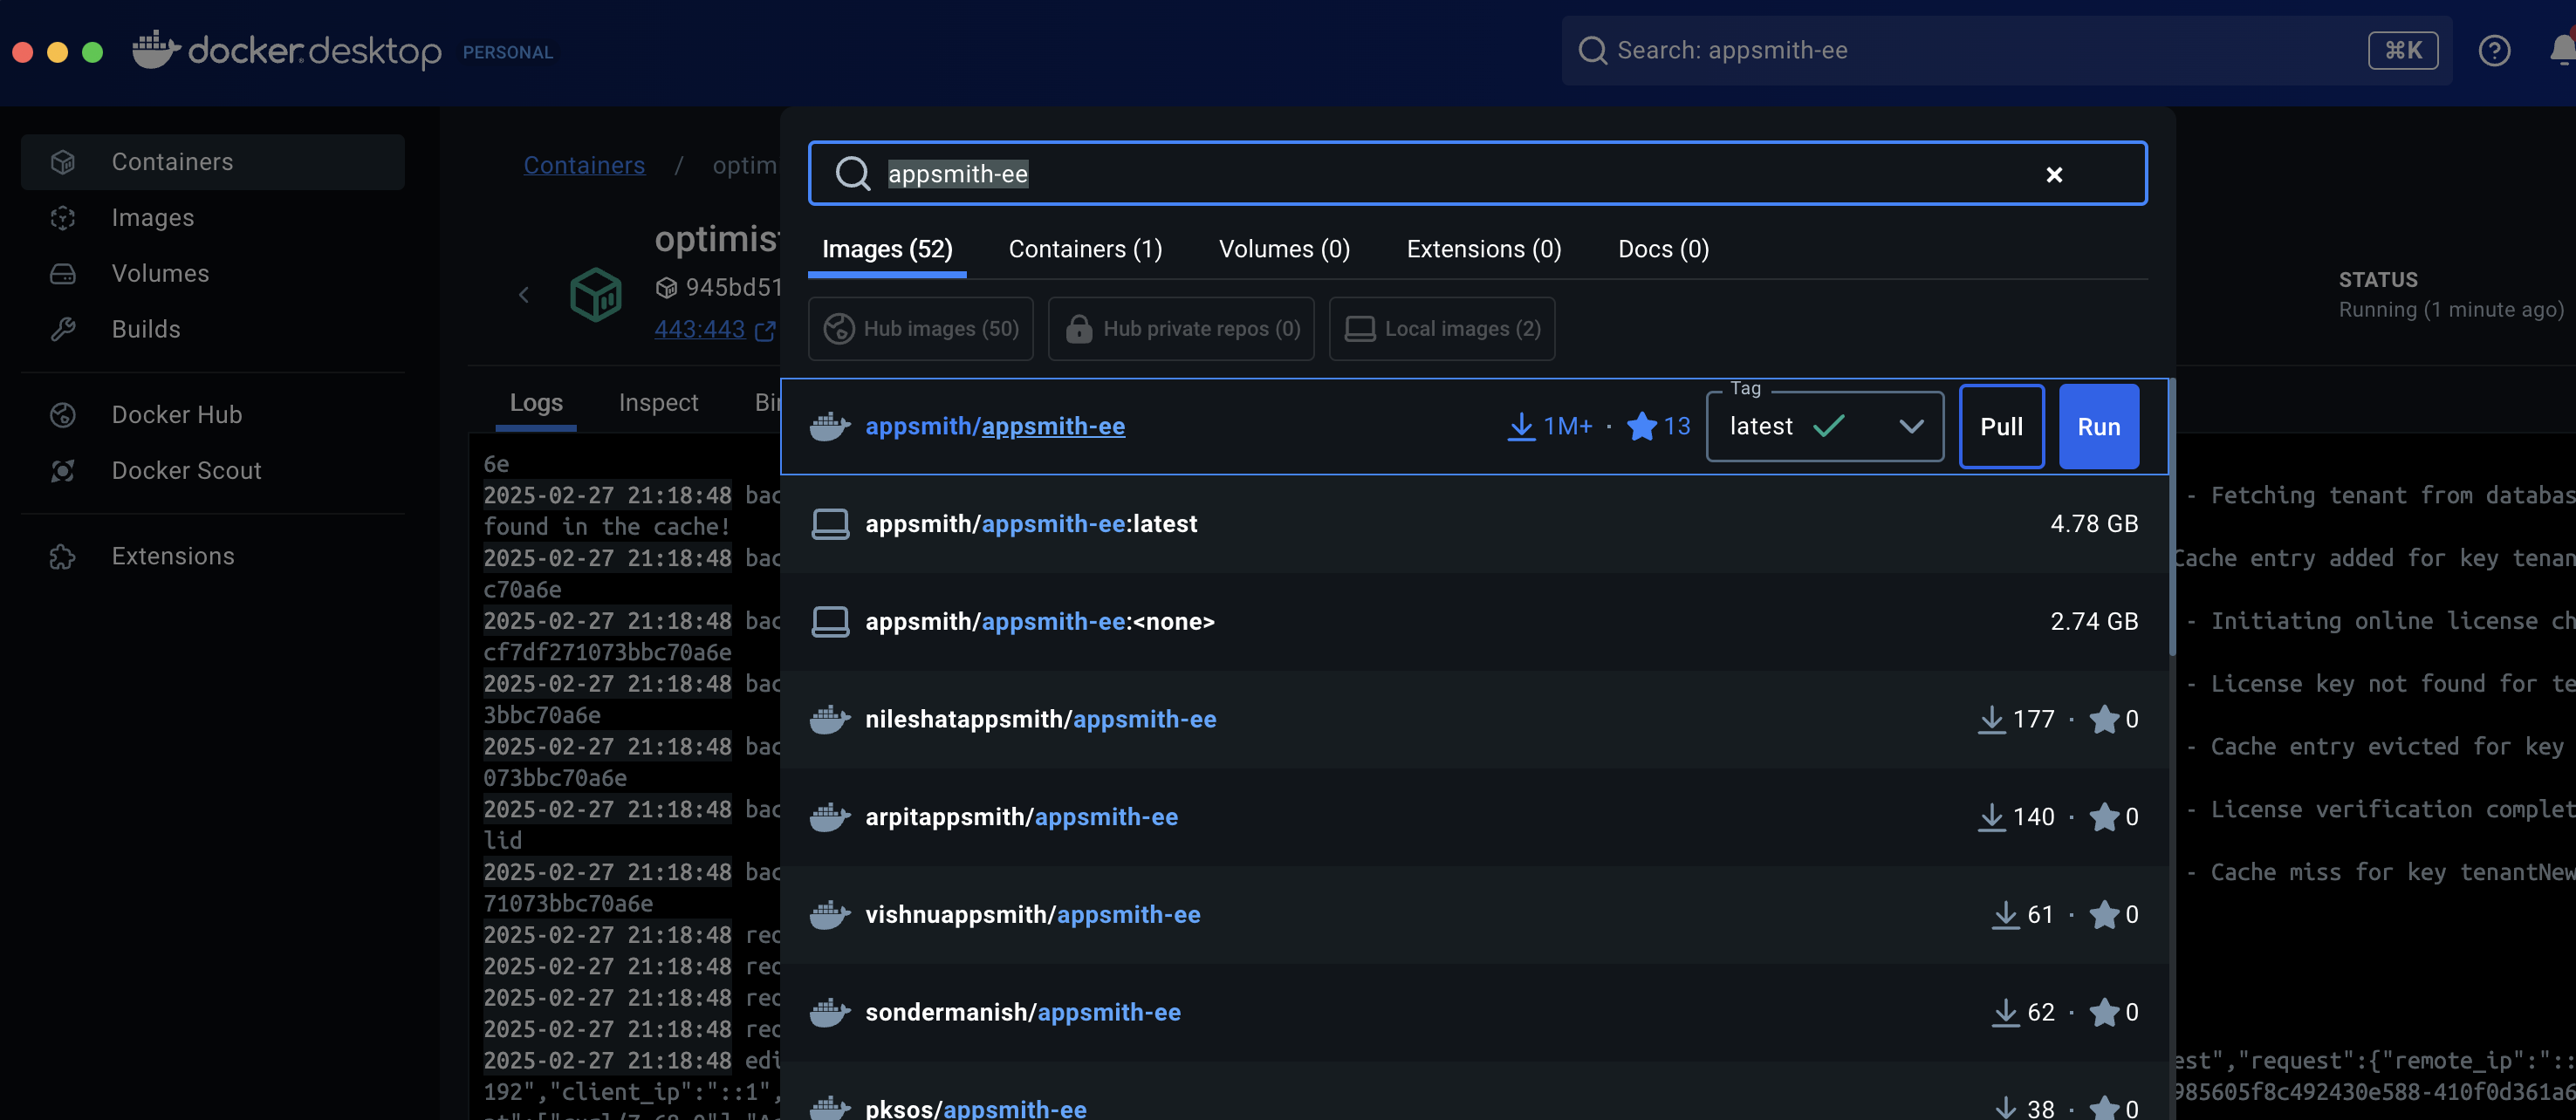
Next, search appsmith-ee in Docker, and click run on the latest release.
Once the download finishes and the container is running, set up a new account by opening localhost in the browser.
Note: This is a fresh install of your own Appsmith server, so you have to create a new account even if you already have an appsmith.com account.
On the next screen, choose Authenticated API to set up a new secure API Datasource.
Configure the datasource as follows:
Name Neo4j URL http://host.docker.internal:7474 Authorization Type Basic User Name neo4j Password YOUR_NEW_PASSWORD 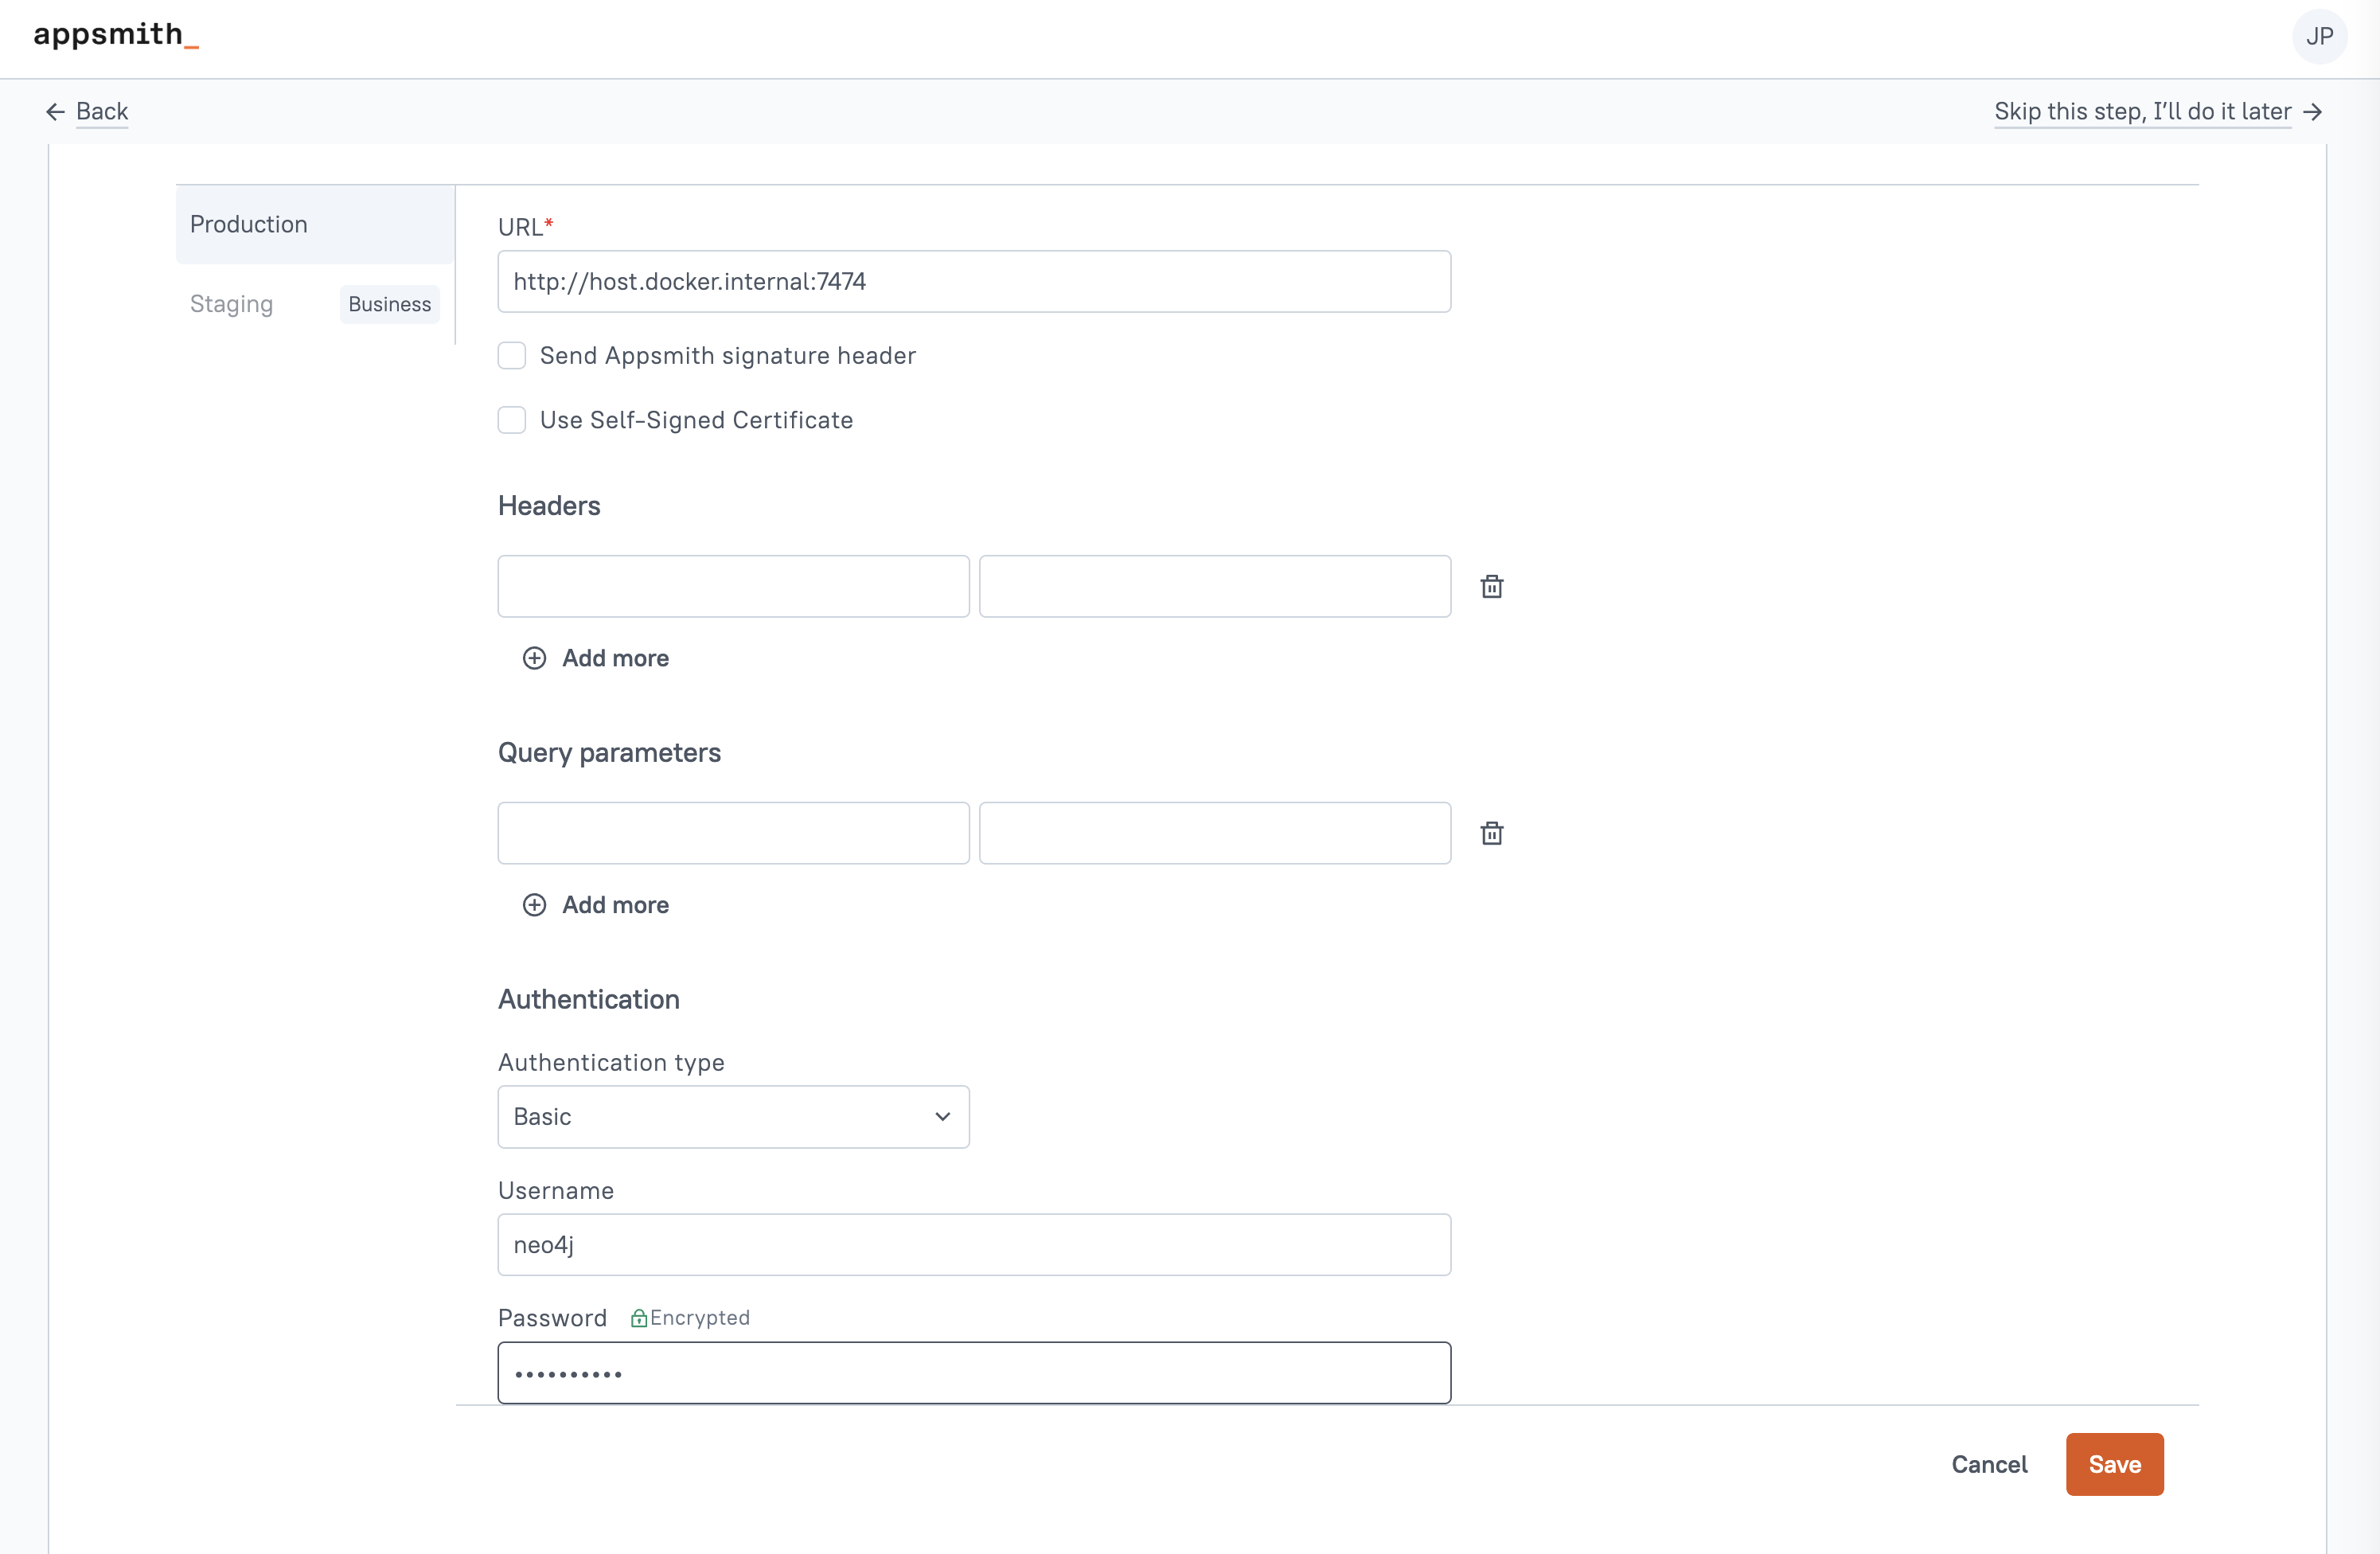
Note: When connecting from one Docker container to another, use
host.docker.internalinstead of local host.Then click SAVE on the datasource, and add a new API.
Set up the new API as follows:
Name GetGraph Method POST URL /db/neo4j/tx/commit Body Type JSON Body {{ { "statements": [ { "statement": `MATCH (n)-[r]-(m) RETURN n, r, type(r) AS relType, m `} ] } }}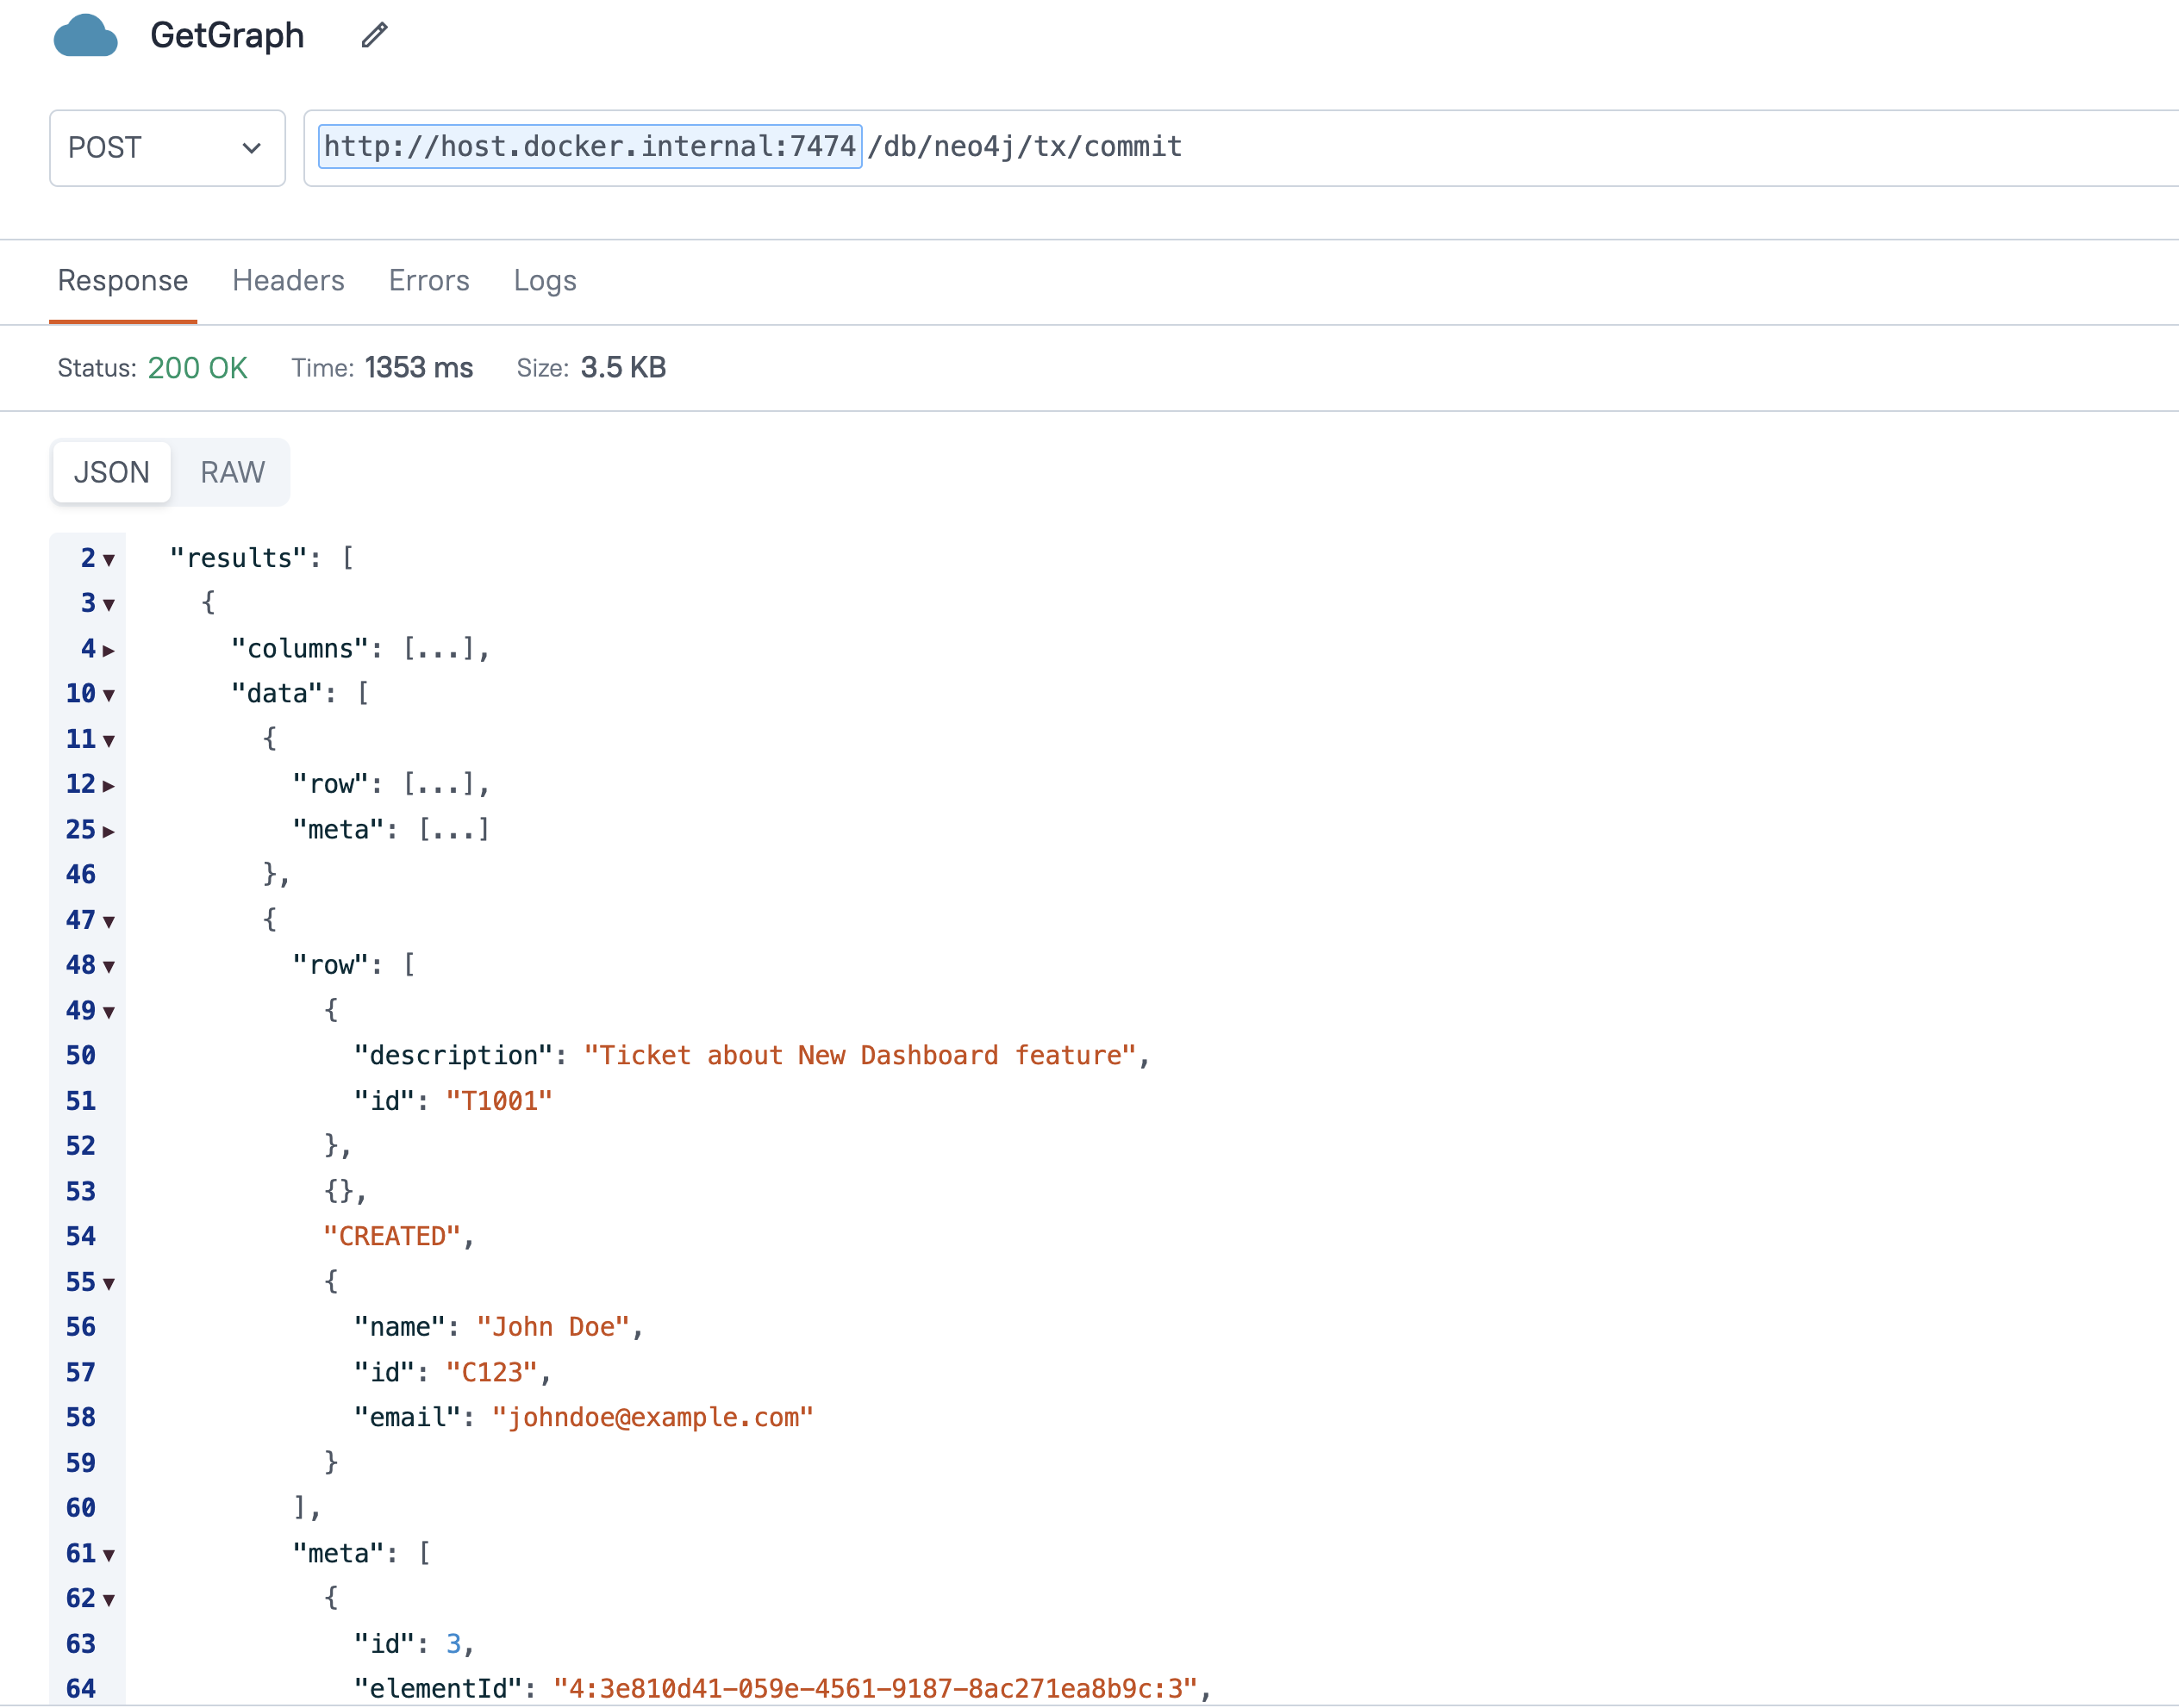
This should return an object with a results array containing rows of nodes and edges, and metadata. Next, we'll display it in a custom widget.
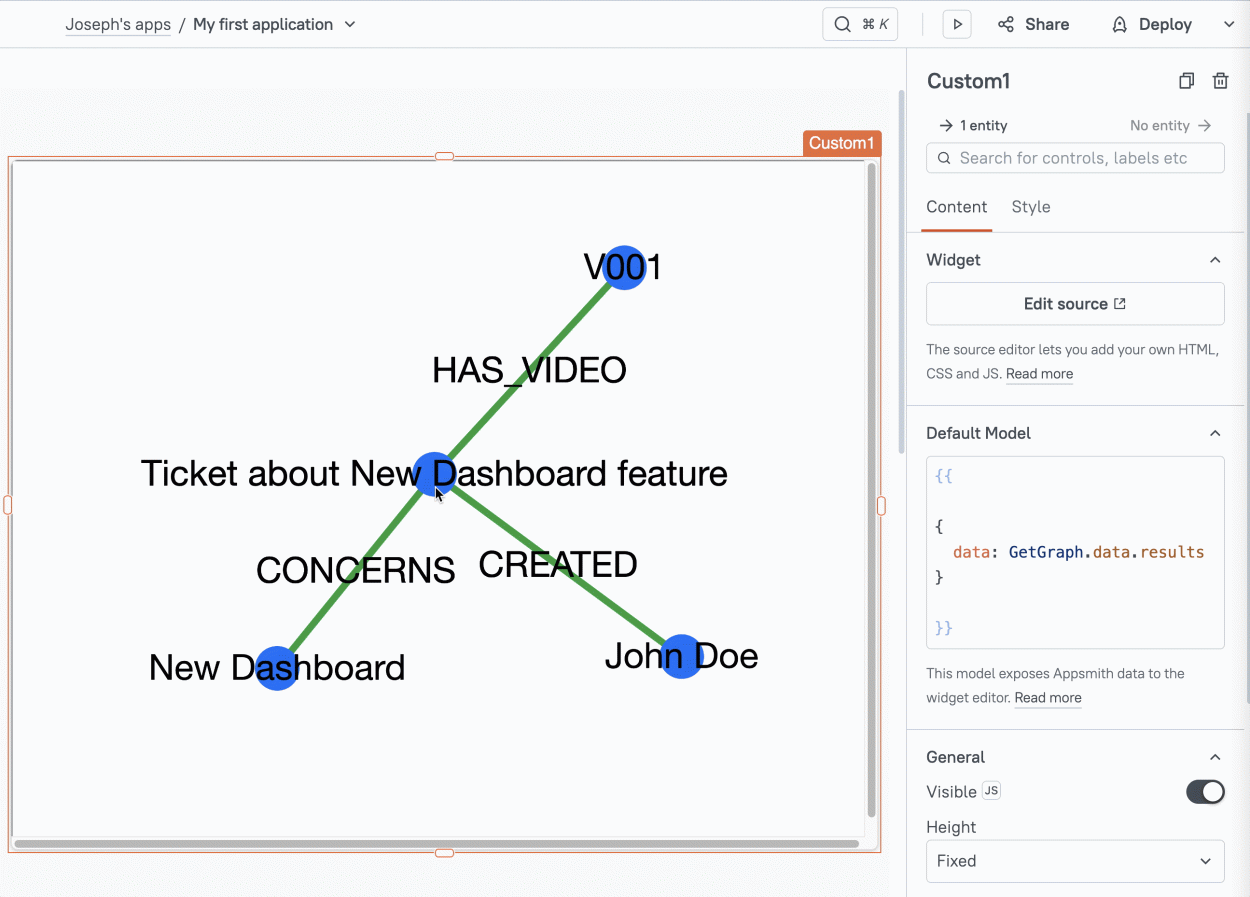
Knowledge Graph Custom Widget
Now go to the UI tab and drag in a custom widget. Update the Default Model to pass in the data from the GetGraph query by entering:
{{

{
	data: GetGraph.data.results
}

}}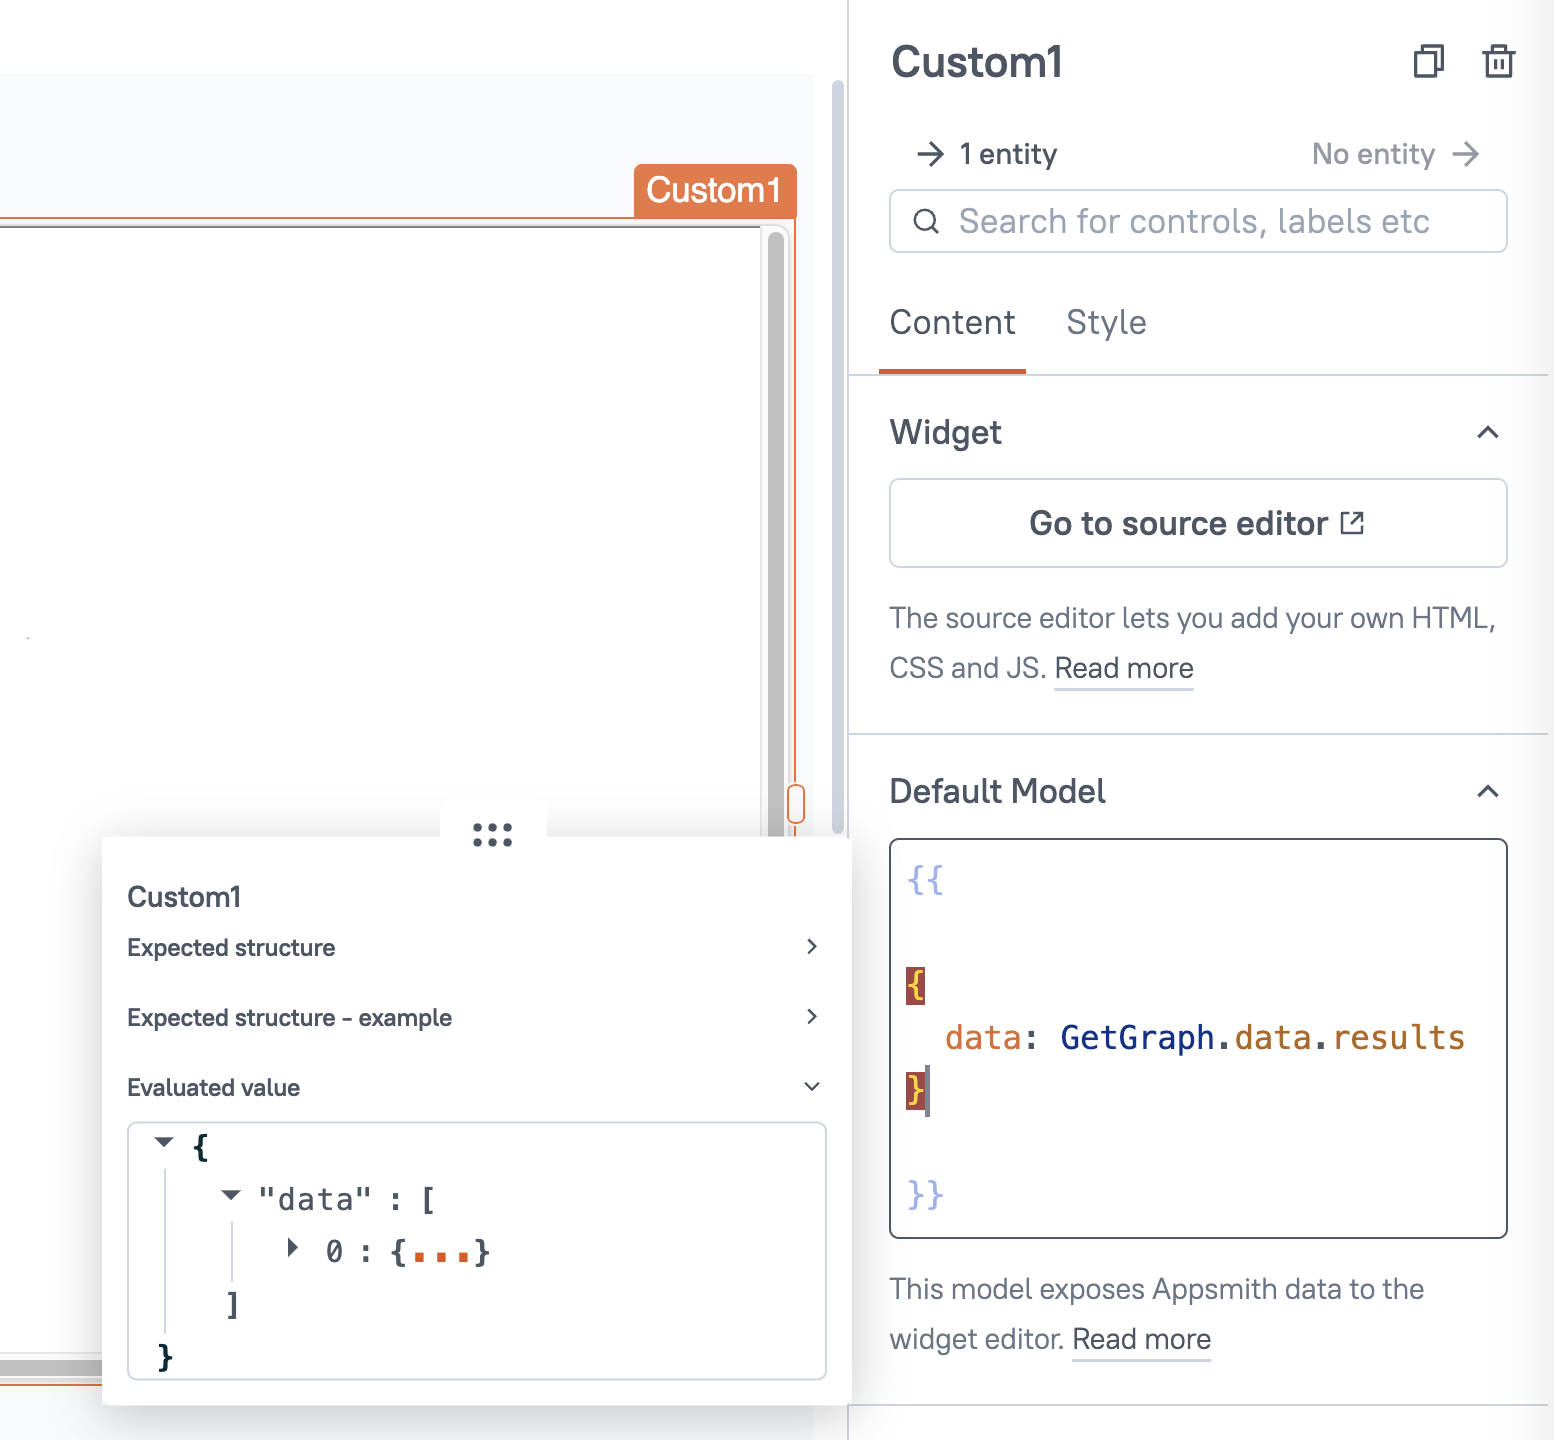
Then click Edit Source to open the custom widget editor.
Next, paste in the code for each tab (HTML, Style, JS):
HTML
<!DOCTYPE html>
<html>
  <head>
    <link rel="stylesheet" href="https://cdnjs.cloudflare.com/ajax/libs/cytoscape/3.20.1/cytoscape.min.css" />
  </head>
  <body>
    <div id="app" style="width: 100%; height: 100vh;"></div>
    <script src="https://unpkg.com/vue@3.0.0/dist/vue.global.js"></script>
    <script src="https://cdnjs.cloudflare.com/ajax/libs/cytoscape/3.20.1/cytoscape.min.js"></script>
  </body>
</html>
Style
#app {
  width: 100%;
  height: 100vh;
}

.network {
  border: 1px solid gray;
  width: 100%;
  height: 100%;
}
JavaScript
const { createApp, ref, onMounted } = Vue;

appsmith.onReady(()=>{

	const App = {
  setup() {
    const containerRef = ref(null);

    const transformData = (rawData) => {
      const elements = [];
      const nodesSet = new Set();

      rawData.forEach(({ row, meta }) => {
        const [source, , relType, target] = row;
        const [sourceMeta, , , targetMeta] = meta;

        if (!sourceMeta.deleted && !nodesSet.has(sourceMeta.id)) {
          nodesSet.add(sourceMeta.id);
          elements.push({ data: { id: sourceMeta.id, label: source.name || source.description || source.id, type: sourceMeta.type } });
        }

        if (!targetMeta.deleted && !nodesSet.has(targetMeta.id)) {
          nodesSet.add(targetMeta.id);
          elements.push({ data: { id: targetMeta.id, label: target.name || target.description || target.id, type: targetMeta.type } });
        }

        if (!sourceMeta.deleted && !targetMeta.deleted) {
          elements.push({ data: { source: sourceMeta.id, target: targetMeta.id, label: relType, type: 'edge' } });
        }
      });

      return elements;
    };

    onMounted(() => {
      const data = appsmith.model.data ? appsmith.model.data[0].data : [];
      const elements = transformData(data);

      cytoscape({
        container: containerRef.value,
        elements,
        style: [
          {
            selector: 'node[type="node"]',
            style: {
              'label': 'data(label)',
              'background-color': '#007bff',
              'text-valign': 'center',
              'text-halign': 'center',
              'width': '20px',
              'height': '20px',
            }
          },
          {
            selector: 'edge[type="edge"]',
            style: {
              'label': 'data(label)',
              'width': 3,
              'line-color': '#28a745',
              'target-arrow-color': '#28a745',
              'target-arrow-shape': 'triangle'
            }
          }
        ],
        layout: {
          name: 'cose',
          rows: 1
        }
      });
    });

    return { containerRef };
  },
  template: '<div ref="containerRef" class="network"></div>'
};

createApp(App).mount('#app');


})
This uses the Cytoscape JavaScript library to display the knowledge Graph data from Neo4j.
From here you can build a knowledge Graph based on your own data, then interact with it from Appsmith, and integrate with other APIs and Databases.
Conclusion
Knowledge Graphs are a powerful tool for exploring your data, and they can be more effective for RAG (retrieval-augmented generation) that traditional databases. Neo4j's makes it easy to self-host your own knowledge graph locally, or in the same VPC as your Appsmith server. This enables you to integrate with any API or database from Appsmith and programmatically create graphs, or query the graph for RAG to improve LLM responses.