

How to Integrate Websockets with Appsmith
Goal
Build an App on Appsmith using native Javascript to connect to Websockets for real-time data.
Sample App Link: https://community.appsmith.com/template/live-cryptocurrency-app
Prerequisites
- An Appsmith Account
- A new or existing App - Which you want to integrate with websockets
- A Websocket endpoint - It can be any endpoint, whether public or your own. You can even re-use the one shared in this tutorial.
Overview
Discover how to enable seamless communication for real-time data in apps such as Stocks and Cryptocurrency with Websockets. This tutorial provides a step-by-step guide on initialising and establishing Websocket connections for your projects.
Connect to Websockets using JSObject
Create a new Page in your Application. On left sidebar, click the + icon next to
Queries/JSand then selectJSObjectsand then enter the code snippet below. You can rename the JSObject to something meaningful asWebsocketUtilsfor future references.export default { socketResponse: null, /* This variable holds the WebSocket endpoint URL */ WEBSOCKET_ENDPOINT: "wss://stream-internal.wazirx.com/stream", /* This property will hold the WebSocket object once it is instantiated */ socket: undefined, /* This function will be executed when the WebSocket connection is successfully established */ socketOnOpen: (data) => { console.log('onopen', data); }, /* This function will be executed when a message is received through the WebSocket connection */ socketOnMessage: (message) => { let response = JSON.parse(message?.data); console.log("socketOnMessage", response); this.socketResponse = response?.data; }, /* This function will be executed when the WebSocket connection is closed */ socketOnClose: (data) => { console.log('onclose', data); }, /* This asynchronous function is intended to be called when the page loads. It initializes the WebSocket connection using the provided WEBSOCKET_ENDPOINT and sets up the event handlers for its onopen, onclose and onmessage */ onPageLoad: async() => { this.socket = new WebSocket(this.WEBSOCKET_ENDPOINT); this.socket.onopen = this.socketOnOpen; this.socket.onclose = this.socketOnClose; this.socket.onmessage = this.socketOnMessage; } }Now in the JSObject settings, enable
Run on Page Loadfor the function onPageLoad. What this function does is that it initialises the Websocket with the endpoint. And assigns the functions for the Websocket's onopen, onclose and onmessage event handlers.Subscribing to events in the Websockets connection
Once the websocket connection is established, the next step would be to subscribe to a particular event through the socket to let the backend know that we are tuning in for all updates related to that event. In this particular example we are planning to subscribe to the Ticker Data of the Cryptocurrency Websocket's endpoint.
We add another function in the same JSObject
WebsocketUtilsto send events in a String format. One of the accepted formats of data to be sent through the Websockets isString, hence we need to Stringify the javascript object we plan to send. Below is the snippet to be added.sendEvent: (eventType, streams) =>{ let tickerObj = { event: eventType, streams, id: Date.now() }; this.socket.send(JSON.stringify(tickerObj)); }Now the next step would be to subscribe to the Ticker data event. Note, messages can be sent/received in Websockets only after the connection to the endpoint is successfully established. Once successful, the
onopenfunction of the socket is triggered. So we plan to run the above sendEvent function inside theonSocketOpenfunction and subscribe. Let us update theonSocketOpenfunction as below.socketOnOpen: (data) => { console.log('onopen', data); this.sendEvent("subscribe", ["!ticker@arr"]); }Here "subscribe" is the event type, and "!ticker@arr" is the event name as per this Websocket Endpoint's backend configuration.
Receiving Data from the Websockets connection
Once the event has been subscribed to, we will start receiving messages whenever there is some change in data at the backend.
This is why Sockets is preferred over Polling for real time data as the client does not have to keep calling APIs to retrieve new Data without the need to check if it has changed or not.
Using the Network tab and filtering by
WS, we can see the Messages that are sent/received in real time via the Websocket connection established.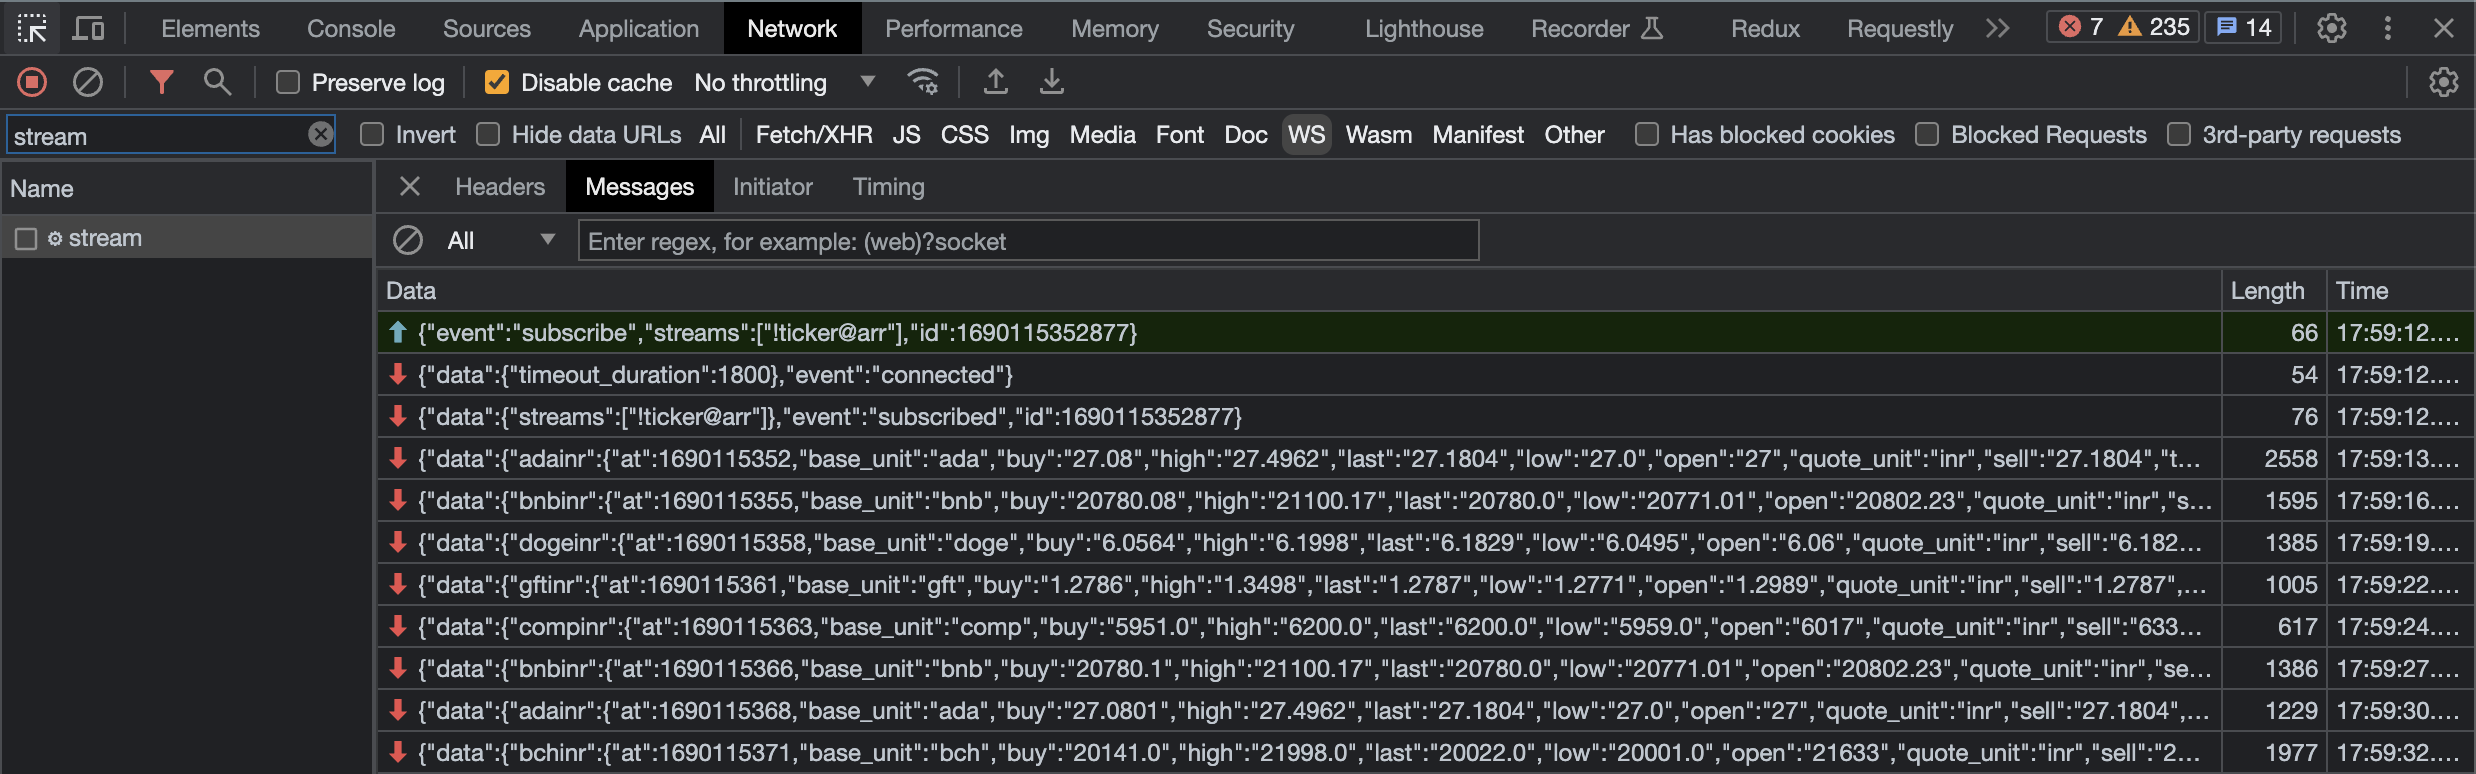
Now lets modify the socketOnMessage function to parse and store the received messages in a variable, so that we can use it to bind to the widgets on the App.
socketOnMessage: (message) => {
	let response = JSON.parse(message?.data);
	console.log("socketOnMessage", response);
	this.socketResponseData = response;
	return response;
}
Using the Platform's Debugger and filtering by
Logs -> Console Logs, we can see the consoled data (seen below) and verify that it has been parsed correctly by our JSObject function above.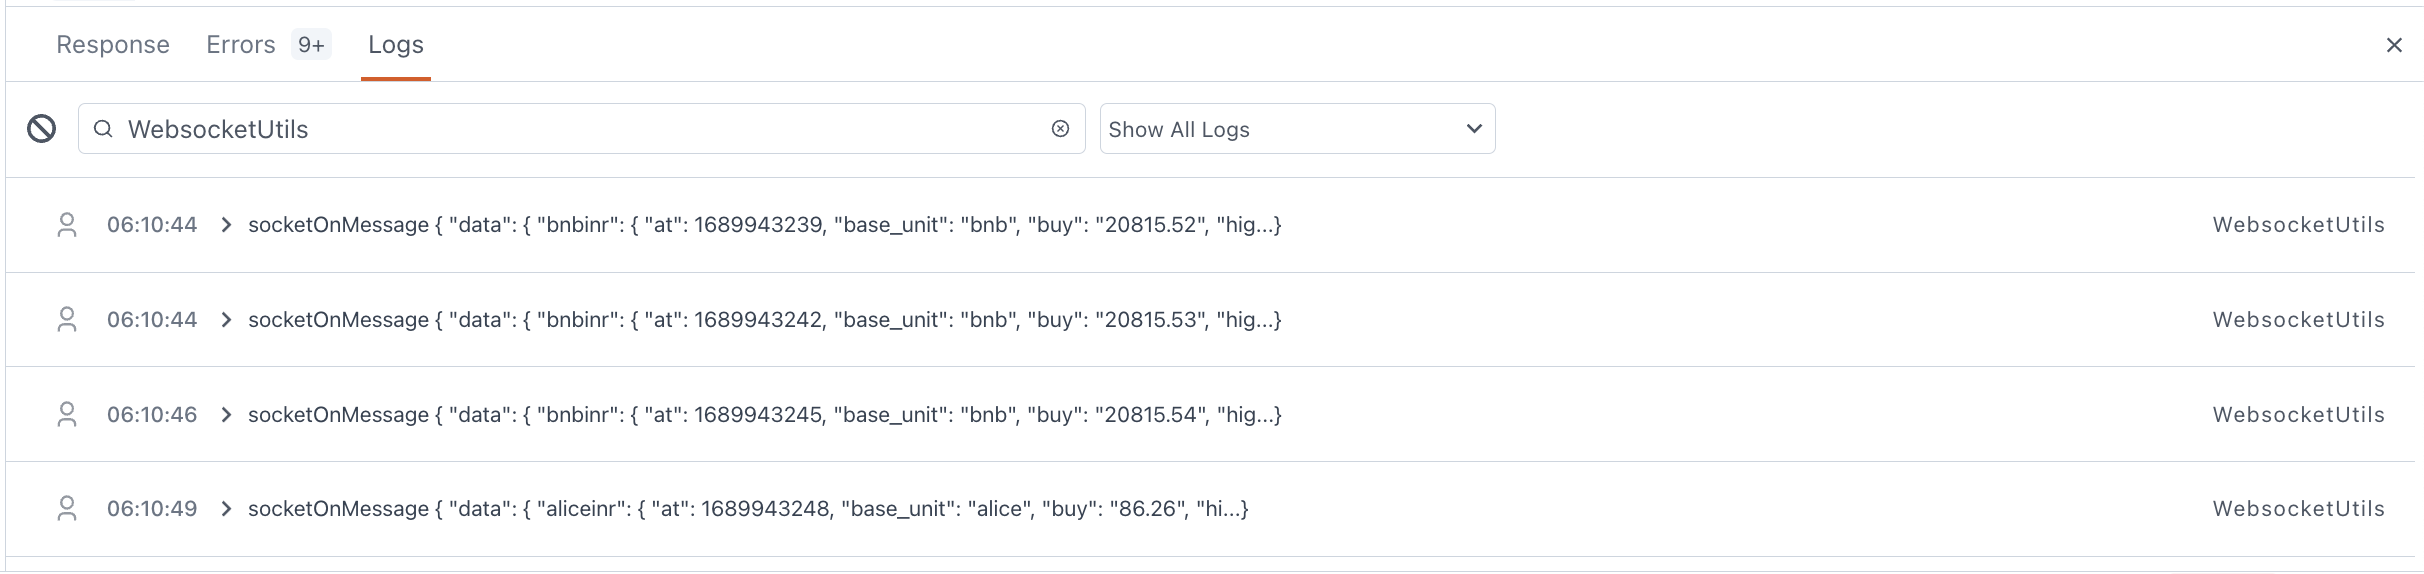
Bind the Websockets Data to the UI's widgets
Next step is to present this Data in a Visual format using something like a List widget. The List widget takes in an Array of Objects or values.
We need to ensure that whatever data that is stored in the socketResponseData variable is either in an Array format or we can use a Lodash function such as_.toArray()to convert the response to an Array.As seen in the below image, we have connected the Data attribute in the List widget properties to
_.toArray(WebsocketUtils.socketResponseData)
Next we need to add the other widgets like CurrencyInput, Text and Image widgets inside the List container and bind them to the values found inside the respective object from the data Array, referred by
currentItem. This needs to be done for the Cryptocurrency Logo, Name, Market and Price data as seen below.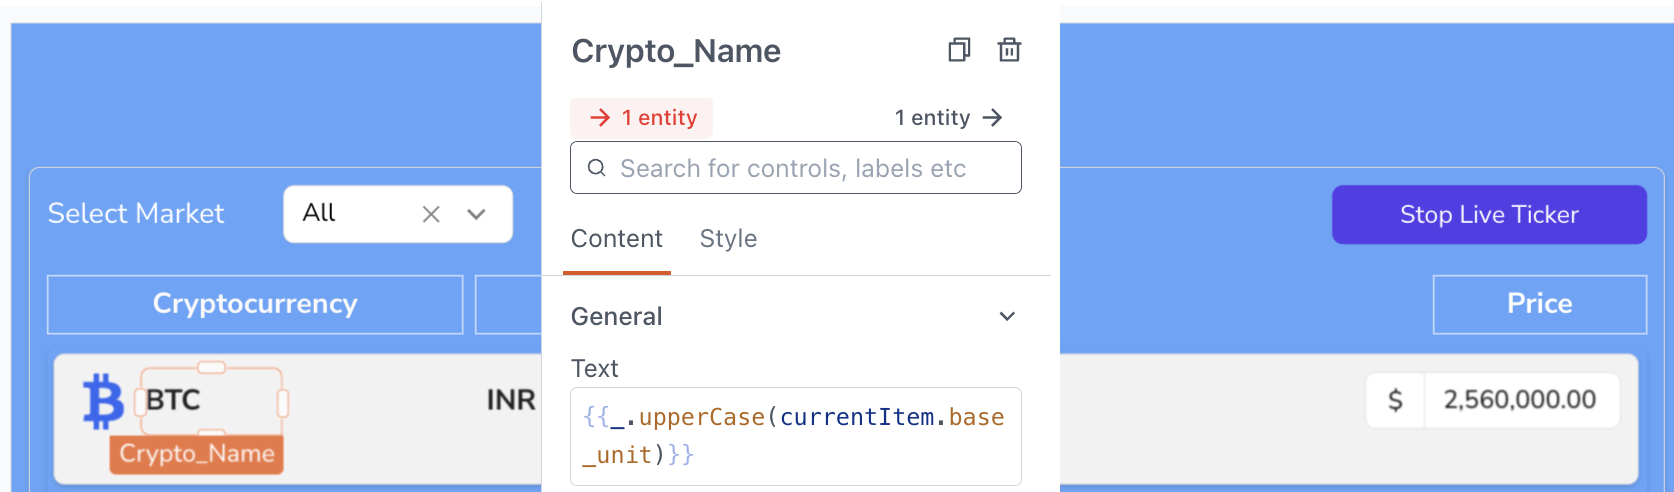
Additional Enhancements
Create a new JSObject called Utils to have the below code, which takes care of adding visual level enhancements and other functionalities.
export default {
	/* Variable that contains boolean value as to whether Ticker data has started/stopped */
	tickerStatus: true,
	/*
		Function to unsubscribe from Ticker Data if its already running, or to subscribe to start receiving Ticker Data.
		Also updates the tickerStatus value.
	*/
	toggleTickerData: () => {
		if (!!this.tickerStatus) {
			WebsocketUtils.sendEvent("unsubscribe", ["!ticker@arr"]);
			WebsocketUtils.socketResponseData = {};
		}
		else WebsocketUtils.sendEvent("subscribe", ["!ticker@arr"]);
		this.tickerStatus = !this.tickerStatus
	},
	/* Function to return whether the crypto currency price has increased or decreased */
	getHighLow: (item) => item.last - item.open < 0 ? "low" : "high"
}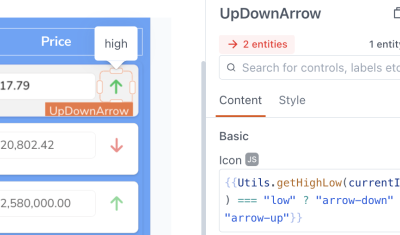
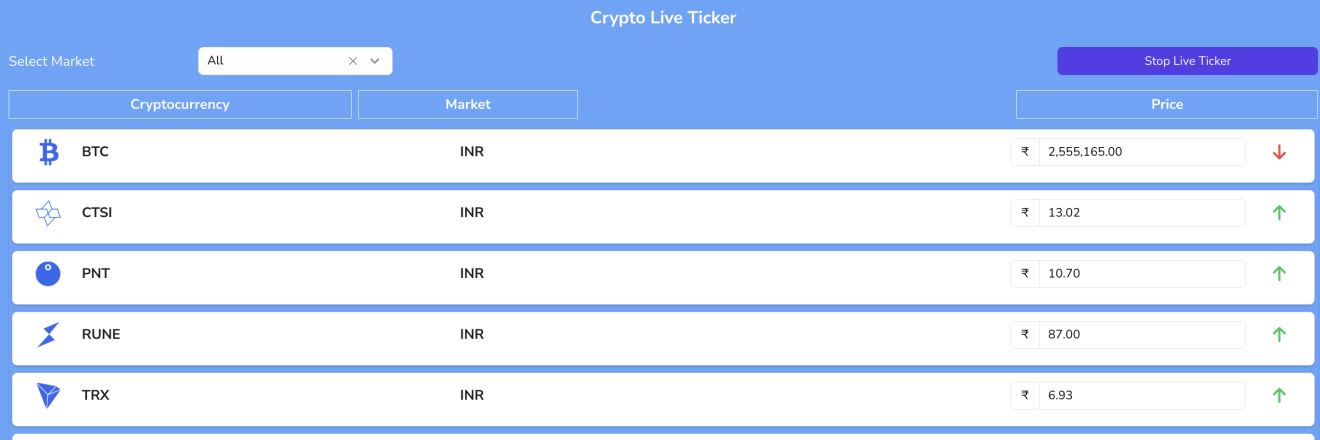
- Introduce an coloured arrow up/down Tertiary Icon button next to the Price, that shows when the value has increased or decreased.

- Add a Toggle Ticker button which can be clicked to Start/Stop the ticker.
The onClick is binded toUtils.toggleTickerDatawhich subscribes or unsubscribes to the Ticker event based onUtils.tickerStatus.
Thats about it. You can go ahead and click Deploy. We now have a Cryptocurrency App that shows the Live Ticker data of each of the coins that has changes in Real Time.
- Introduce an coloured arrow up/down Tertiary Icon button next to the Price, that shows when the value has increased or decreased.
Conclusion
We've successfully learned how to create a Basic Cryptocurrency app using Websockets on the Appsmith platform. This enables us to establish real-time communication with the Websocket endpoint API, subscribe and handle incoming data. With the combinations of these skills and Appsmith, you can now build dynamic and real-time applications, displaying data like live market data and price changes. The possibilities are vast, so feel free to unleash your creativity and build innovative apps using Appsmith's powerful capabilities. Happy coding!
Also check out the sample forkable app created using Appsmith to help you review and understand the above Tutorial better:
https://community.appsmith.com/template/live-cryptocurrency-app


Does this work if I want to connect it to a Flask-SocketIO?