


Intro
We have over 45 widgets in Appsmith, including several options for capturing data. There's the standard form widget, with a drag and drop canvas to add other widgets like text inputs, radio buttons, and file pickers. Or you can use the JSONForm widget, which auto-generates all of the input fields based on the schema of your data. Or you can skip the form and just use the table widget's inline editing to add/edit rows. And if none of those options fit your needs, you can always use a custom widget to build any type of form you want, using any library or framework.
In this guide, I'll be building a new type of form in a custom widget, using the JSONForm JavaScript library (not the JSONForm widget). This library auto-generates forms based on a config object, in the same way that Appsmith's JSONForm widget works. However, using the library will give you full control of the UI and UX, for more advanced use cases.
This guide will cover:
- Modifying JS library code examples to run in a custom widget
- Using libraries from a CDN like JSDelivr.com
- Passing data to a custom widget's model
- Making the custom widget react to model changes
Let's get started!
The JSONForm Library
The standard form widget and JSONForm widget offer a wide range of options that should serve most use cases. But for the ultimate control on the UI and UX of your form, you may want to use a custom widget. This could mean writing everything from scratch, or using a library like JSONForm.
https://github.com/jsonform/jsonform
There's an HTML sample in the Getting Started section that you can copy into a custom widget to use as a starting point.
<!DOCTYPE html>
<html>
  <head>
    <meta charset="utf-8" />
    <title>Getting started with JSON Form</title>
    <link rel="stylesheet" type="text/css" href="deps/opt/bootstrap.css" />
  </head>
  <body>
    <h1>Getting started with JSON Form</h1>
    <form></form>
    <div id="res" class="alert"></div>
    <script type="text/javascript" src="deps/jquery.min.js"></script>
    <script type="text/javascript" src="deps/underscore.js"></script>
    <script type="text/javascript" src="deps/opt/jsv.js"></script>
    <script type="text/javascript" src="lib/jsonform.js"></script>
    <script type="text/javascript">
      $('form').jsonForm({
        schema: {
          name: {
            type: 'string',
            title: 'Name',
            required: true
          },
          age: {
            type: 'number',
            title: 'Age'
          }
        },
        onSubmit: function (errors, values) {
          if (errors) {
            $('#res').html('<p>I beg your pardon?</p>');
          }
          else {
            $('#res').html('<p>Hello ' + values.name + '.' +
              (values.age ? '<br/>You are ' + values.age + '.' : '') +
              '</p>');
          }
        }
      });
    </script>
  </body>
</html>
Note that there are a few dependencies like jquery and underscore, and this example assumes those libraries will be available with a relative path like src="deps/jquery.min.js". However, in a custom widget, we have to import those dependencies from a CDN like JSDeliver.com.
Start out by dragging in a new custom widget and clicking Edit source to open the code editor. Then, clear out all of the sample code in the HTML, Style, and JavaScript tabs. Now paste in the HTML from the Getting Started sample.
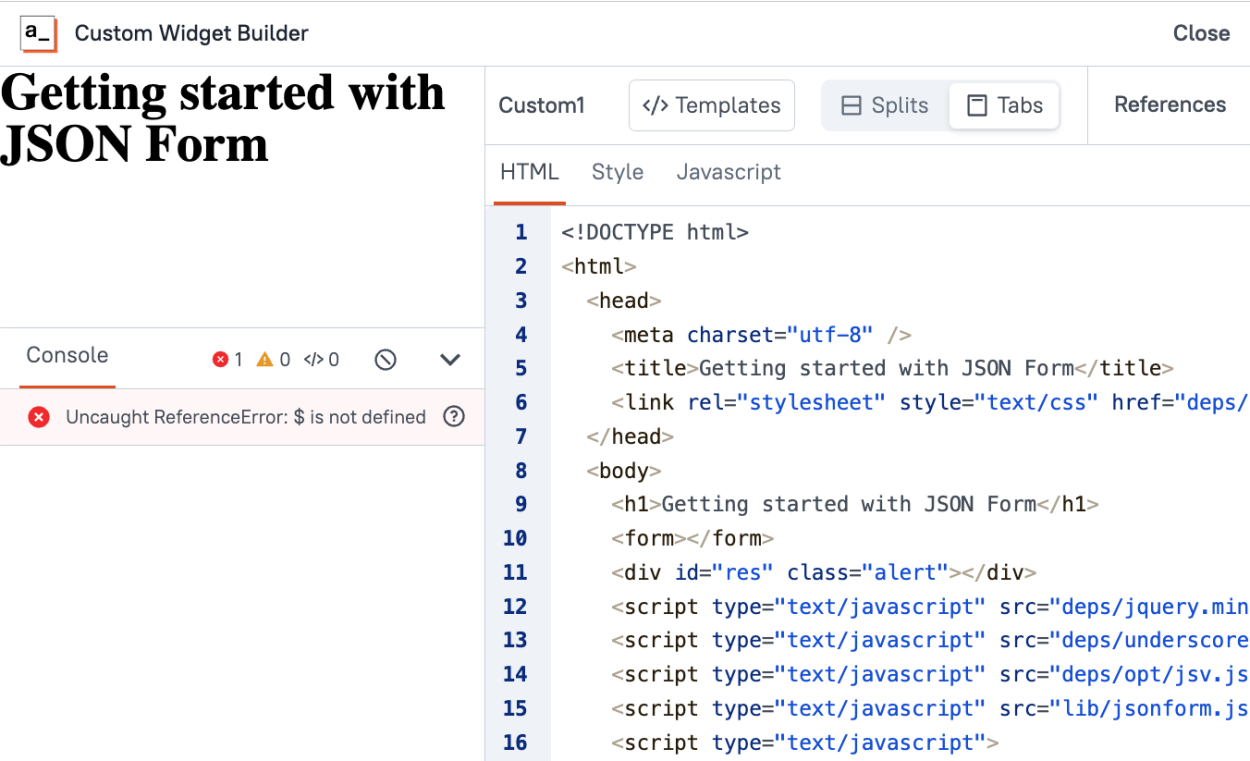
You should see an error in the console: Uncaught ReferenceError: $ is not defined
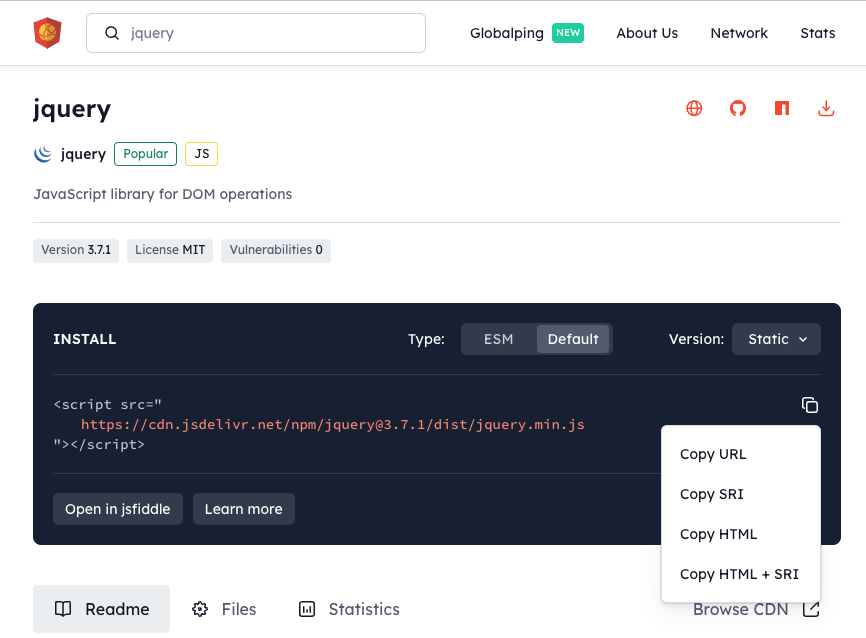
JQuery uses $ as a variable name, but we haven't actually installed it yet. The relative path needs to be replaced with an actual link to the library from a CDN. Search JQuery on JSDelivr and copy the URL, then paste into the HTML of the custom widget.
This resolves the first error, but now we get:
Uncaught TypeError: $(...).jsonForm is not a function
A new error! That's progress.
Ok, jsonForm is not a function? Easy. Install the JSONForm library using the CDN link from JSDeliver. And now we get...
Script error.
Uh... ok, this time the error message isn't quite as helpful. But we still have a few dependencies that haven't been imported, so finish up by adding underscore and jsv. The new list of script tags should look like this:
        <script type="text/javascript" src="https://cdn.jsdelivr.net/npm/jquery@3.7.1/dist/jquery.min.js"></script>
        <script type="text/javascript" src="https://cdn.jsdelivr.net/npm/underscore@1.13.6/underscore-min.min.js"></script>
        <script type="text/javascript" src="https://cdn.jsdelivr.net/npm/JSV@4.0.2/lib/jsv.min.js"></script>
        <script type="text/javascript" src="https://cdn.jsdelivr.net/npm/jsonform@2.2.5/lib/jsonform.min.js"></script>
And we have lift off! 🚀
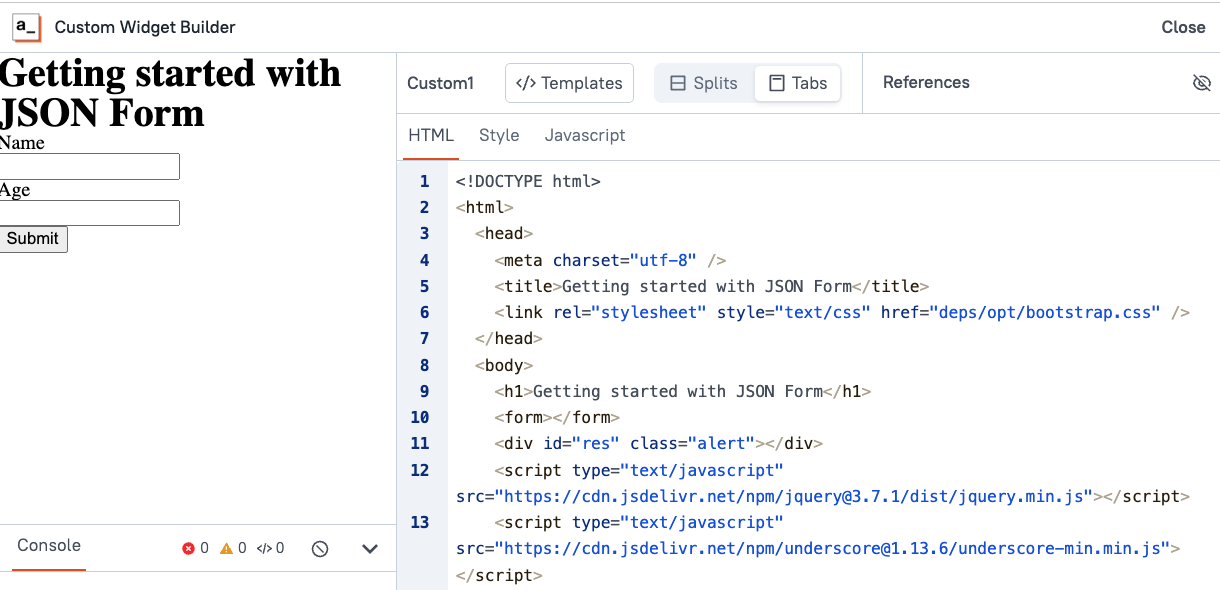
The form is rendering, and there are no errors in the console! Now we're getting somewhere. But we still have some work to do.
Next cut the last set of script tags with the JavaScript code from the HTML section and paste it into the JavaScript tab. Remove the script tags and just paste in the actual JavaScript code.
What's this? A new error? Well, a warning anyway.
Missing appsmith.onReady() function call. Initiate your component inside 'appsmith.onReady()' for your custom widget to work as expected.The form is rendering, but we're not using an appsmith.onReady() function. This means if we try to pass data into the custom widget from the rest of the app, the custom widget will load without it. So we need to put the code inside a function and pass that as a parameter to the onReady function. The new code should look like this:
appsmith.onReady(()=>{
    $('form').jsonForm({
        schema: {
            name: {
                type: 'string',
                title: 'Name',
                required: true
            },
            age: {
                type: 'number',
                title: 'Age'
            }
        },
        onSubmit: function (errors, values) {
            if (errors) {
                $('#res').html('<p>I beg your pardon?</p>');
            }
            else {
                $('#res').html('<p>Hello ' + values.name + '.' +
                                             (values.age ? '<br/>You are ' + values.age + '.' : '') +
                                             '</p>');
            }
        }
    });
})
Ok, no errors or warnings again, and the form is still rendering. Now to pass in the schema to generate forms using data from outside the custom widget.
Passing data into the custom widget
Custom widgets have a model, or an object of data that can be accessed from both inside the custom widget and outside it, in the rest of your app. This is the entry/exit point for any interactions you want to program.
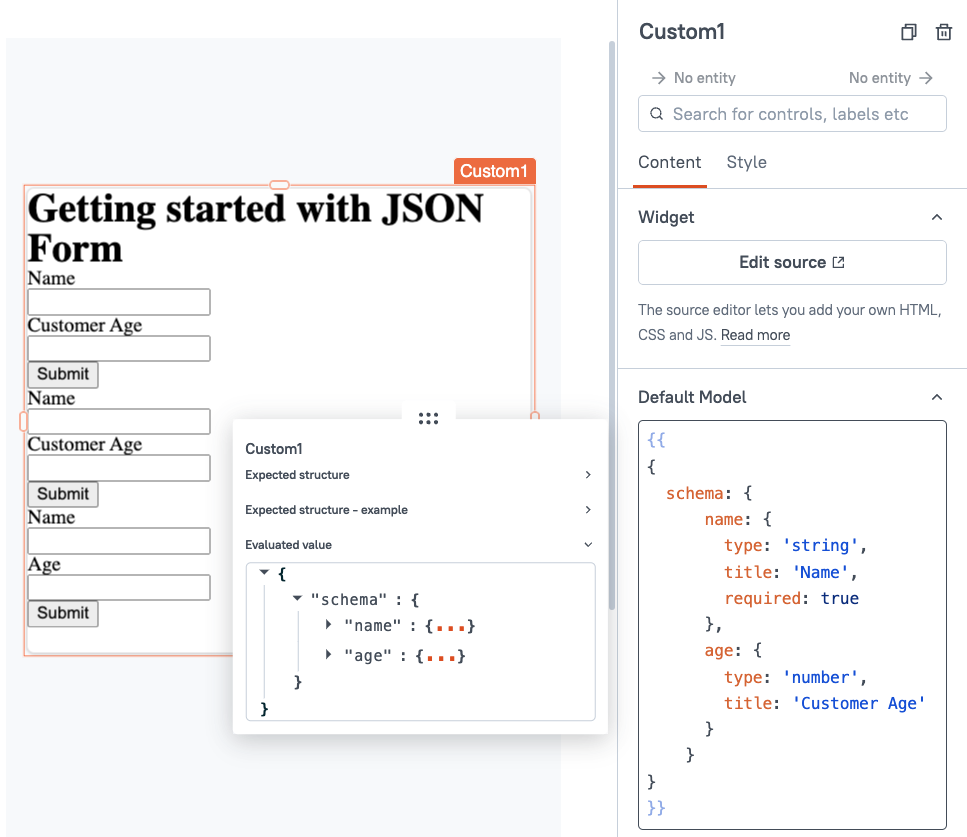
Start by replacing the default 'tips' object with a new 'schema' object, using the JSON schema that is currently being used in the custom widget. Now, back in the custom widget editor, replace the hard-coded schema with a reference to the appsmith model.
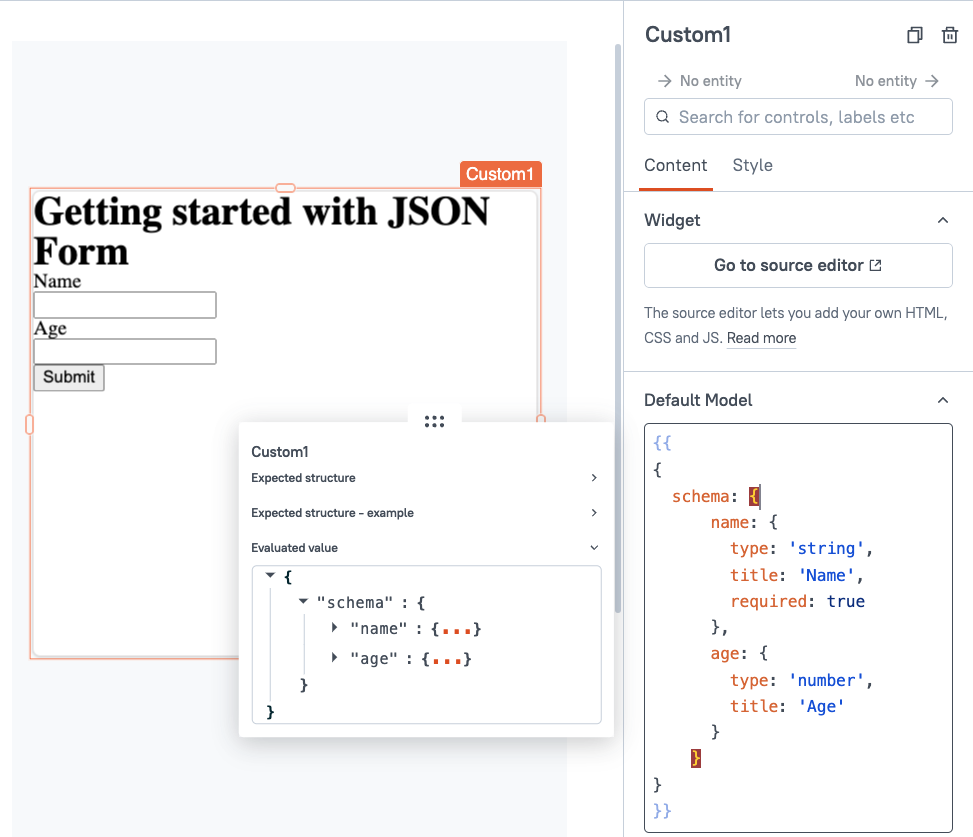
appsmith.onReady(()=>{
    $('form').jsonForm({
        schema: appsmith.model.schema,
        onSubmit: function (errors, values) {
            if (errors) {
                $('#res').html('<p>I beg your pardon?</p>');
            }
            else {
                $('#res').html('<p>Hello ' + values.name + '.' +
                                             (values.age ? '<br/>You are ' + values.age + '.' : '') +
                                             '</p>');
            }
        }
    });
})
Awesome! The form still works, and now we can generate new forms using a config object coming from the rest of our app.
Updating the model
Next try typing in a new value for the title of one of the fields, like changing Name to Customer Name. Hmm... no change in the custom widget.
To make the widget reactive to changes in the model, we have to use the appsmith.onModelChange() method to regenerate the form based on the new data.
First, add an appsmith.onModelChange() function with an empty arrow function inside.
appsmith.onModelChange(()=>{

})
Then copy and paste in the same code from the onReady function. Now try updating the model again.
WHAT?! It's adding a new set of the same fields!
Ok, we need to clear the form inside the onModelChange() function before re-running the $('form').jsonForm() to load the new schema. I checked the docs (and ChatGTP) and it turns out JSONForm doesn't provide a method for this. But jQuery does! Just add $('form').empty(); before re-initializing the form.
Test it out again and you should see the form update as you type in the model, without the weird duplication issue this time.
However, we have another ambiguous script error in the custom widget console, with no other info. 🧐
The issue here is that onModelChange gets fired when the widget is first loading and there's no model available. So the fix is to exit the onModelChange function when there's no value in the model to respond to.
appsmith.onModelChange(()=>{

    if(!appsmith.model.schema){return}
    $('form').empty()
    $('form').jsonForm({
        schema: appsmith.model.schema,
        onSubmit: function (errors, values) {
            if (errors) {
                $('#res').html('<p>I beg your pardon?</p>');
            }
            else {
                $('#res').html('<p>Hello ' + values.name + '.' +
                                             (values.age ? '<br/>You are ' + values.age + '.' : '') +
                                             '</p>');
            }
        }
    });
Great! No errors again, and the form updates as you type in the model.
Saving the form response
The last step is to capture the values entered in the form and save them to the model so they are available to the rest of the app. This will enable you to pass the values to an API or database.
Simply add a line to the onSubmit function to update the model with the values variable. Be sure to add this to both the onReady and onModelUpdate function.
Here's the final code:
appsmith.onReady(()=>{
    $('form').jsonForm({
        schema: appsmith.model.schema,
        onSubmit: function (errors, values) {
            if (errors) {
                $('#res').html('<p>I beg your pardon?</p>');
            }
            else {
                appsmith.updateModel({values:values})
                $('#res').html('<p>Hello ' + values.name + '.' +
                                             (values.age ? '<br/>You are ' + values.age + '.' : '') +
                                             '</p>');
            }
        }
    });
})
appsmith.onModelChange(()=>{
    if(!appsmith.model.schema){return}
    $('form').empty()
    $('form').jsonForm({
        schema: appsmith.model.schema,
        onSubmit: function (errors, values) {
            if (errors) {
                $('#res').html('<p>I beg your pardon?</p>');
            }
            else {
                appsmith.updateModel({values:values})
                $('#res').html('<p>Hello ' + values.name + '.' +
                                             (values.age ? '<br/>You are ' + values.age + '.' : '') +
                                             '</p>');
            }
        }
    });
})
Accessing the submitted values
Once the user clicks submit you should be able to access the values inside the custom widget's model. Add a text widget next to the custom widget, and set the value to {{Custom1.model.values}}.
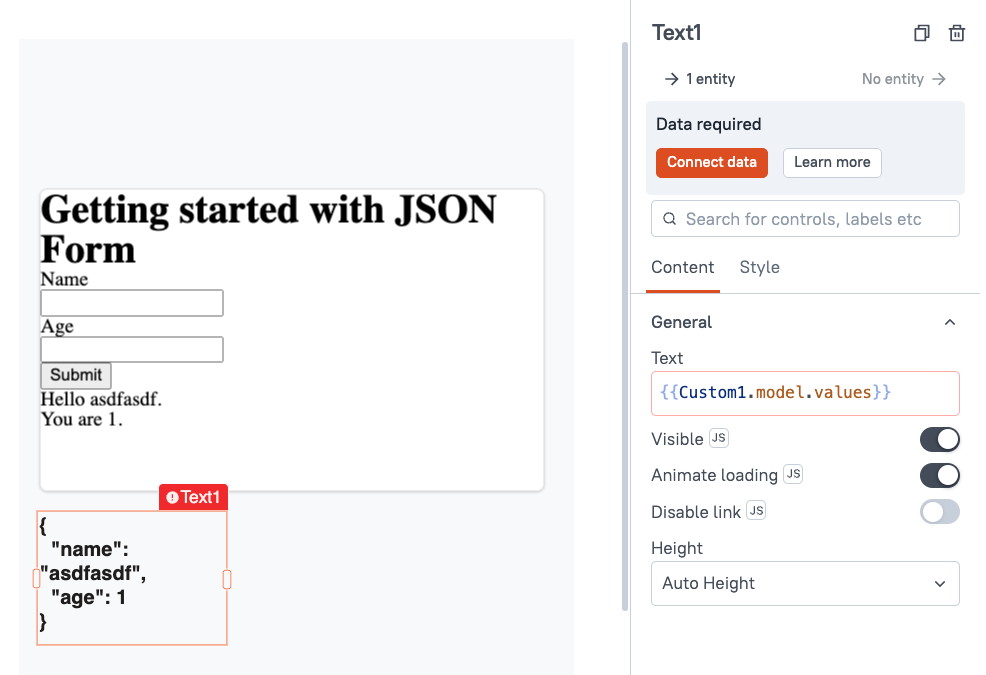
Now you can use the same {{Custom1.model.values}} binding to access these values and pass them on to any API or database query.
Conclusion
The custom widget is an extremely powerful tool for building any kind of UI, using any library or framework. Chances are one of our 45 widgets will work for most use cases, but when you really need full control, the custom widget can do just about anything!
REMINDER: This month's contest topic is custom widgets! There's still over a week left to submit your entry for a chance to win some Appsmith swag, and recognition in our Discord and newsletter.