

Building a Drawing Pad Widget using p5.js and an Iframe
Goal
Use the p5.js JavaScript library to create a multi-color drawing pad widget.
Prerequisites
An Appsmith account
A new or existing app to build the new widget in
Overview
P5.js is a JavaScript library for creating drawings and graphics programatically. This guide will cover how to use the p5.js library in an Iframe Widget to capture the user's mouse movements and create a multi-color drawing pad widget!
This will enable apps that allow users to create and save SVG drawings, for use cases like
Add a new JS Object
Paste the following code into the new JS Object:
export default { canvas: ` <script src="https://cdnjs.cloudflare.com/ajax/libs/p5.js/1.4.0/p5.min.js"></script> <script> let windowWidth = 500; let windowHeight = 500; let canvas; let drawing = []; let currentPath = []; let isDrawing = false; let colorPicker; let clearButton; let undoButton; let currentColor = '#000000'; function setup() { canvas = createCanvas(windowWidth, windowHeight); canvas.position(0, 40); canvas.mousePressed(startPath); canvas.mouseReleased(endPath); colorPicker = document.getElementById('color-picker'); colorPicker.addEventListener('change', onColorChange); clearButton = document.getElementById('clear-button'); clearButton.addEventListener('click', clearDrawing); undoButton = document.getElementById('undo-button'); undoButton.addEventListener('click', undoDrawing); } function draw() { background(255); drawing.forEach(path => { stroke(path.color); strokeWeight(10); noFill(); beginShape(); path.forEach(({ x, y }) => vertex(x, y)); endShape(); }); if (isDrawing) { stroke(currentColor); strokeWeight(10); noFill(); currentPath.push({ x: mouseX, y: mouseY }); beginShape(); currentPath.forEach(({ x, y }) => vertex(x, y)); endShape(); } } function startPath() { isDrawing = true; currentPath = []; currentPath.color = currentColor; stroke(currentColor); drawing.push(currentPath); } function endPath() { currentPath.color = currentColor; isDrawing = false; autoSaveDrawing(); } function onColorChange() { currentColor = colorPicker.value; currentColor = color(currentColor); } function clearDrawing() { drawing = []; autoSaveDrawing(); } function undoDrawing() { drawing.pop(); autoSaveDrawing(); } function autoSaveDrawing() { const svg = \`<svg xmlns="http://www.w3.org/2000/svg" viewBox="0 0 \${width} \${height}"> <rect x="0" y="0" width="\${width}" height="\${height}" fill="white"/> \${drawing .map( path => \`<path d="\${path .map(({ x, y }) => (x === path[0].x && y === path[0].y ? \`M\${x} \${y}\` : \`L\${x} \${y}\`)) .join(' ')}" stroke="\${path.color}" stroke-width="10" fill="none"/>\` ) .join('')} </svg>\`; parent.postMessage({ svg }, '*'); } // Initial canvas setup setup(); </script> <style> #buttonbar { display: flex; justify-content: flex-end; } #color-picker, #undo-button, #clear-button { margin-left: 10px; } </style> <div id="buttonbar"> <input type="color" id="color-picker" value="#000000" /> <button id="undo-button">Undo</button> <button id="clear-button">Clear</button> </div> <canvas id="canvas"></canvas> ` }NOTE:
- The
windowWidthandwindowHeightproperties at the top of the script can be changed to set the canvas (and output SVG) size.
- The
Add a new Iframe widget to the canvas
- Add the new Iframe widget to your app
- Set the srcDoc property to:
{{JSObject1.canvas}}
Accessing the SVG drawing for saving
The script posts a message from the Iframe to the parent window (your Appsmith app), which contains an object with an
svgproperty. Each new line drawn will post a new message, updating the drawing which can be accessed atIframe1.message.svg.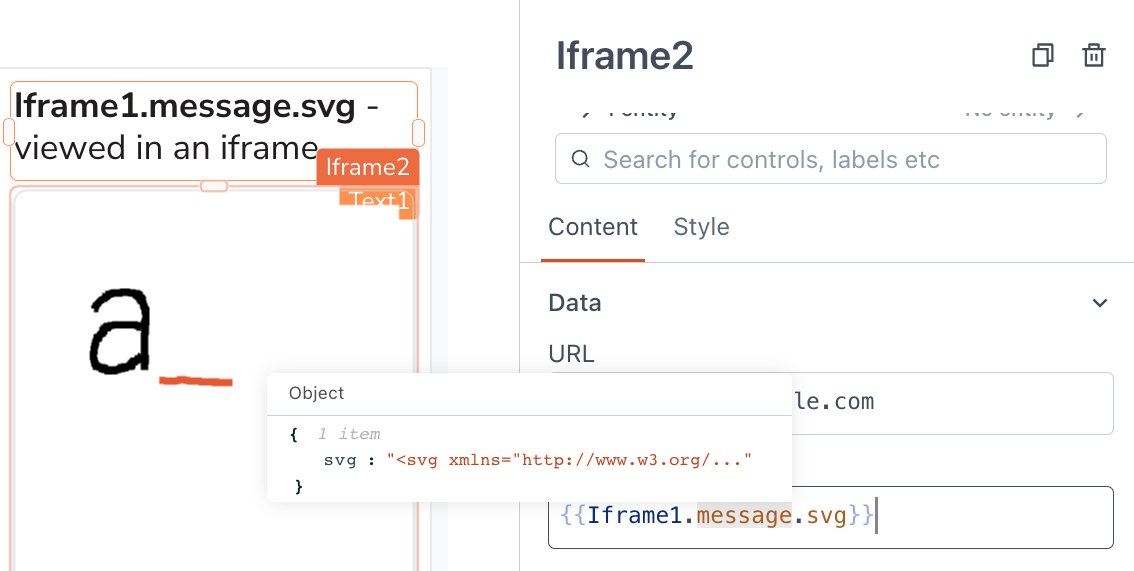
Modifying the Code (optional)
You may want to adjust the JSObject code to insert variables from the rest of your app, for values like the color, image size, etc. This code has been written as a template literal (string), making it easy to insert
${variables}. However, the code also contains some template literals nested in theautoSaveDrawing()function that had to be\escaped. The extra backslashes tell the JS interpreter to ignore the next character so that it continues to be read as text instead of code.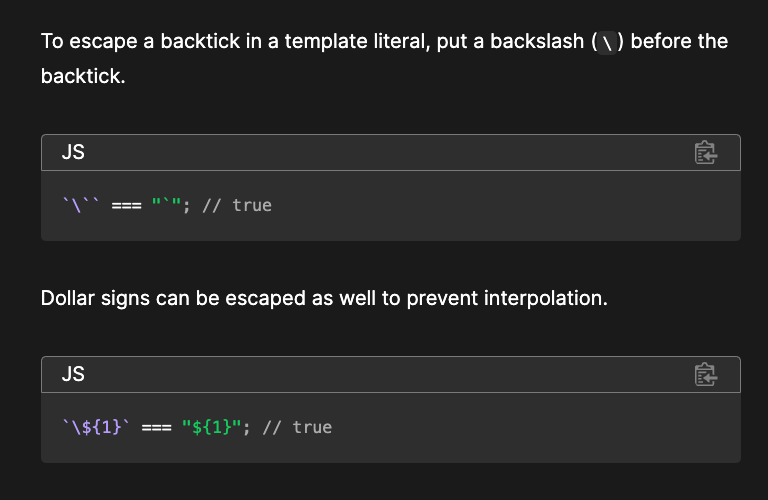
Conclusion
Once again, the Iframe Widget has come to the rescue, enabling new use cases and possibilities with just a few lines of code and an external library. Check out the links below for more awesome Iframe examples!