Plan Your Day/Week Meals & Find Recipes Using Meal Planner Tool
Goal
I will guide you how to develop the meal planner application using REST API datasource with API integrations of spoonacular.com
Prerequisites
Appsmith Account
spoonacular API Key
Googlesheet/ Supabase for storing user details
Overview
Using Appsmith, I developed an app that helps you create an account and plan your meals for a day or a week. You can check a summary of your meal plans and search for recipes by name, ingredients, or nutrients to find the right ones for you.
Functionality covered:
- Signup new user
- Login to Application
- Plan your Meal for day or Week
- Search for recipe according to Recipe name, ingredients or Nutrients
Step 1: Sign Up or Log In to Meal Planner App
- Visit Appsmith Cloud to sign up or log in.
- Create a New Application and select a suitable theme.
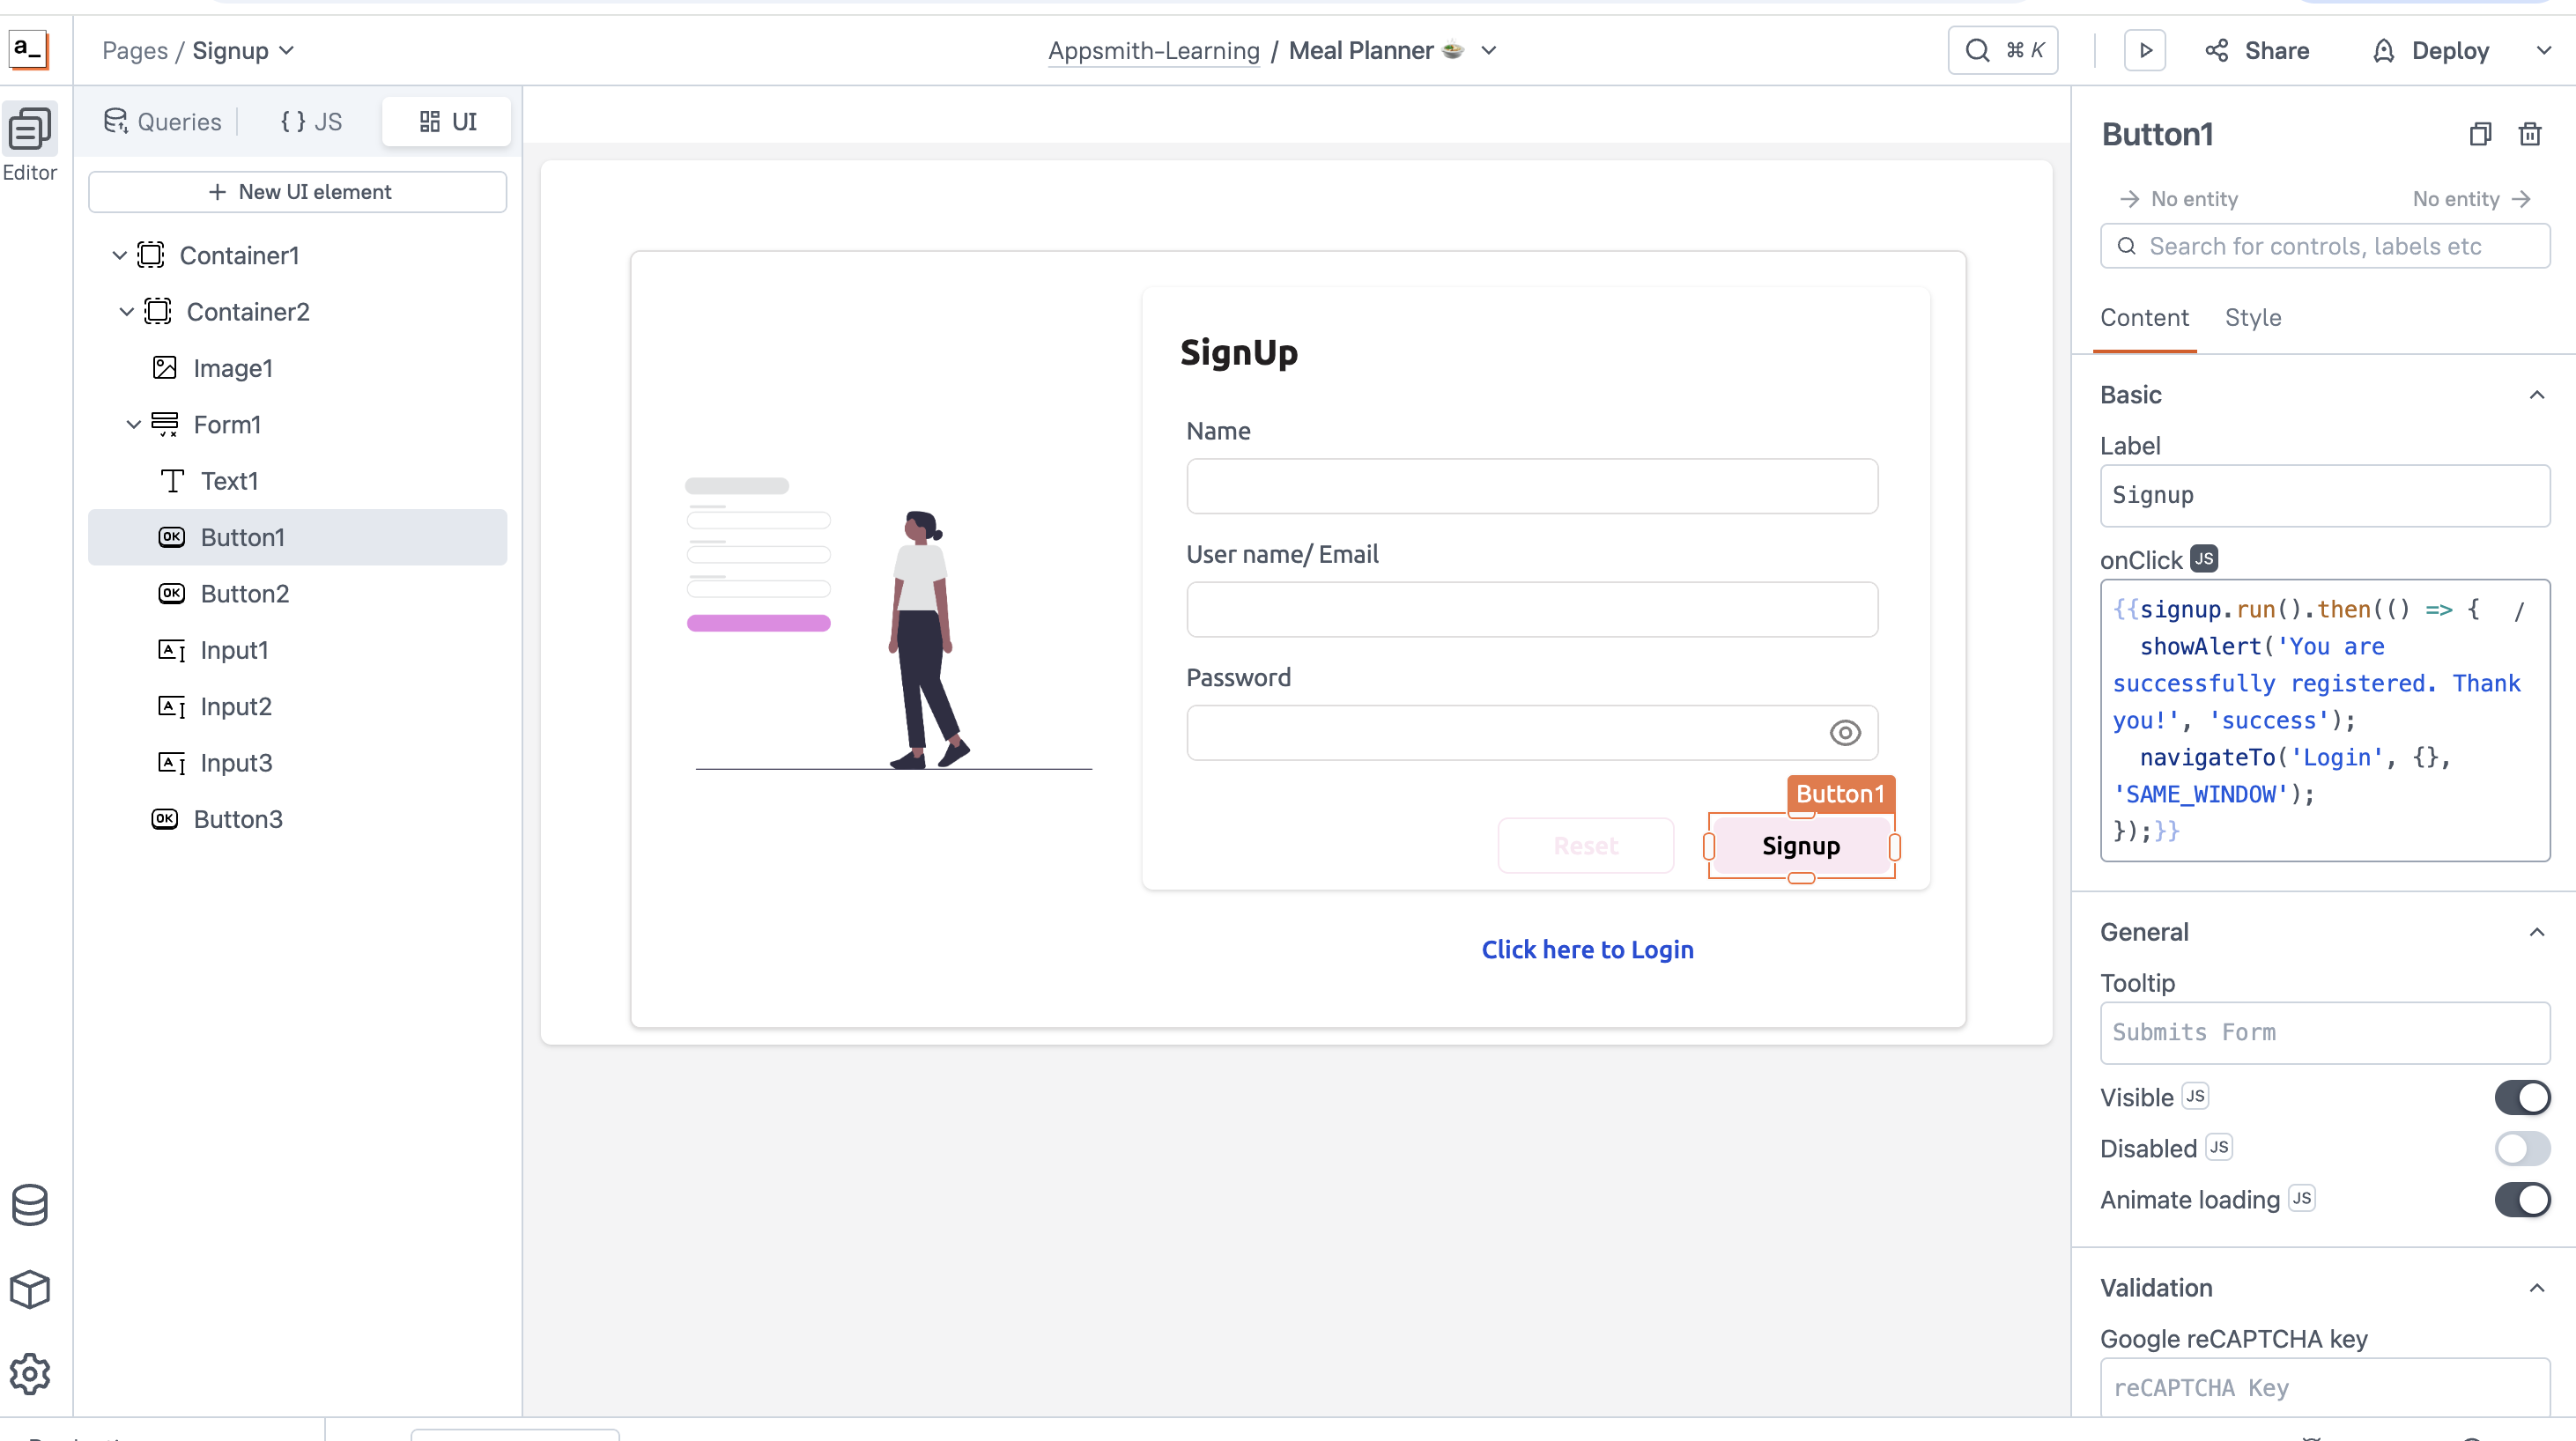
Add a Sign-Up Page
- Add new form widget with following widgets
- Input1 widget for Name
- Input2 widget for Email
- Input3 widget for Password
- Create
user_signupdatabase table in SupaBase & integrate with appsmith as PostgreSQL
INSERT INTO user_signup (name, email, password) VALUES ('{{Input1.text}}', '{{Input2.text}}', '{{Input3.text}}');Name the query assignupCall query onClick event of Signup button
{{signup.run().then(() => {
  showAlert('You are successfully registered. Thank you!', 'success');
  navigateTo('Login', {}, 'SAME_WINDOW');
});}}
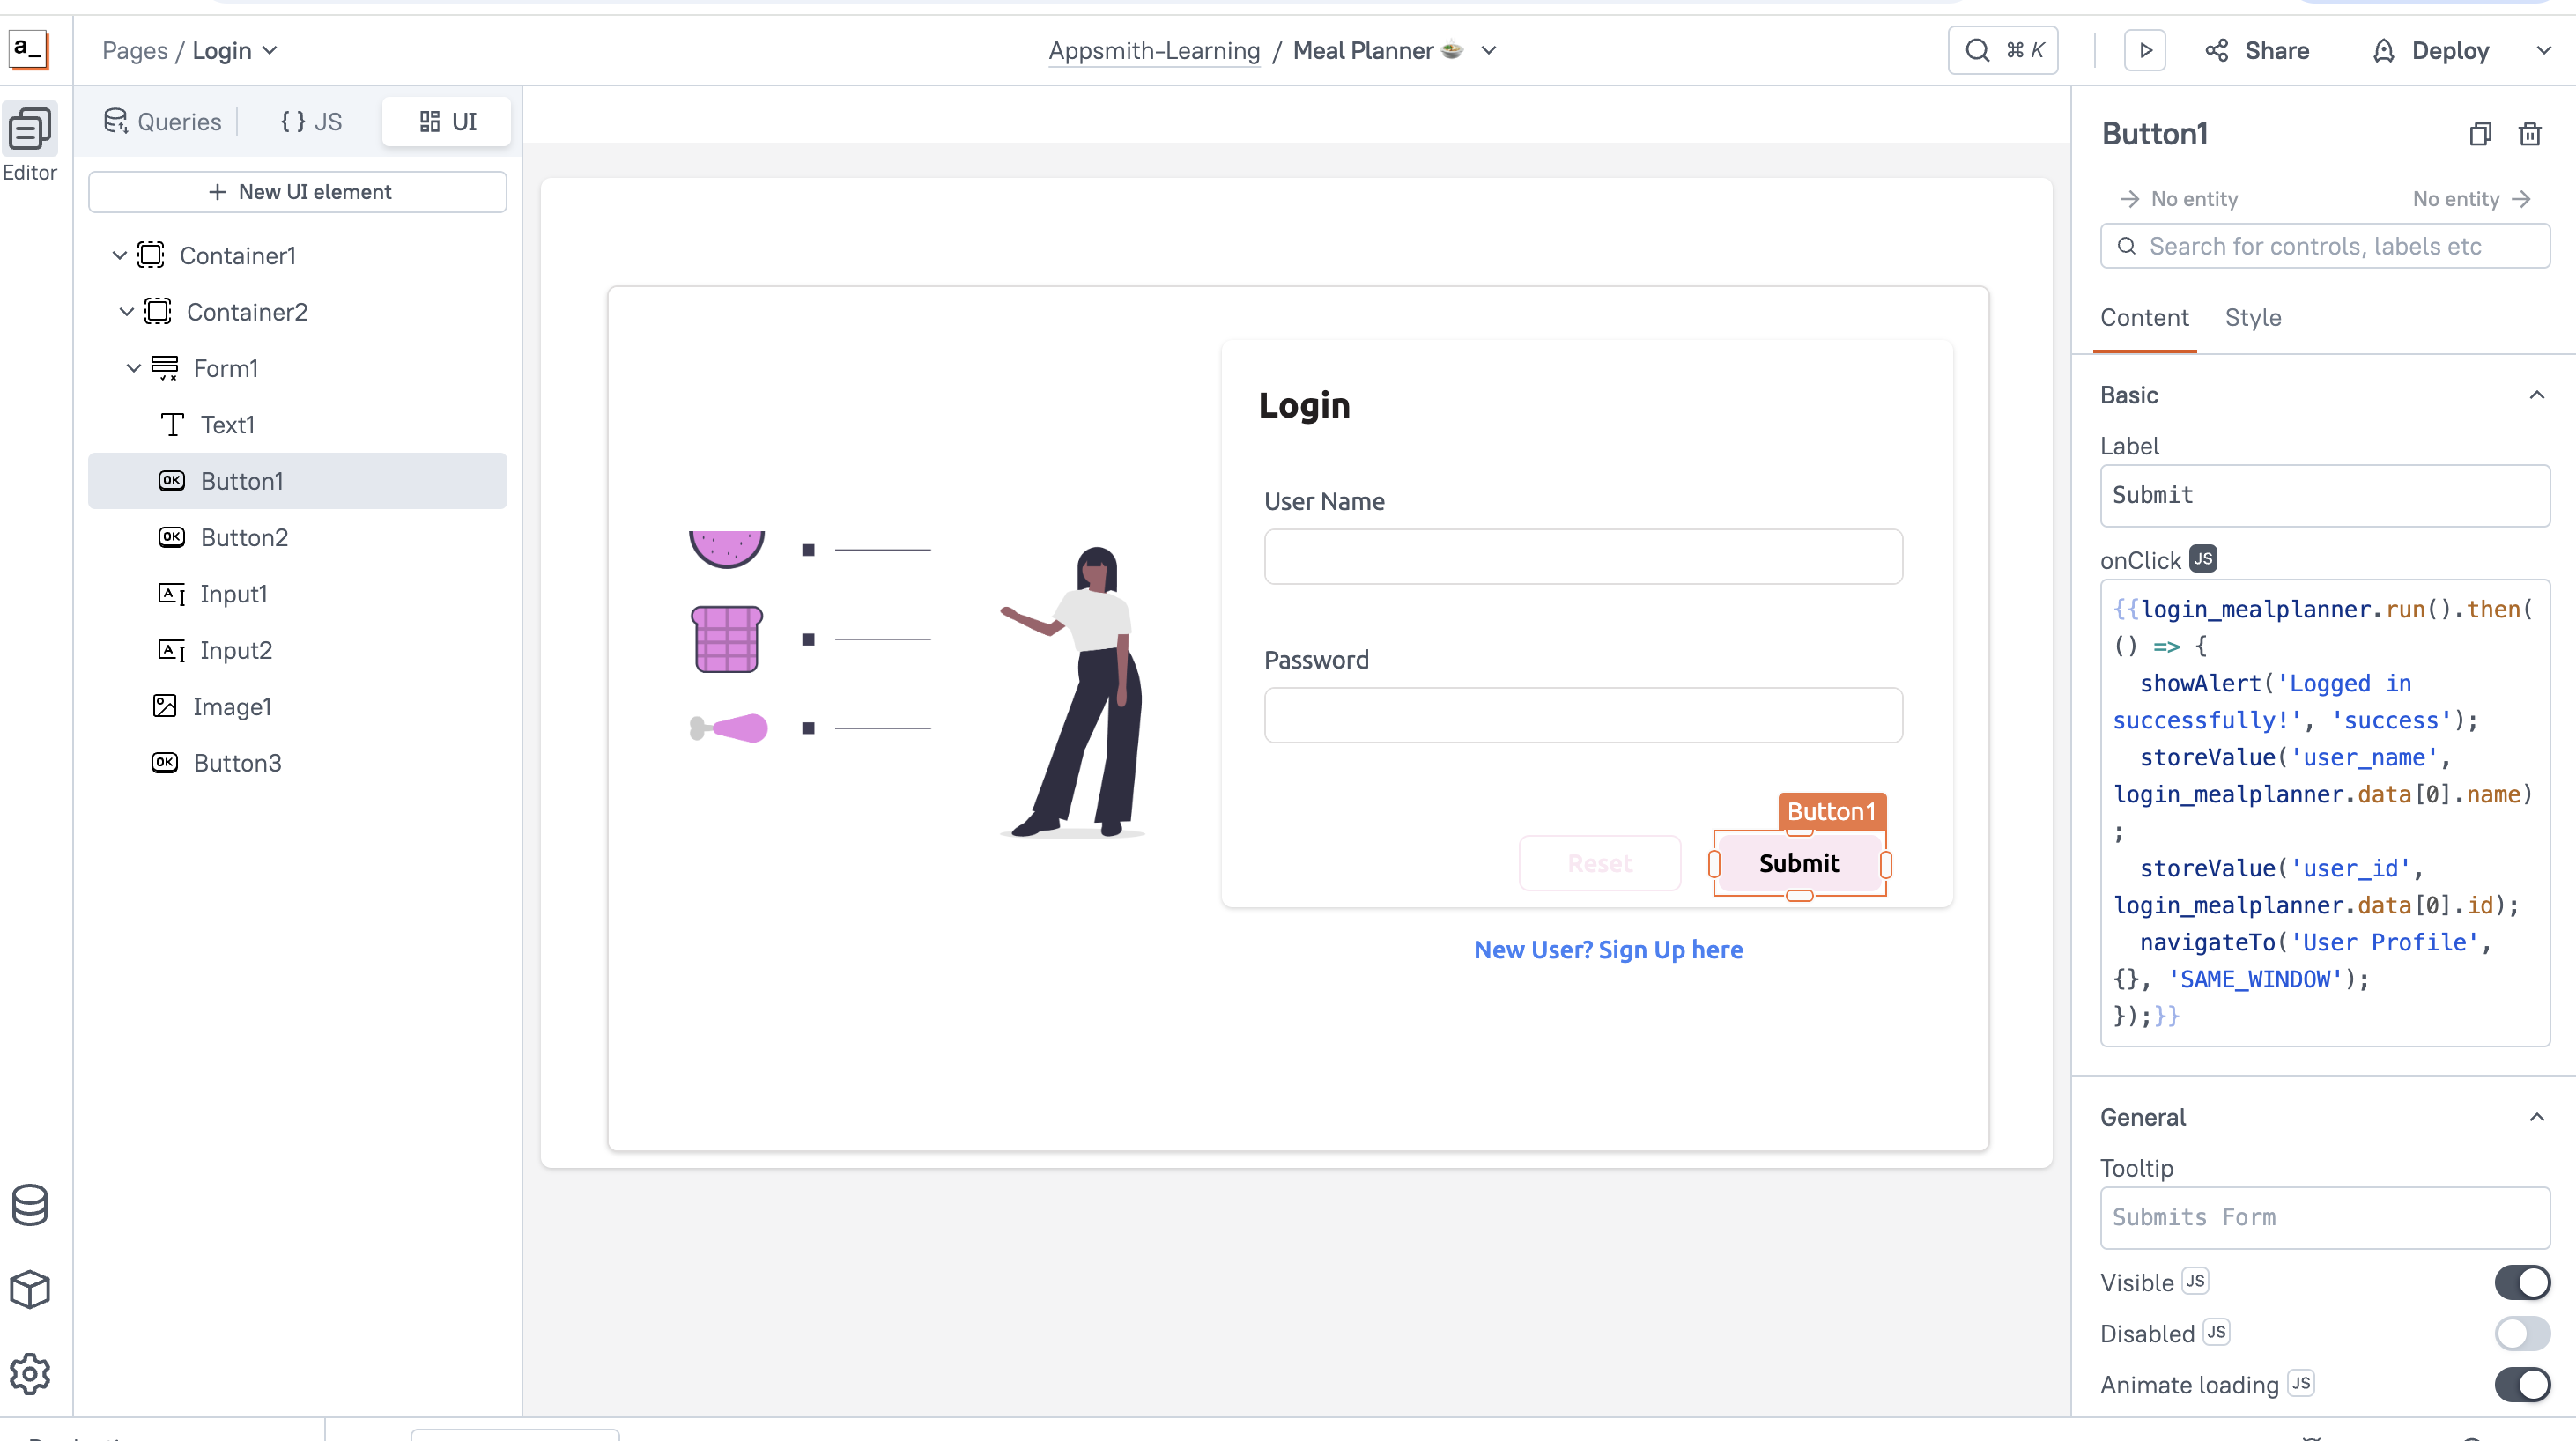
Add a Login Page
- Add new form widget with following Input widgets
- Input1 for Email
- Input2 for Password
- create Login query
SELECT * FROM user_signup WHERE email = '{{Input1.text}}' AND password = '{{Input2.text}}';Name the query as
login_mealplannerCall query on Login button of Login form
{{login_mealplanner.run().then(() => {
  showAlert('Logged in successfully!', 'success');
  storeValue('user_name', login_mealplanner.data[0].name);
  storeValue('user_id', login_mealplanner.data[0].id);
  navigateTo('User Profile', {}, 'SAME_WINDOW');
});}}
Step 2: Redirect to Complete Profile Page
After a successful login, redirect users to a "Complete Your Profile" page.
- Complete your profile will have JsonForm with input widgets to a Name, Age, Gender, Weight, Height, Activity level, Diet preference, Allergies
-
Write query for complete user profile
INSERT INTO public.user_mealplanner ("created_at","name","age","gender","weight","height","activitylevel","dietpreference","allergies","userid") VALUES ('NOW()','{{appsmith.store.user_name}}','{{(JSONForm1.formData || {}).age}}','{{(JSONForm1.formData || {}).gender}}','{{(JSONForm1.formData || {}).weight}}','{{(JSONForm1.formData || {}).height}}','{{(JSONForm1.formData || {}).activitylevel}}','{{(JSONForm1.formData || {}).dietpreference}}','{{(JSONForm1.formData || {}).allergies}}','{{appsmith.store.user_id}}') -
Name query as Insert_public_user_mealplanner1 & call on Submit button
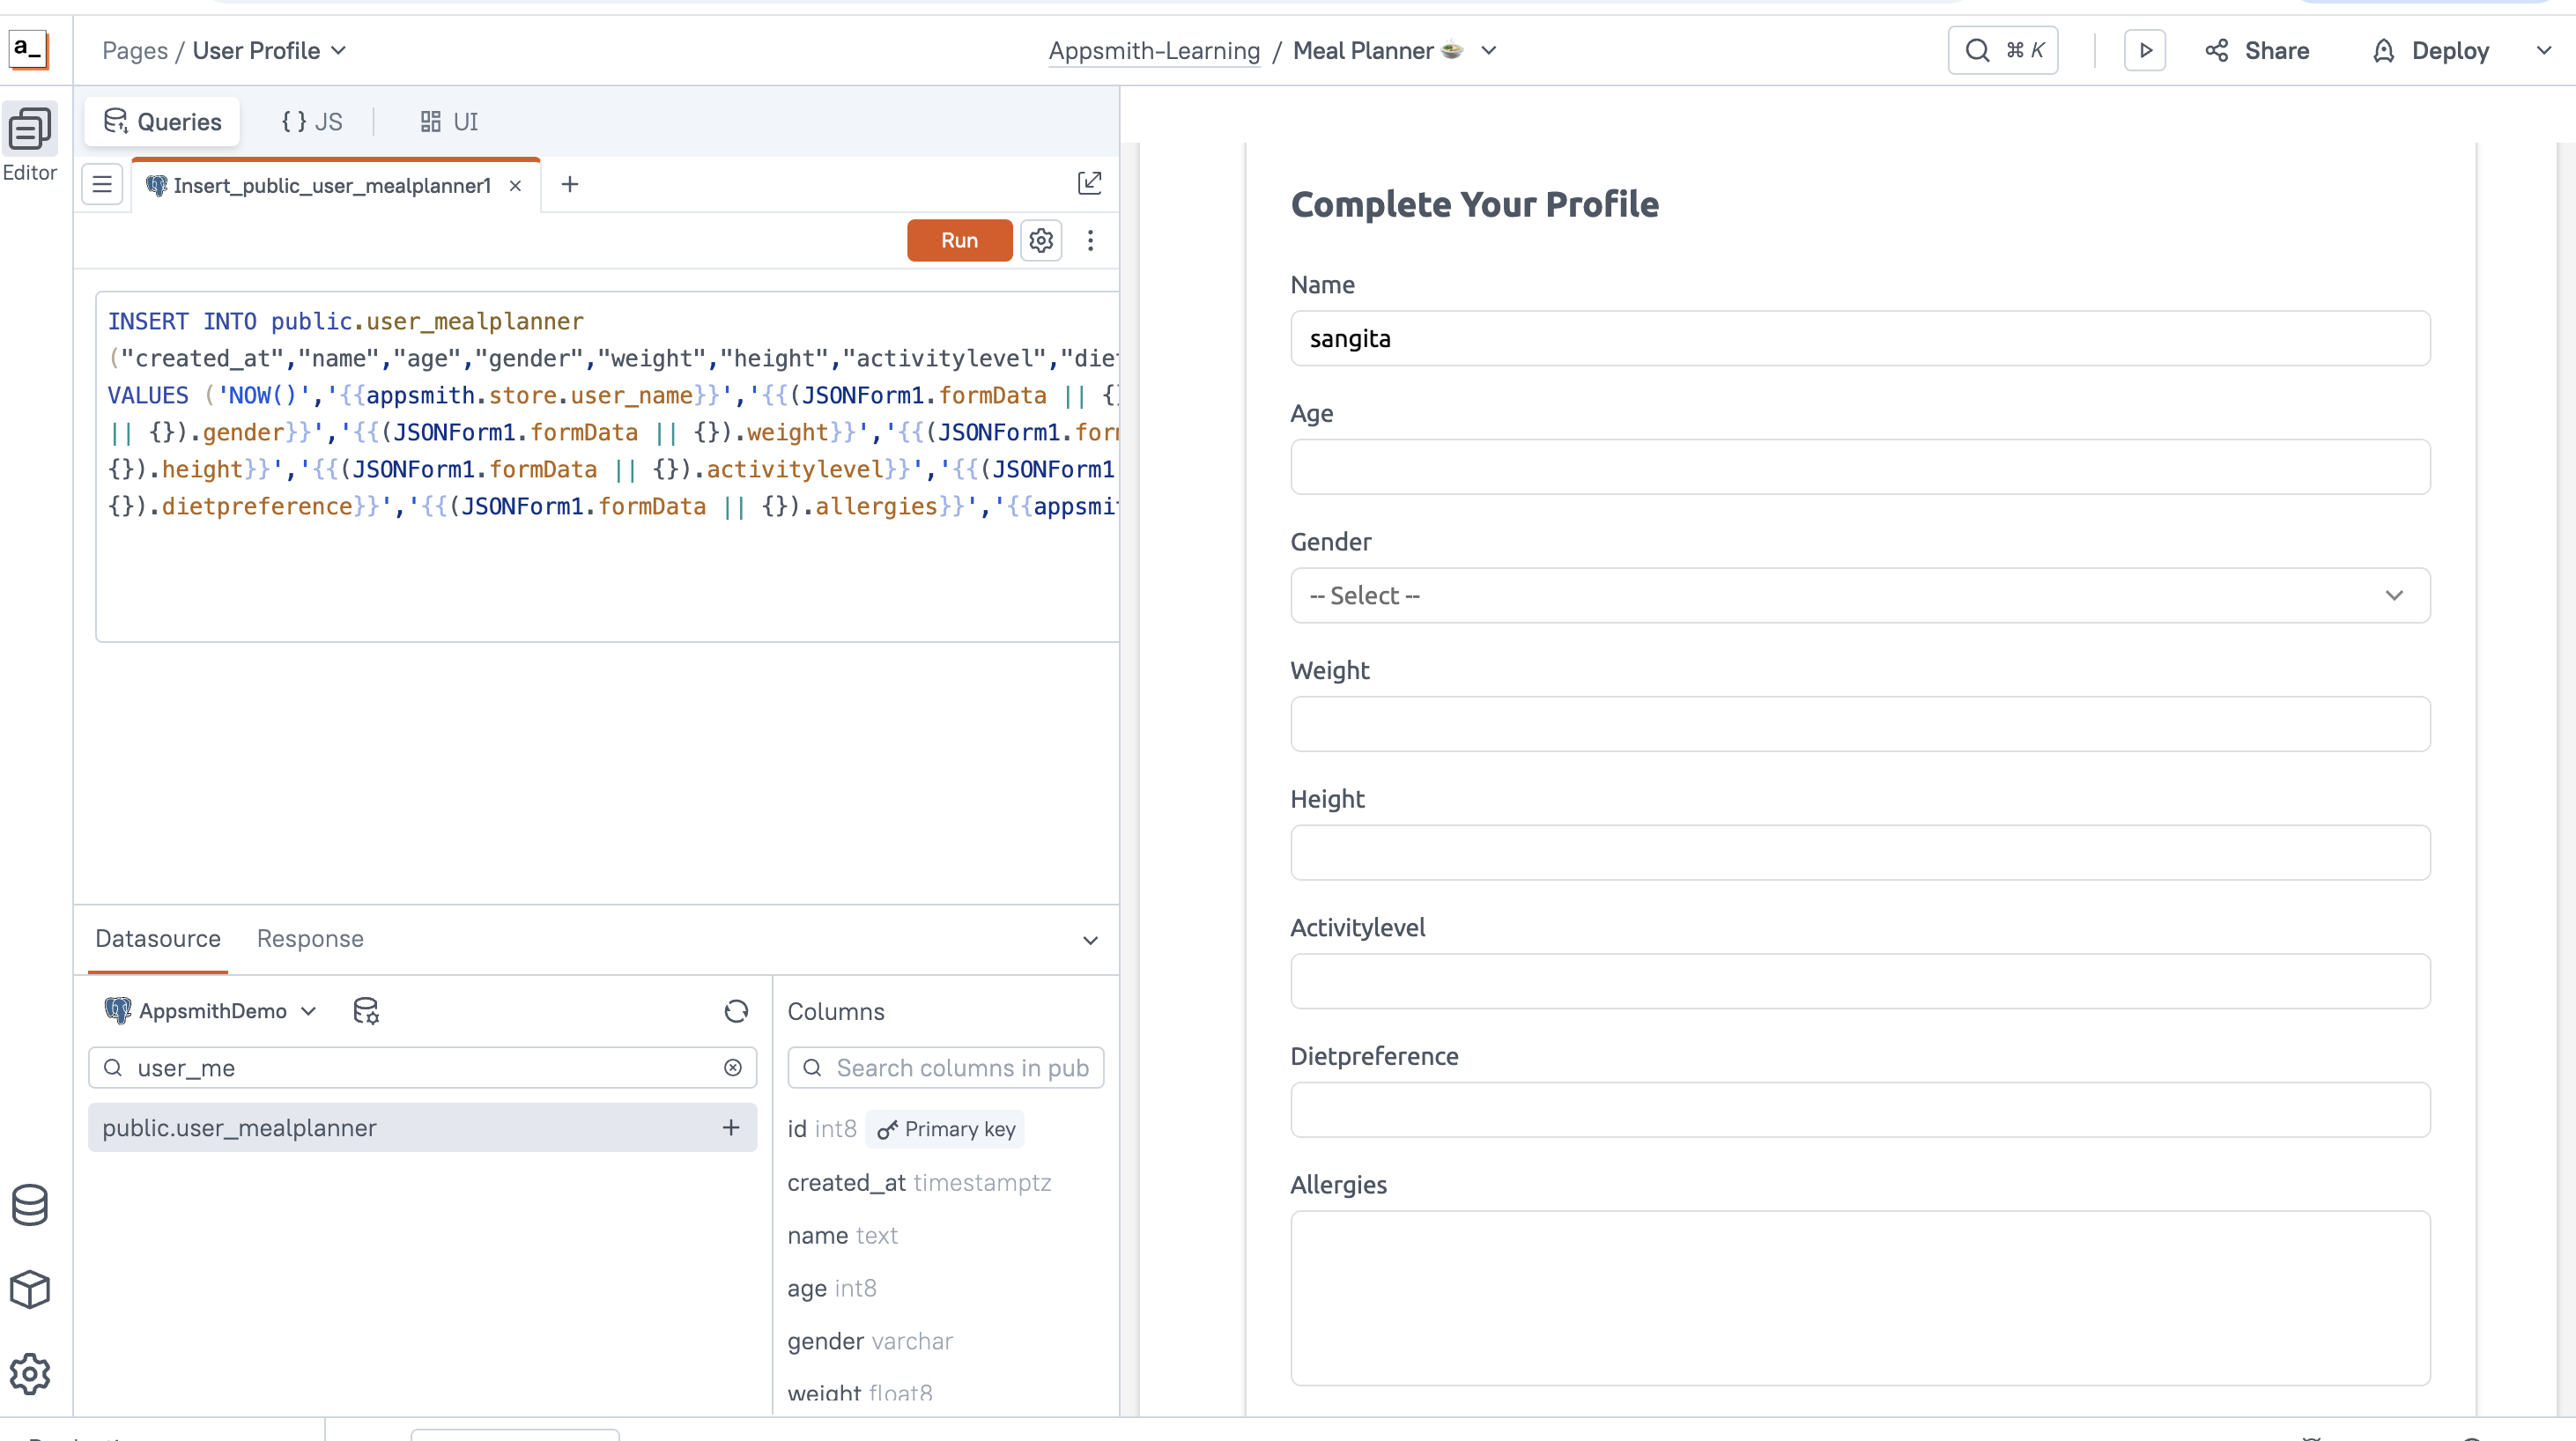
{{Insert_public_user_mealplanner1.run().then(() => {
  showAlert('You have Successfully completed your profile!', 'success');
  navigateTo('View User', {}, 'SAME_WINDOW');
});}}
Step 3: Plan Your Meal for Day or Week
Here we need REST API for getting Meal data & Recipe details from spoonacular.com
- Select Datasource In Appsmith => REST API
- Base URL=> https://api.spoonacular.com
- x-api-key=> <your_spoonacular_apikey>
Create API query to Create Plan for day or week
GEThttps://api.spoonacular.com/mealplanner/generate?timeFrame={{Select1.selectedOptionValue}}&targetCalories={{Input1.text}}&diet={{Select2.selectedOptionValue}}&exclude={{Input2.text}}Name query as createplanAppsmith UI :Add Form widget to make meal plan with Input widgets
- Select widget Plan- day/week
- Input1 for Calories
- Select widget for diet type
- Input widget for Allergies
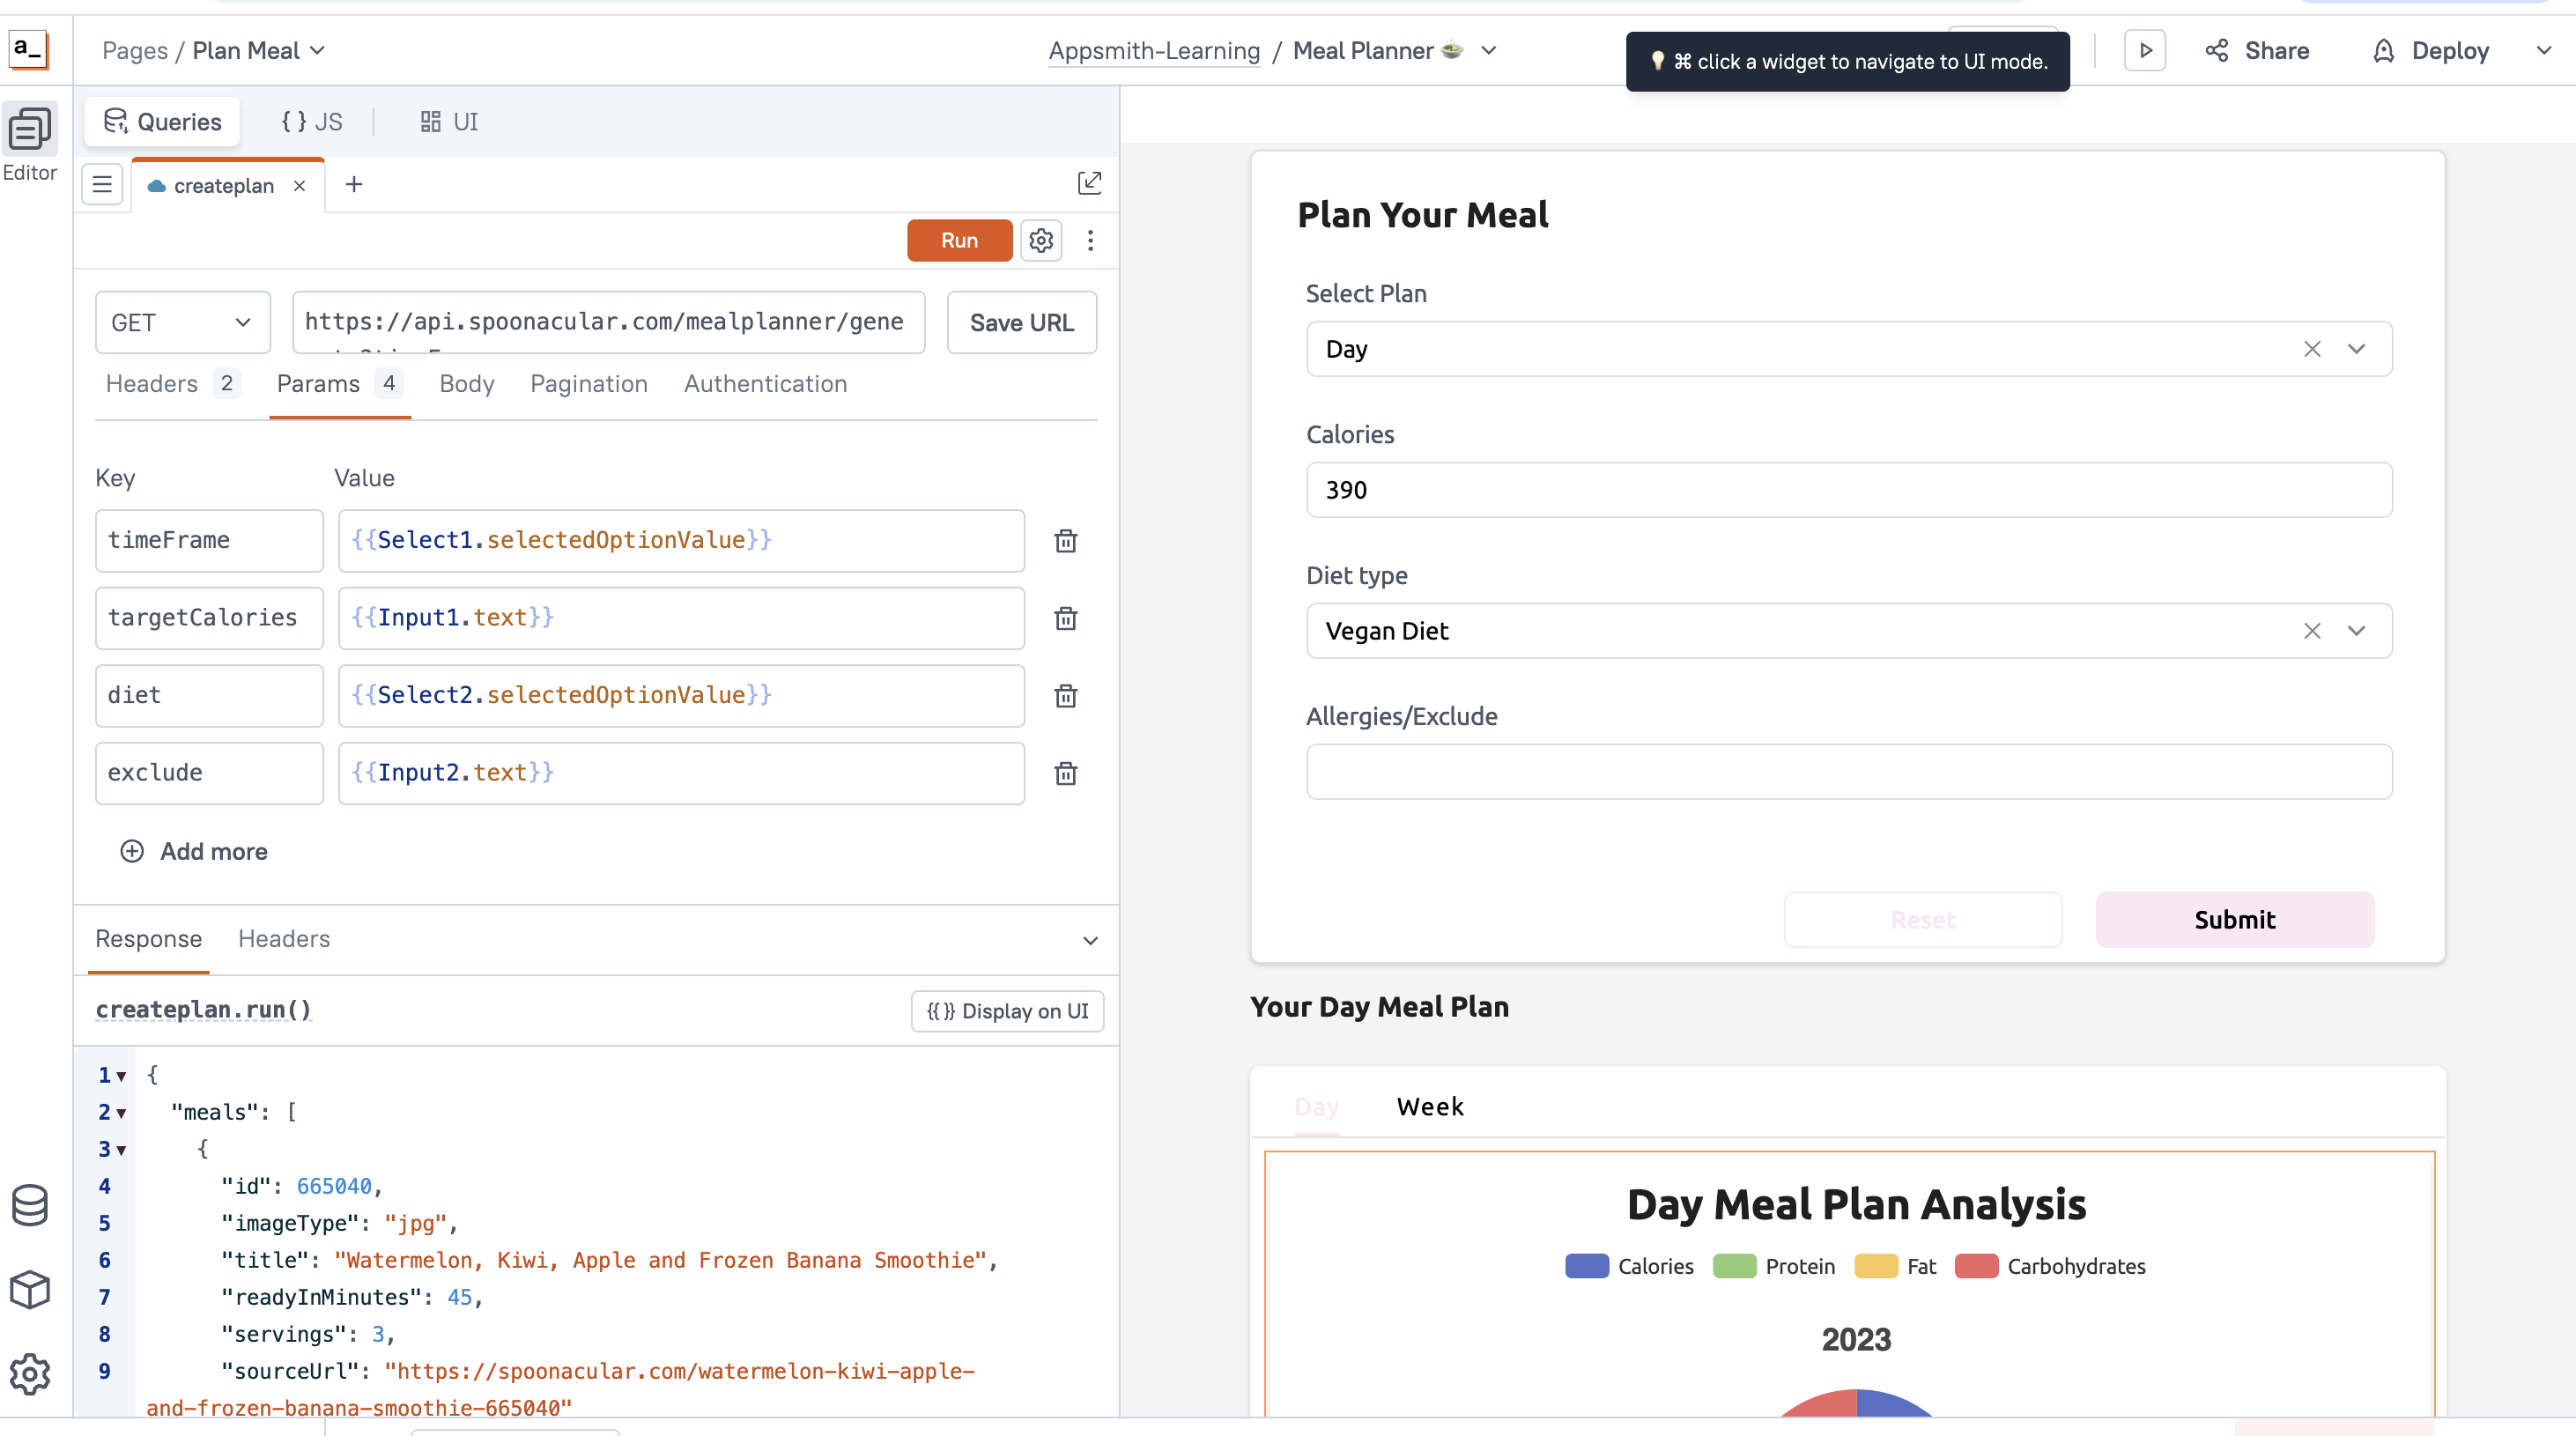
Write JS object to calculate Day meal or Week meal nutrients
export default {
  calculateDayNutrients: function() {
    const meals = createplan?.data?.meals || [];
    let totalNutrients = {
      calories: createplan?.data?.nutrients?.calories || 0,
      protein: createplan?.data?.nutrients?.protein || 0,
      fat: createplan?.data?.nutrients?.fat || 0,
      carbohydrates: createplan?.data?.nutrients?.carbohydrates || 0
    };
    meals.forEach(meal => {
      if (meal?.nutrients) {
        totalNutrients.calories += meal.nutrients.calories || 0;
        totalNutrients.protein += meal.nutrients.protein || 0;
        totalNutrients.fat += meal.nutrients.fat || 0;
        totalNutrients.carbohydrates += meal.nutrients.carbohydrates || 0;
      }
    });
    return {
      totalNutrients,
      meals: meals.map(meal => ({
        title: meal.title || 'Unknown',
        readyInMinutes: meal.readyInMinutes || 0,
        servings: meal.servings || 1,
        nutrients: meal.nutrients || {},
        sourceUrl: meal.sourceUrl || ''
      }))
    };
  }
};
Call “create plan” query on “Submit” button OnClick event & onSuccess call JsObject
{{createplan.run().then(() => {});
JSObjectAnalyseData.calculateDayNutrients();}}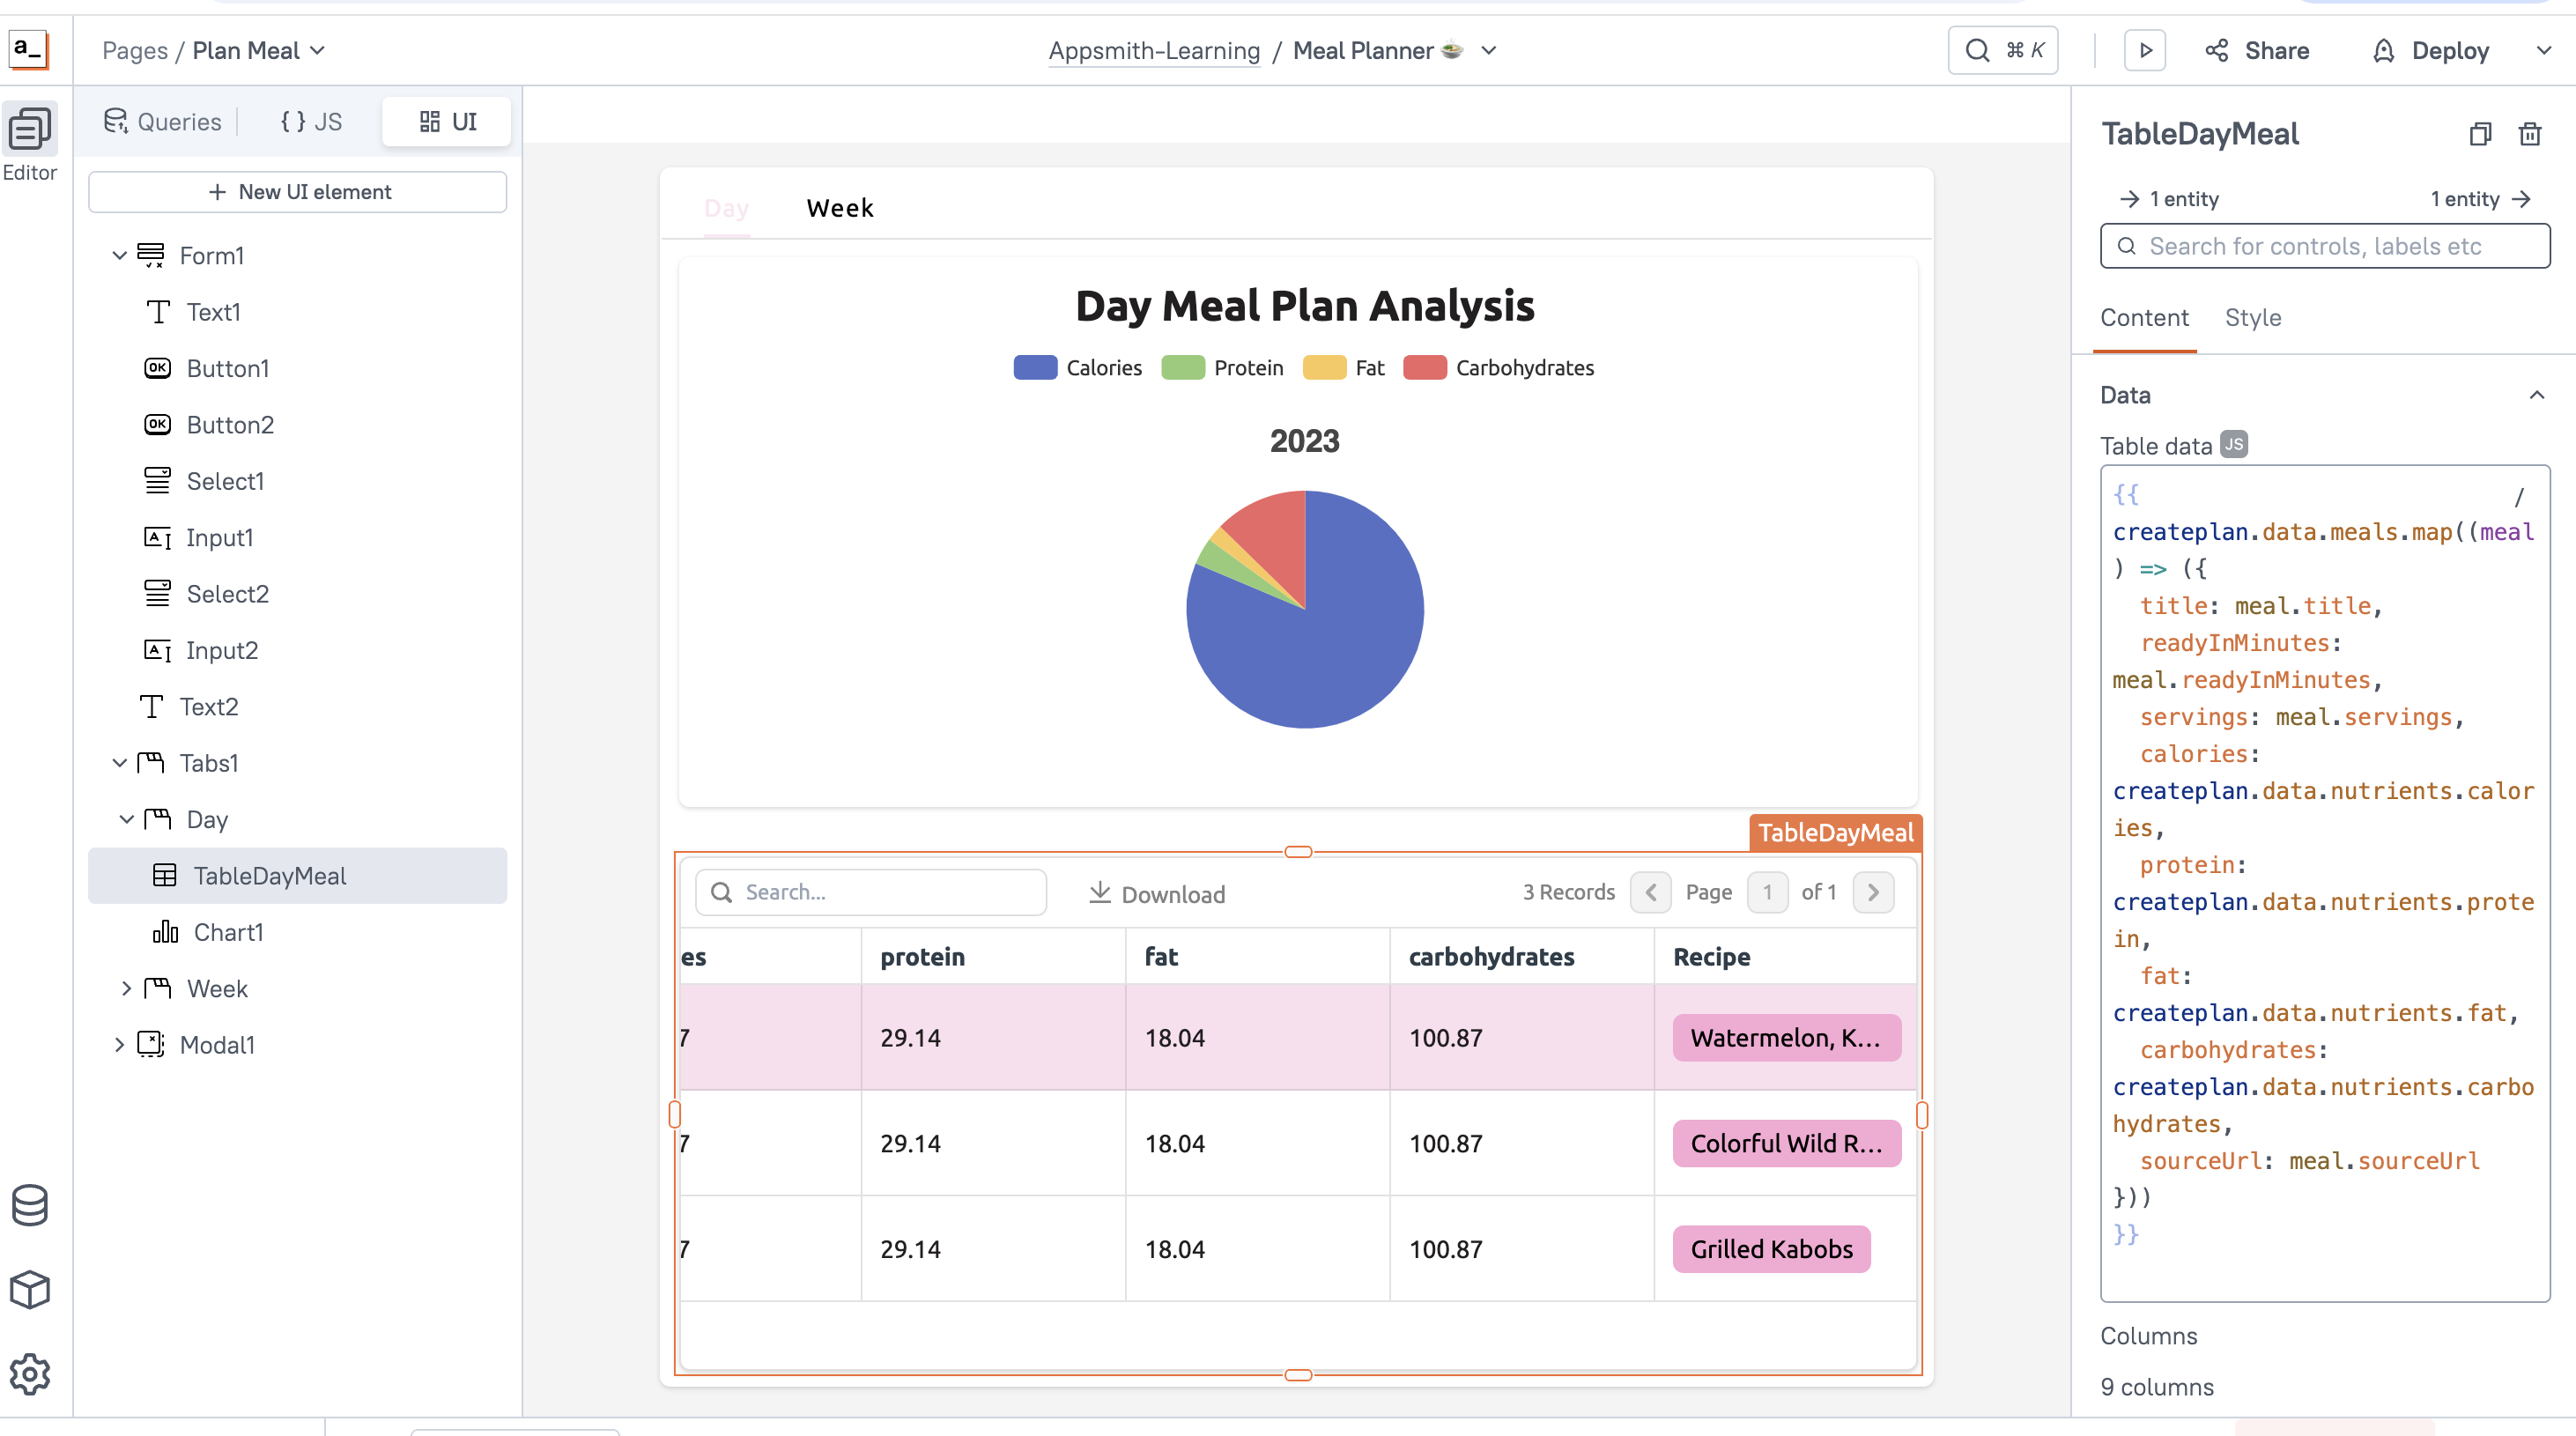
Add Table widget to view the meal plan data with Data binding=>
{{
createplan.data.meals.map((meal) => ({
  title: meal.title,
  readyInMinutes: meal.readyInMinutes,
  servings: meal.servings,
  calories: createplan.data.nutrients.calories,
  protein: createplan.data.nutrients.protein,
  fat: createplan.data.nutrients.fat,
  carbohydrates: createplan.data.nutrients.carbohydrates,
  sourceUrl: meal.sourceUrl
}))
}}
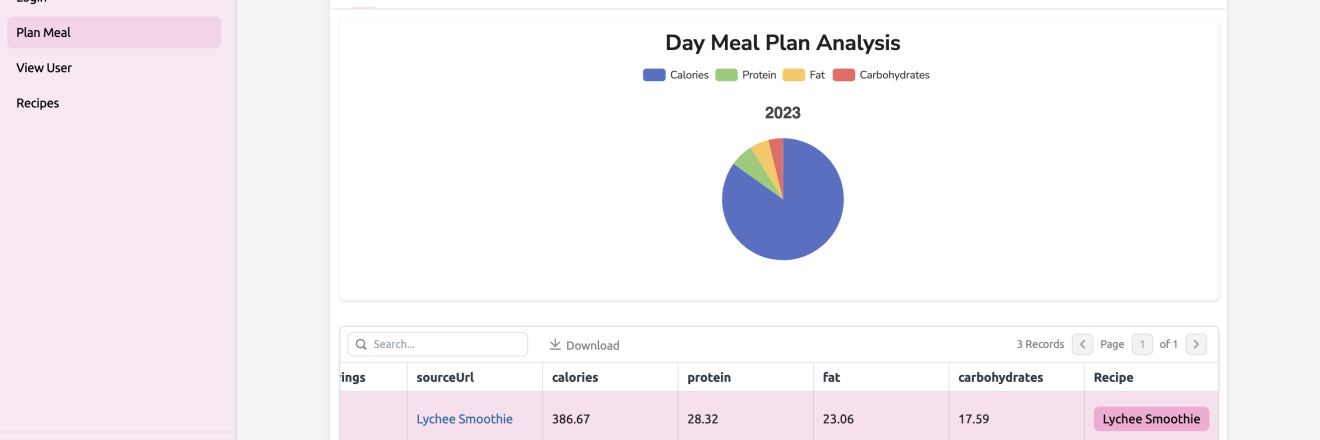
Add Chart widget to analyse meal plan according to nutrients with Data binding for pie chart=>
{{[
  { x: 'Calories', y: JSObjectAnalyseData.calculateDayNutrients()?.totalNutrients?.calories || 0 },
  { x: 'Protein', y: JSObjectAnalyseData.calculateDayNutrients()?.totalNutrients?.protein || 0 },
  { x: 'Fat', y: JSObjectAnalyseData.calculateDayNutrients()?.totalNutrients?.fat || 0 },
  { x: 'Carbohydrates', y: JSObjectAnalyseData.calculateDayNutrients()?.totalNutrients?.carbohydrates || 0 }
]}}
Create API query to view the details of displayed meal plan recipes
GEThttps://api.spoonacular.com/recipes/{{List1.triggeredItem.id}}/informationname it as RecipeInformationTable widget name it as “TableDayMeal” Add new column with button “Recipe” to display the details information/recipe of Planned meal
On Recipe button click Open Modal with Recipe details.
Step 4: Search for Recipe
Create API query to view recipe details according to recipe name, Nutrients & Ingredients
GET https://api.spoonacular.com/recipes/complexSearch?query={{Input1.text}}&includeIngredients={{Input3.text}}&minCarbs={{Input2.text}}&minProtein={{Input5.text}}&maxProtein={{Input6.text}}Name it as SearchRecipeByNameAdd Form widget for Searching required food recipes
- With input widgets
- Input1 for Recipe name
- Input2 for minCarbs
- Input4 for maxCarbs
- Input5 for minProtein
- Input6 for maxProtein
- Input3 for Ingredients
On submit button OnClick() event call query
{{SearchRecipeByName.run();}}Data binding with List widget=>
{{SearchRecipeByName.data.results}}For each Recipe item show button to view the details Instructions & Ingredients details
OnClick event of “View Recipe” button Open Modal & execute query RecipeInformation
{{showModal(Modal2.name).then(() => {
  RecipeInformation.run();
});}}
Data binding=>
Summary Text widget:
{{RecipeInformation.data.summary}}Instructions Text widget:
{{RecipeInformation.data.instructions}}Ingredients Table widget:
{RecipeInformation.data.extendedIngredients}}Recipe Image widget:
{{RecipeInformation.data.image}}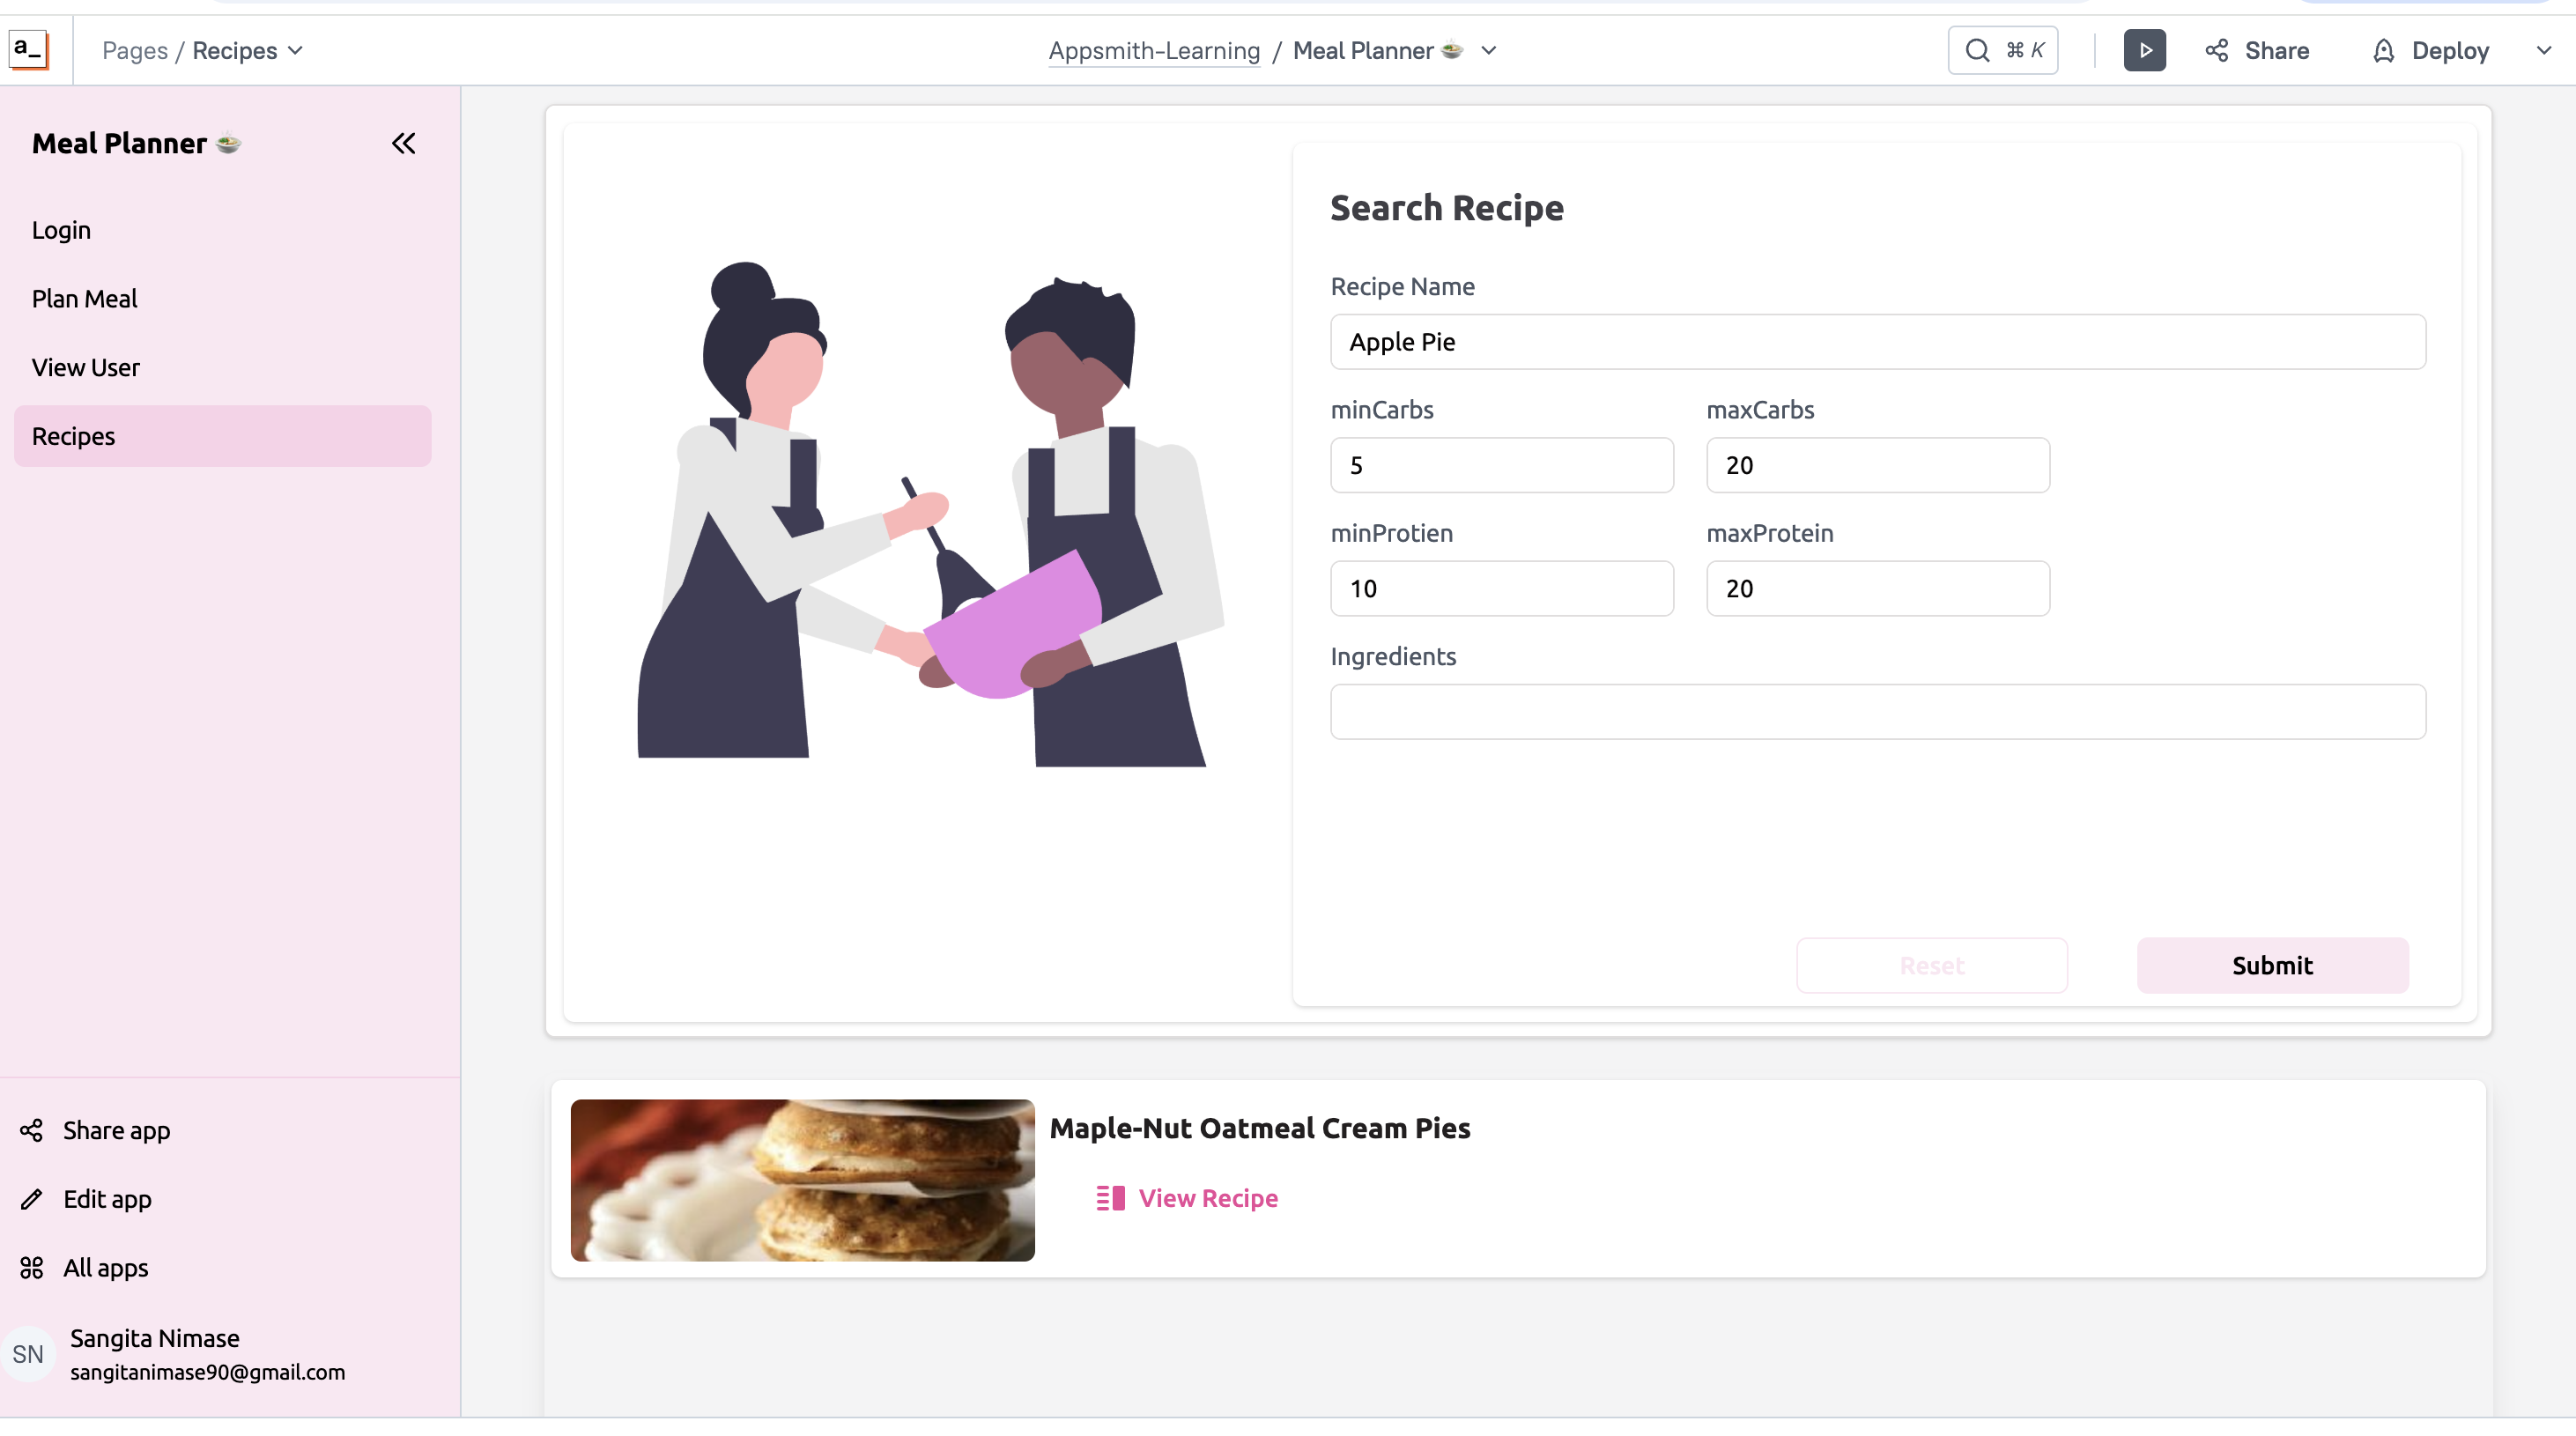
Conclusion
Using Appsmith Widgets and Datasources, you can build dynamic applications like a Meal Planner with ease. Appsmith’s intuitive drag-and-drop interface, combined with powerful REST API and database integrations
