Google Docs has a wide range of options when it comes to uploading images. You can drag in a file from your local drive, upload by URL, search the web, and several other options. But when it comes to extracting those images to use again elsewhere, Google isn't quite so accommodating.
Right click an image, and you'll notice that the regular save image as option is not available. Google replaces the standard browser context menu with their own, and it lacks any options for exporting the images. Fortunately, there are several workarounds.
Option 1: Download as Web Page
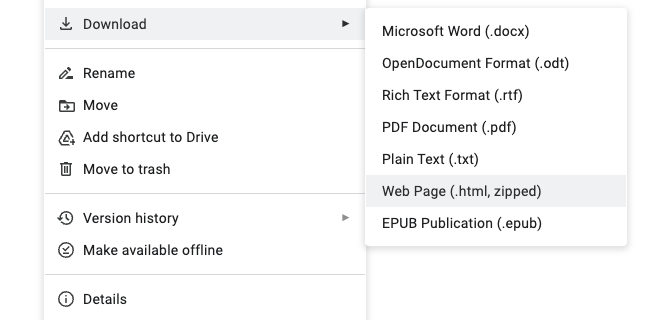
The easiest option is to download the doc as a web page. Unzip the file, and you'll find a subfolder with all of the images in their original resolution, regardless of whether they were resized or cropped in the Google Doc.
Option 2: Download as a Word Doc
Similarly, you can also download the doc as a Word doc and extract the images. Just change the file extension to .zip, save, and then extract. Again, you'll find a subfolder with all the images. This works with any .docx formatted Word Doc.
Option 3: Publish to Web and Scrape Images
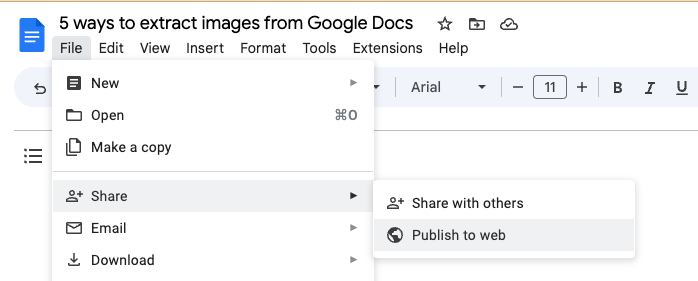
Ok, those first two options are great if your end goal is to download the files locally. But what if you just want the image URLs to share, outside of the Google Doc? Simply publish the doc to the web, then use regex to parse out the image URLs.
Using REGEX to extract the image URLs
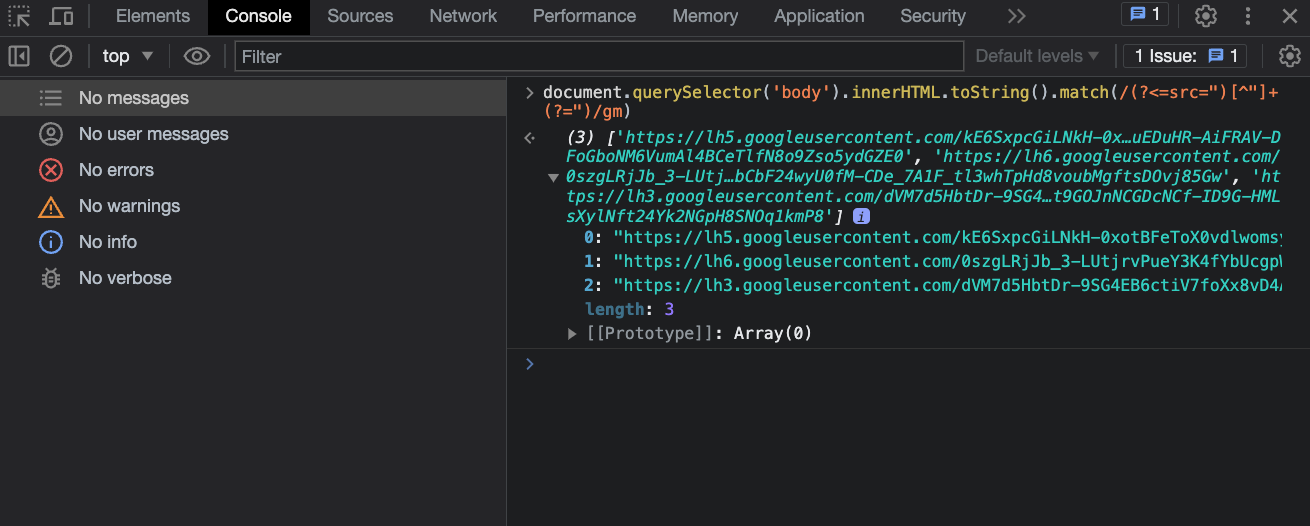
- Open the new public doc, right-click, and Inspect ( Mac: Opt + Shift + I / Win: Ctrl + Shift + I )
-
Click the Console tab, paste in the following snippet, and run:
document.querySelector('body').innerHTML.toString().match(/(?<=src=")[^"]+(?=")/gm)
Or View Page Source on the public web page, copy, and paste in your favorite text editor.
Then use the same REGEX to search the doc: /(?<=src=")[^"]+(?=")/gm
Option 4: Google Apps Script
Public URLs can be quite useful, if you want the images to be public. But what if you want to extract all the images to somewhere else in the cloud, without exposing them publicly? Just create a new Google Apps Script, and paste in this function. Pass it an ID for the Google Doc, and an optional destination folder ID. If no destination is provided, the function will create a new folder in the same folder as the doc.
function getDocImages(sourceId, destinationId) {
  const sourceName = DriveApp.getFileById(sourceId).getName();
  const allImages  = DocumentApp.openById(sourceId).getBody().getImages();

  if(!destinationId){
    const parentId = DriveApp.getFileById(sourceId).getParents().next().getId();
    destinationId  = DriveApp.getFolderById(parentId).createFolder('images').getId()
    };

  const saveTo = DriveApp.getFolderById(destinationId) ;

  allImages.forEach( (i, idx) => saveTo.createFile(i.getAs('image/png').setName( `${sourceName}_${idx + 1}` )) )

}
Option 5: Google Docs API
Lastly, we have the Google Docs API. This is the most powerful option, but also the hardest to configure.
- In Google Console, create a new Project, and enable the Google Docs API
- Create a new set of OAuth2 credentials
- add the redirectlurl:
https://app.appsmith.com/api/v1/datasources/authorize
- In Appsmith, add a new Authenticated API datasource
- Configure as shown in the Appsmith docs
- Save the datasource and authorize
- Use the docId to GET the doc and parse out the images
GET https://docs.googleapis.com/v1/documents/{documentId}
This will return a Document object, which contains a bunch of other nested objects. We're looking for the inlineObjects object. All of the images are stored as-- you guest it-- more nested objects, inside the inlineObjects.
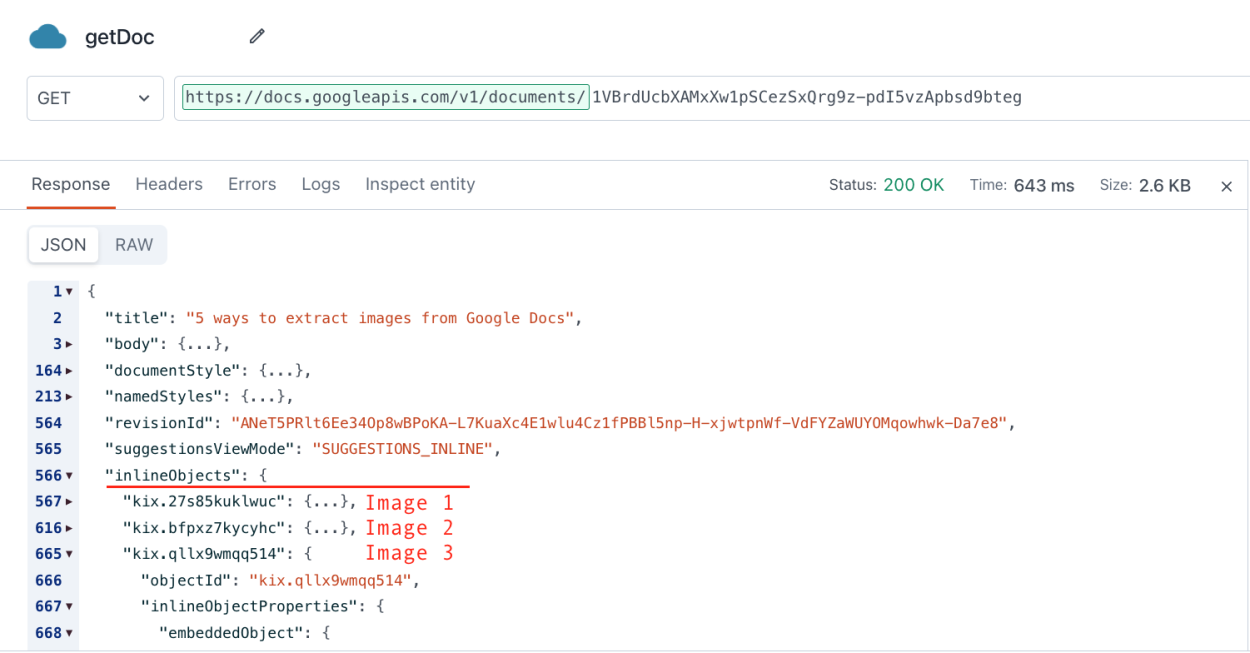
The images are stored as separate key:value pairs, instead of an array. So to loop over the objects and return the links, we first have to extract the Object.keys() of the inlineObjects, and define an array that we can loop over.
	gdocImageLinks () {
		const inlineImgObj = getDoc.data.inlineObjects;
		const imgKeys = Object.keys(inlineImgObj);
		const imgLinks = imgKeys.map(k=>inlineImgObj[k]?.inlineObjectProperties?.embeddedObject?.imageProperties);
		return imgLinks
	}
This will return an array of imageProperties, which will contain a contentUrl or a sourceUrl, depending on how the image was uploaded.
Conclusion
It turns out there are lots of ways to extract images from a Google Doc. In fact, there's one more I left out.
Right-click the image > view more actions > save to Keep. And guess what!? Once the image is in Keep, suddenly that helpful right-click > save image as option is there! For now...




![Thumbnail for the [FTW] Building a Calendar Widget Using Fullcalendar.js & the Google Calendar API 🗓️ video](/sites/default/files/styles/card_image/public/video_thumbnails/fSG_-tS0tUZYnK_KGq62_rsVZejErRRnMuhOL8HEl8k.jpg?itok=eqB2GYof)
Decided to consolidate all of my old Google Apps Scripts from various tutorials and blog posts over the years. https://github.com/GreenFluxLLC/google-apps-script-utils
UPDATE: Here's one more method, using Python in Google Colab,
https://blog.greenflux.us/extracting-all-images-from-a-google-doc-using…