


ChatGPT may be the most well known, but there are tons of other AI platforms with similar chat features, and an API for adding chat to your own application or website. They all have slightly different formats to the API schema and UI, but they have a few things in common:
- An input for a prompt, with a Send button
- A chat history, with different formatting for the user and system
- A copy button for the response
- Markdown formatting and code syntax highlighting
These features will define the MVP (minimum viable product) for our custom AI chat bot widget.
In this guide, we'll build a general purpose AI Chat interface that can be used with any AI Chat API. We'll use vanilla JavaScript, HTML and CSS to build out the basic functionality, then throw in a few libraries for Markdown and syntax highlighting.
Let's get started!
Check out the finished app and copy the template here!
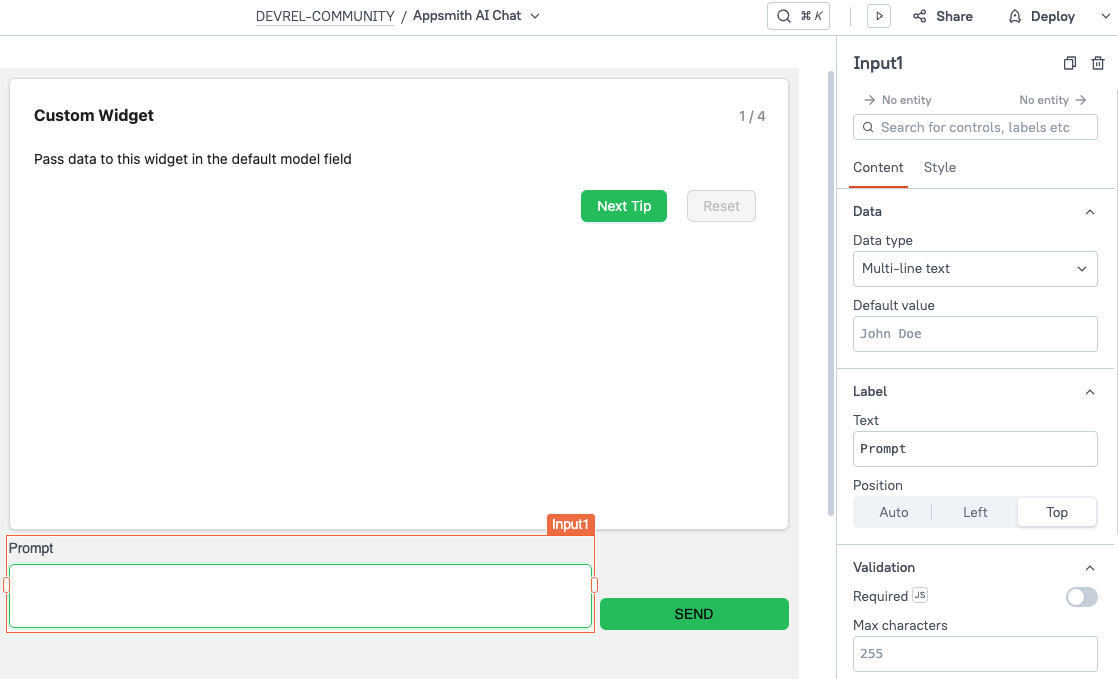
Adding Widgets to UI
To keep the custom code to a minimum, we can use a regular Appsmith Input and Button widget for the first requirement. So we'll focus only on a custom widget for displaying the chat history, adding a copy button, and adding formatting and syntax highlighting.
Add a custom widget to the UI, and place an Input and Button widget below.
Sending a Message
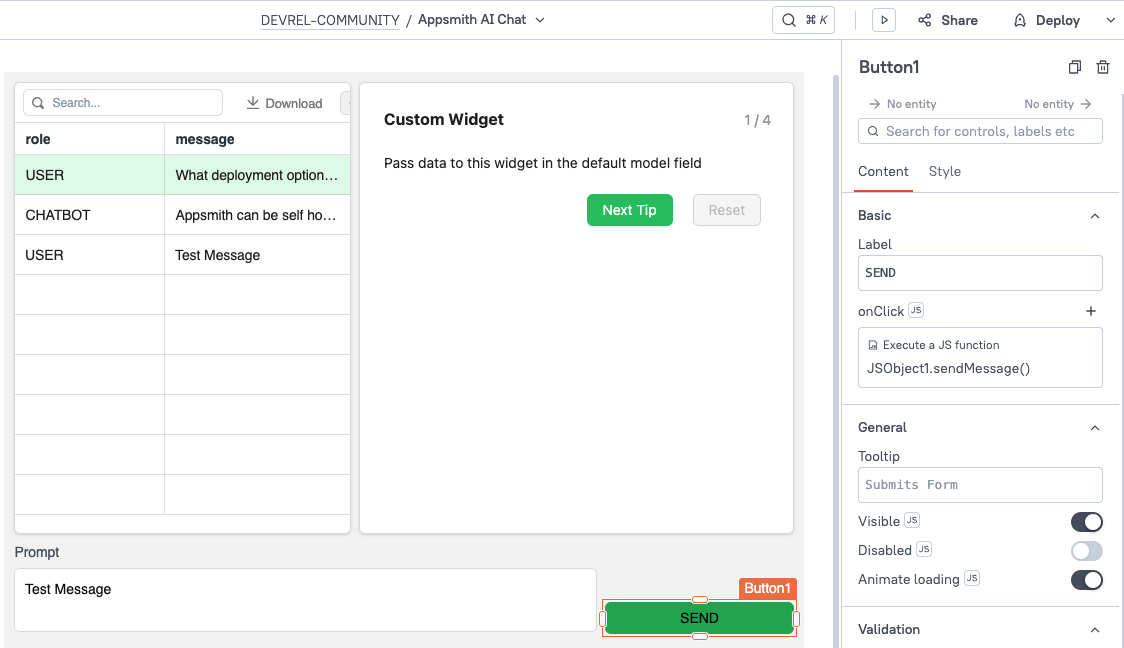
For now, we're going to skip the AI and focus on building the custom widget. We can store a fake array of messages in a JSObject variable, then update that variable to send a message. We'll cover integrating an AI at the end.
Add a new JSObject and add a chatHistory variable to use as sample data. Then add a function for sending a new message.
export default {

    chatHistory: [
     {
       role: "USER",
       message: "What deployment options does Appsmith support?"
     },
     {
       role: "CHATBOT",
       message: "Appsmith can be self hosted and deployed with Docker or Kubernetes, in AWS, Google Cloud, Azure, Digital Ocean, and many other cloud platforms."
     }
   ],
    sendMessage(){
        const newMessage = { role: "USER", message: Input1.text };
        this.chatHistory = [...this.chatHistory, newMessage];
        return this.chatHistory;
    }
}
Displaying Messages
Add a table widget to display the chat history temporarily, until we finish building the chat widget. Then set the button's onClick to run the sendMessage function and test it out. You should be able to add new messages to the array now.
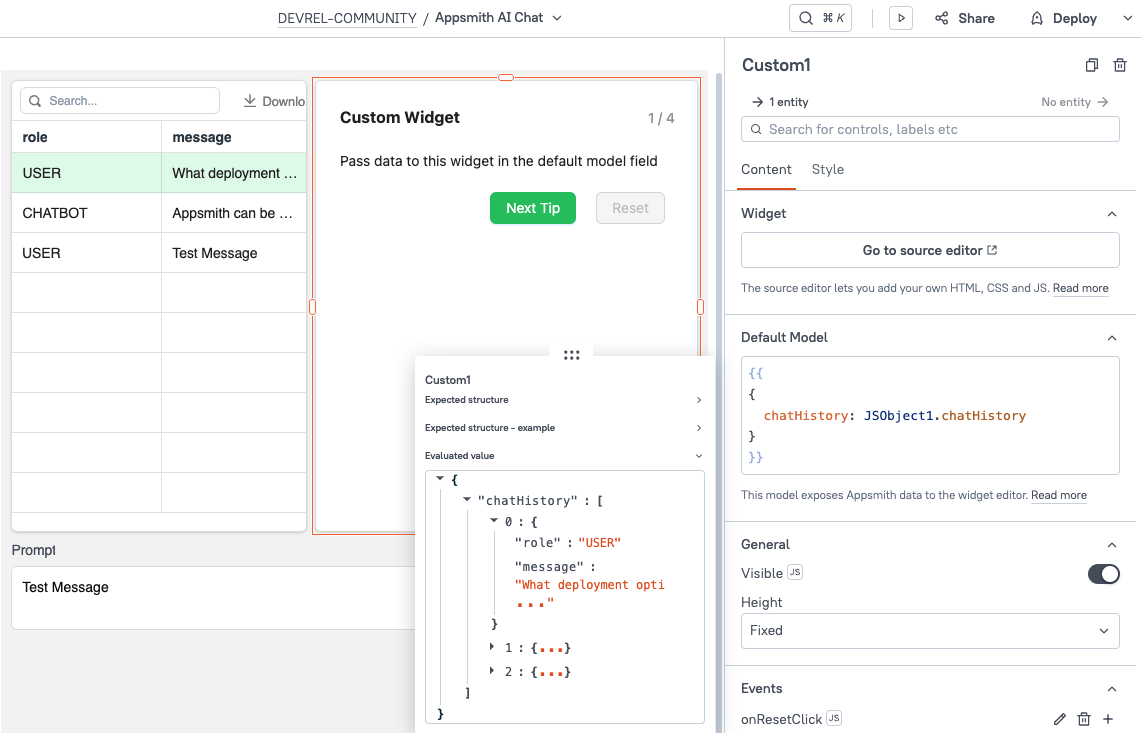
Now select the custom widget, and update the default model to pass in the chat history:
Next, click Edit Source and clear out the CSS and JavaScript tabs. Then update the HTML tab with this snippet:
<!-- Chat widget container -->
<div class="chat-widget" id="chat-widget">
 <div class="messages-container" id="messages-container">
   <!-- Messages will be dynamically inserted here -->
 </div>
</div>
Then add a function in the JavaScript tab to loop over the chat history and add new divs to the messages container. Be sure to wrap the code in an appsmith.onReady() function.
const messagesContainer = document.getElementById('messages-container');

function renderMessage(message, isUser) {
	const messageElement = document.createElement('div');
	messageElement.className = 'message ' + (isUser ? 'user-message' : '');
	messageElement.innerHTML = message || '';
	messagesContainer.appendChild(messageElement)
}


function updateMessages(){
		const chatHistory = appsmith.model.chatHistory || [];
		if (!chatHistory[0]?.message) { return; }
		messagesContainer.innerHTML = '';
		chatHistory.forEach(msg => renderMessage(msg.message, msg.role === 'USER'));
	}

appsmith.onReady(() => {

	appsmith.onModelChange(() => {
		updateMessages()
	});

});
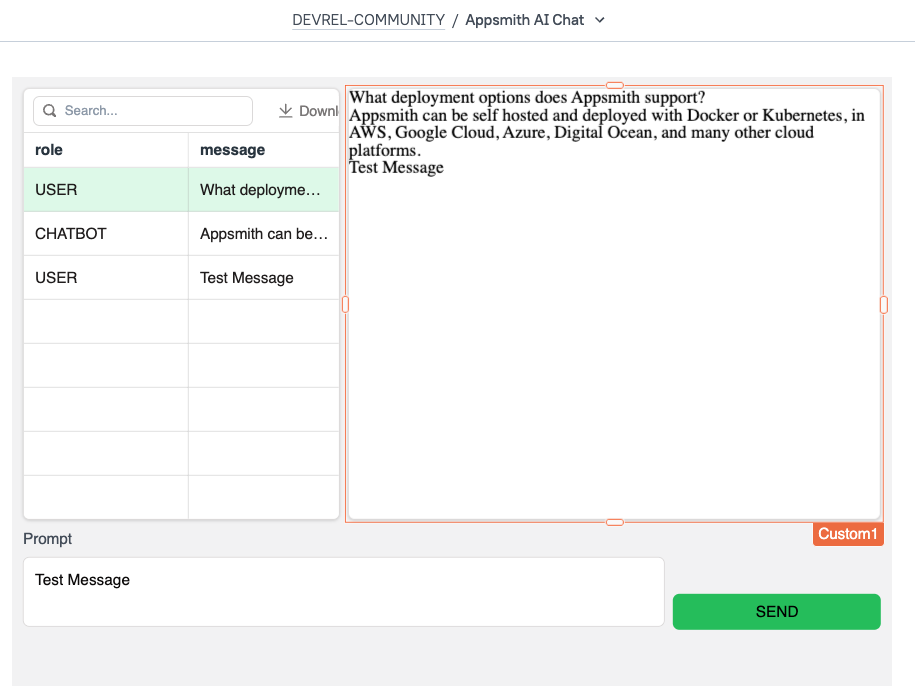
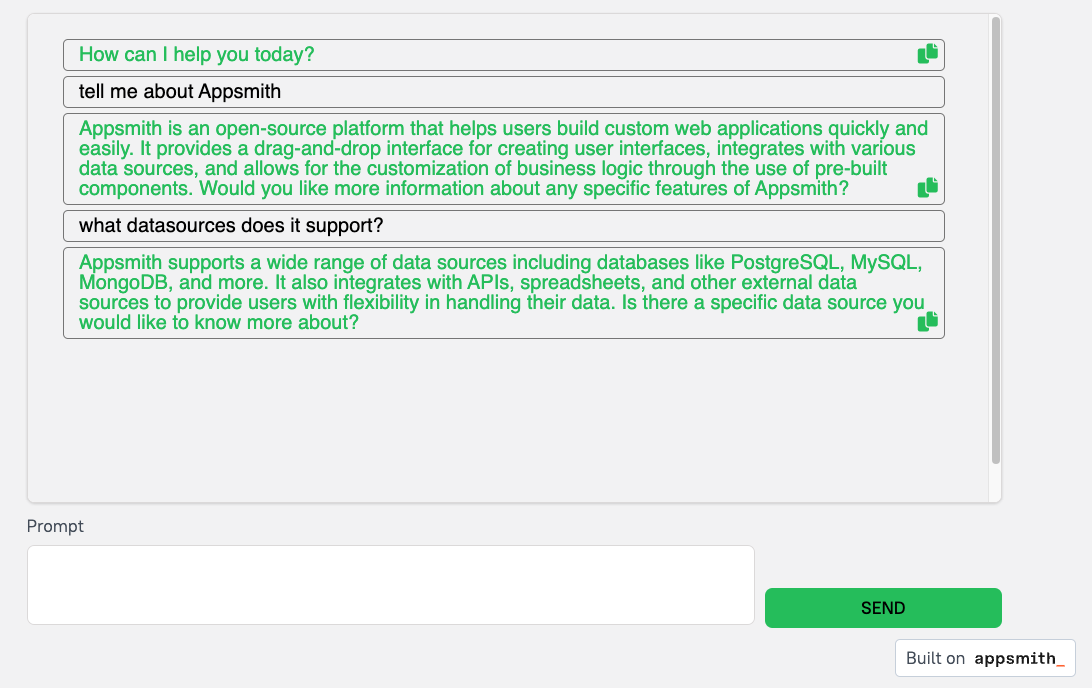
You should now see the messages displayed in the custom widget. Go back to the app editor and try adding a new message to makes sure the UI updates.
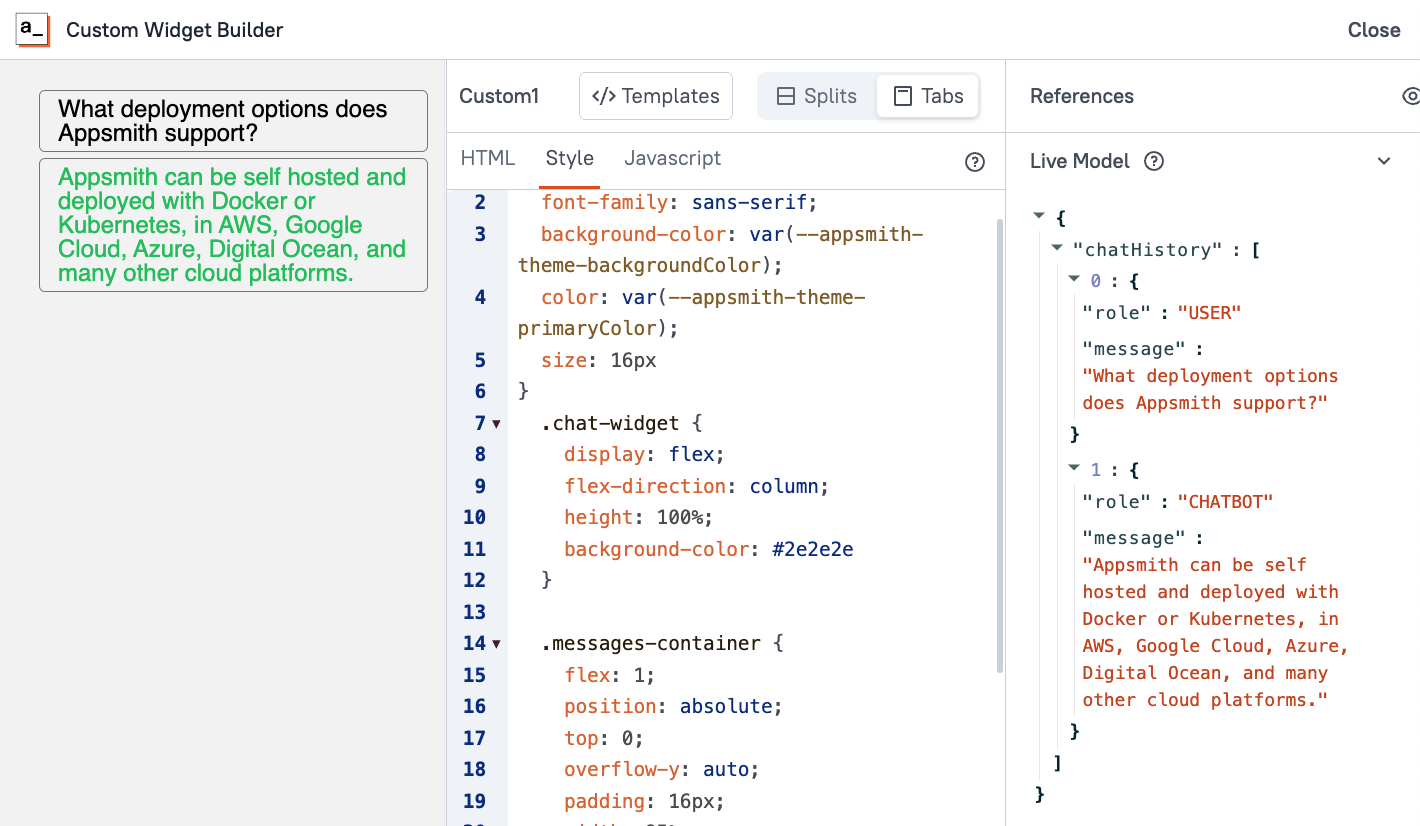
Adding Styling
Next, give the messages some styling to look more like a chat. You can use different styles on the user and system messages.
body{
	font-family: sans-serif;
	background-color: var(--appsmith-theme-backgroundColor);
	color: var(--appsmith-theme-primaryColor);
	size: 16px
}
  .chat-widget {
    display: flex;
    flex-direction: column;
    height: 100%;
		background-color: #2e2e2e
  }

  .messages-container {
    flex: 1;
		position: absolute;
    top: 0;
    overflow-y: auto;
    padding: 16px;
		width: 95%;
		height: 100%
  }

.message {
	margin: 4px 12px;
	border: solid 1px grey;
	border-radius: 4px;
	padding: 4px 12px
}

.user-message {
	color: black
}
Now things are starting to look more like a chat app!
Copy Button
Next we'll add a copy button to the responses. Start out by importing the font-awesome css library for copy icon and any other icons you want to use.
<link rel="stylesheet" href="https://cdnjs.cloudflare.com/ajax/libs/font-awesome/6.0.0-beta3/css/all.min.css">Then update the renderMessage function to conditionally add a copy button if the message is from the chatbot.
function renderMessage(message, isUser) {
	const messageElement = document.createElement('div');
	messageElement.className = 'message ' + (isUser ? 'user-message' : '');
	messageElement.innerHTML = message || '';

	if(!isUser){
		const icon = addCopyIcon(message);
	messageElement.style.position = 'relative';
	messageElement.appendChild(icon);
	}
	messagesContainer.appendChild(messageElement)
}

// Function to handle the copy event by saving to appsmith.model
function handleCopy(text) {
	appsmith.updateModel({copyText: text});
	appsmith.triggerEvent('copy');
}

function addCopyIcon(message){
    const copyIcon = document.createElement('i');
    copyIcon.className = 'fas fa-copy copy-icon';
    copyIcon.style.cursor = 'pointer';
    copyIcon.style.position = 'absolute';
    copyIcon.style.bottom = '5px';
    copyIcon.style.right = '5px';
    copyIcon.addEventListener('click', () => {
        handleCopy(message);
    });
    return copyIcon;
}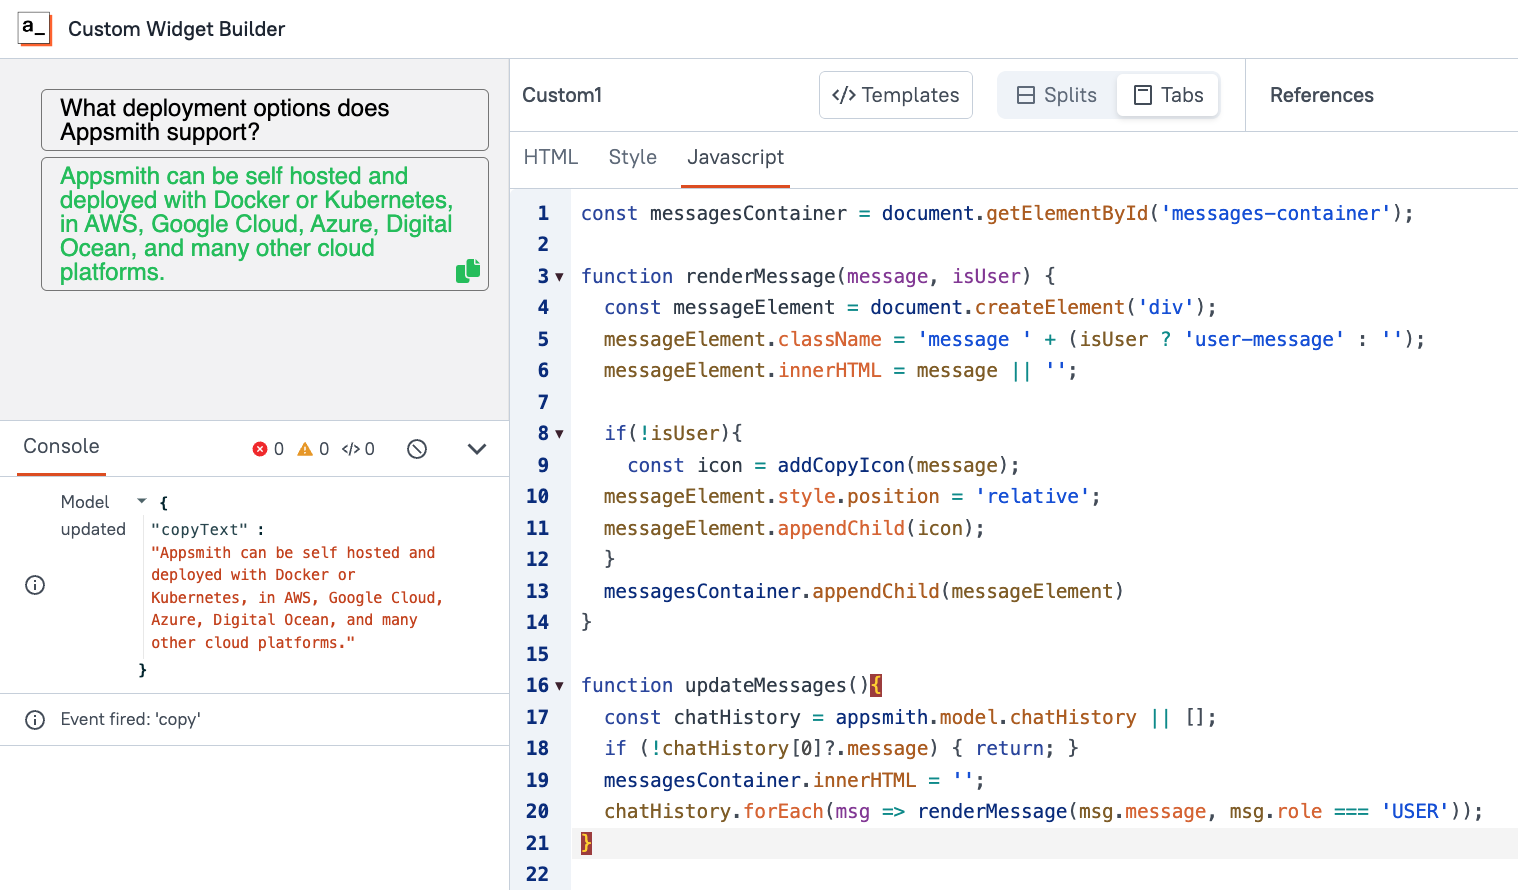
This will save the text to the model, and fire an event name copy. But we still need to define that event.
Adding a Custom Widget Event
Go back to the main app editor, and select the custom widget. Then go down to the events section. You'll see an onResetClick action that was part of the default custom widget example. Delete it, and add a new event named copy. Then, in the event settings, select Copy to clipboard, and set the value to {{Custom1.model.copyText}}.
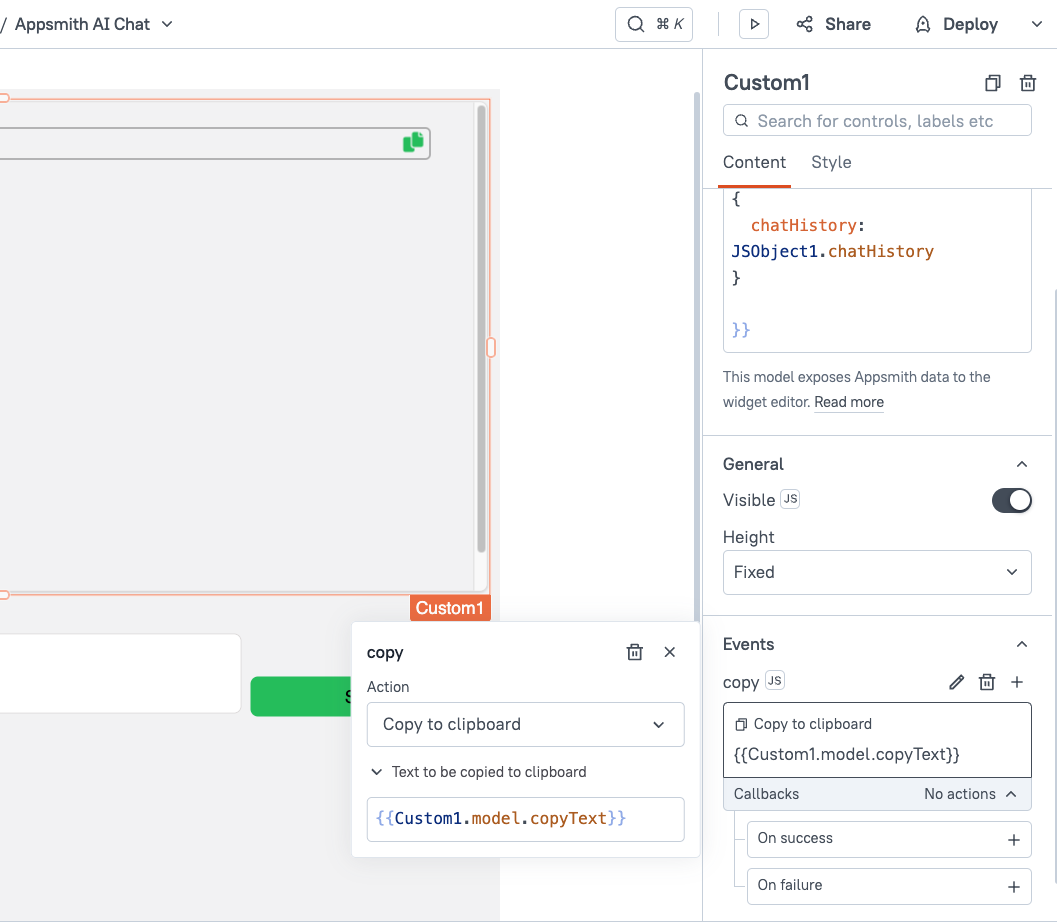
Ok, now test it out! The clipboard should get set with the message text when you click the copy button.
Markdown and Syntax Highlighting
Lastly, we'll add support for displaying Markdown, and syntax highlighting for responses that include code. Start out by importing Marked using the ESM version, by adding this line to the top of the JS file:
import {marked} from 'https://cdn.jsdelivr.net/npm/marked@14.1.1/+esm';Then add a message with some markdown so we have something to test with from the custom widget to see if the formatting works.
Next, update the render message function to parse the message with Marked, before adding it to the DOM:
function renderMessage(message, isUser) {
    const messageElement = document.createElement('div');
    messageElement.className = 'message ' + (isUser ? 'user-message' : '');
    // Using marked to parse and render markdown
    messageElement.innerHTML = marked(message);

    if(!isUser){
        const icon = addCopyIcon(message);
        messageElement.style.position = 'relative';
        messageElement.appendChild(icon);
    }
    messagesContainer.appendChild(messageElement)
}
You should now be able to display Markdown formatting in the messages.
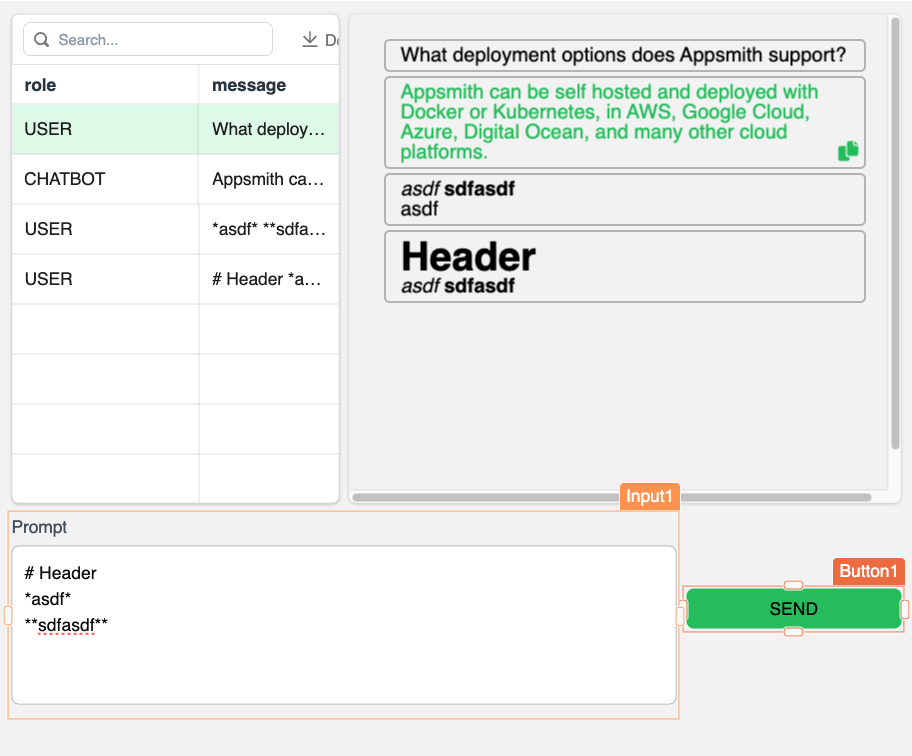
Lastly, we'll add support for displaying syntax highlighting on code blocks.
First import the Highlight JS and CSS to the HTML doc:
<link rel="stylesheet" href="https://cdnjs.cloudflare.com/ajax/libs/highlight.js/11.7.0/styles/default.min.css">
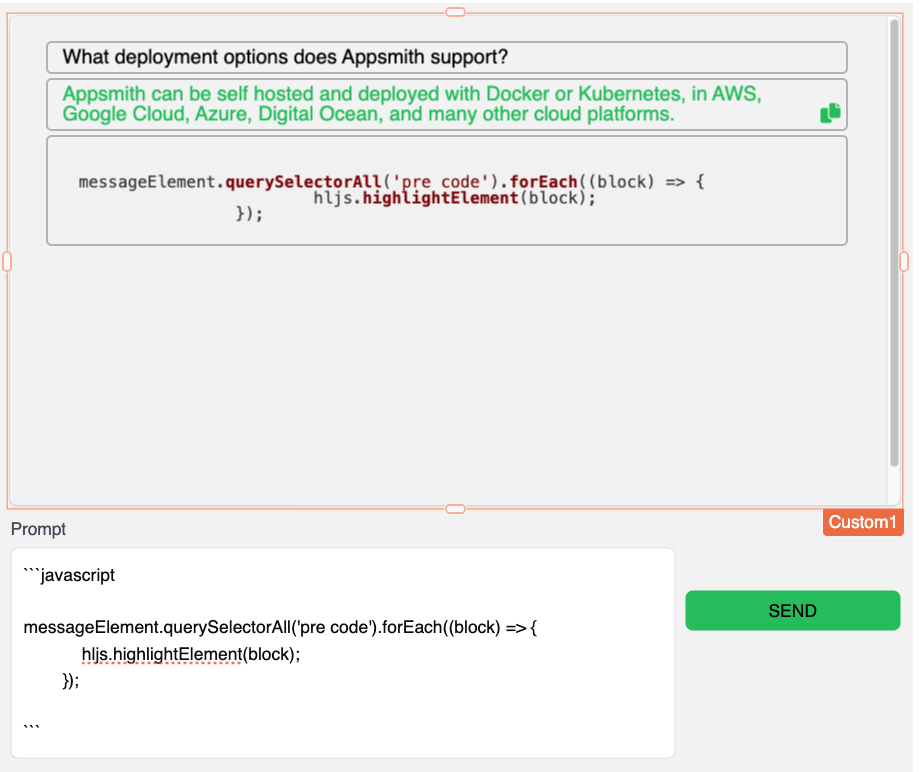
<script src="https://cdnjs.cloudflare.com/ajax/libs/highlight.js/11.7.0/highlight.min.js"></script>Next, add another message to the thread, but this time use a Markdown code block. Start with ```javascript, then add a function to the message and close it with ```. This way we have something to display with syntax highlighting.
Then update the renderMessage function to parse it with HighlightJS after applying the Markdown formatting.
function renderMessage(message, isUser) {
	const messageElement = document.createElement('div');
	messageElement.className = 'message ' + (isUser ? 'user-message' : '');

	messageElement.innerHTML = marked(message || '', {
		highlight: function(code, language) {
			const validLanguage = hljs.getLanguage(language) ? language : 'plaintext';
			return hljs.highlight(validLanguage, code).value;  // Syntax highlighting using highlight.js
		}
	});

	if(!isUser){
		const icon = addCopyIcon(message);
		messageElement.style.position = 'relative';
		messageElement.appendChild(icon);
	}
	messageElement.querySelectorAll('pre code').forEach((block) => {
			hljs.highlightElement(block);
		});
	messagesContainer.appendChild(messageElement)
}
You should now see the syntax highlighting on the code blocks.
Connecting Your Chat API
From here, you can easily connect any AI Chat API and replace the mock chat history with the actual API response. Just update the JSObject to send the user message to your API, then push the response to the chat history.
For this example, I'll be using the built-in Appsmith AI, which is free to use and does not require an API key. To get started, add a new Datasource and choose Appsmith AI. You can optionally add files for the AI to reference, or just give the Datasource a name and click Save.
Then add a query named addMessage, and set the Action to Generate Text. This method is like the /completions endpoint in OpenAI. It responds once, but does not maintain a chat history. This can easily be added though, by passing the chat history with each user message.
Update the Prompt to:
Below is a new message from the user, and a history of your chat with them. Review the history and the new message, then reply as the system to continue the conversation. # NEW MESSAGE:
{{Input1.text}}
# CHAT HISTORY
{{JSObject1.chatHistory}}
Then, update the JSObject. You'll want to remove the mock response from the user, and add an initial greeting from the chatbot. Then update the sendMessage function to call the AI Text Generation action, and save the response to the chat history.
export default {

	chatHistory: [{role: "CHATBOT", message: "How can I help you today?"}],

	async sendMessage(){
		const newMessage = { role: "USER", message: Input1.text };
		this.chatHistory.push(newMessage);
		const reply = await addMessage.run();
		this.chatHistory.push({role:"CHATBOT", message: reply.response});
		resetWidget('Input1')
		return this.chatHistory;
	}

}
And then... DEPLOY! 🚀
You should now have a functioning AI chat bot. Try it out and see if it retains context from one question to the next.
Conclusion
There are lots of AI Chat APIs that can be used to quickly add AI to your own internal tools and web apps, but creating an interface for the chat can be a little challenging. This guide has shown how you can use vanilla JavaScript to create the chat history display, then use Marked and HighlightJS to add Markdown and syntax highlighting. From here, you can easily copy this custom widget into any app to add your own personalized AI chat bot using any API.


Nice! You never cease to amaze!
Hi Joseph and team,
Great starting point. Unlike other templates, I only seem to be able to run the preview. Is it possible to obtain the template within my own Appsmith dev environment ?
Thanks
Simon
In reply to Hi Joseph and team, Great… by simon-lewis
Doh ! I can see now when viewing Joseph's awesome tutorial how simple this is. No need to download a template as I can build it quickly by following along .... Yay !