

Connecting to the Stripe API
Goal
- Create an API key in Stripe and save it as an Authenticated API Datasource in Appsmith
- Create APIs to list and manage Charges and Refunds from Appsmith
Prerequisites
An Appsmith account
A Stripe account and test or production store already set up (not covered in this tutorial)
Overview
Stripe's API is easy to use and has excellent documentation and developer tools. If you're already using Stripe and want to integrate with the API, this tutorial will help you get started. The Charges and Refunds endpoints will be used as examples, but you can use this same approach to connect to any of Stripes endpoints.
Topics Covered
- Creating an API Key in Stripe
- Saving the key as an Authenticated API Datasource in Appsmith
- Creating APIs to List Charges and Refunds, and Create Refunds
- Refunding Payment Intents
Create an API Key in Stripe
Start out by going to your Stripe Dashboard and navigate to the API Key tab. Ensure you have the Test Mode toggle turned on at first, and get your app working properly before connecting to production data. If your Stripe store is already live, you can create a separate test store to be safe.
- Click the + Create restricted key button in the bottom right
- Name the key
- Select write access for Charges (or any other scopes needed for your use case)
- Scroll to bottom and click Create key to save the key
- Click Reveal test key, and leave this page open to copy in the next section
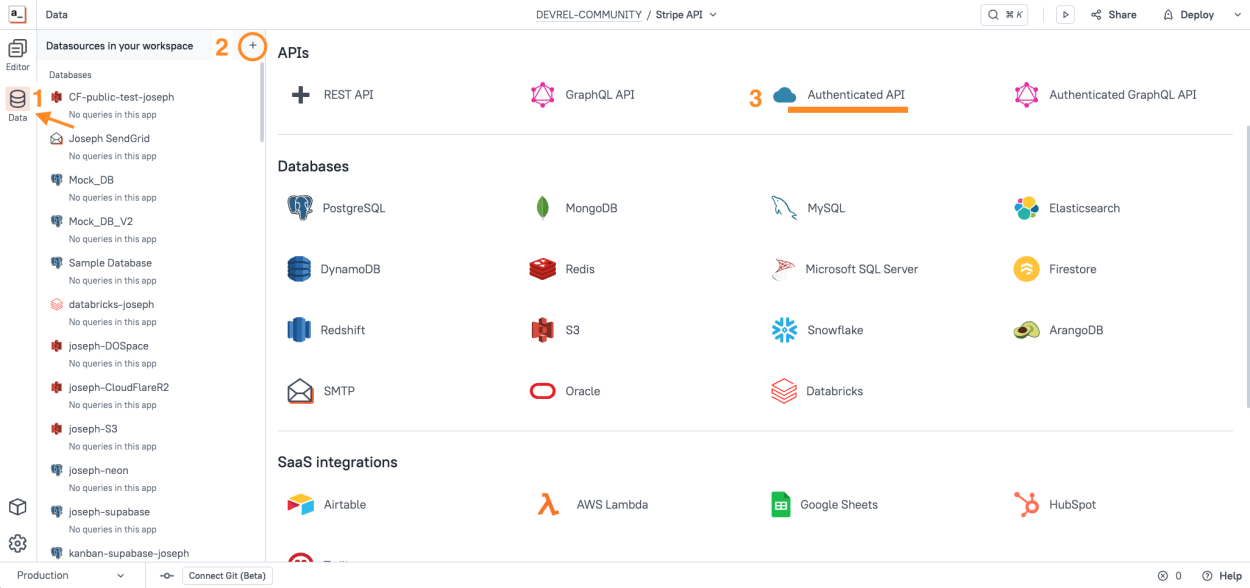
Creating an Authenticated API Datasource in Appsmith
Next, open a new Appsmith app, or an existing app you want to integrate with Stripe. Click the Data icon on the left sidebar and create a new Authenticated API Datasource.
Fill in the form as follows:
Name Give the Datasource a title. It helps to also add your name, when working with a team. URL https://api.stripe.com Authentication Type Bearer token Bearer token YOUR_API_KEY Notice the green lock icon on the Bearer token field. This indicates the field is encrypted on your self-hosted Appsmith server, and will never be sent to client applications. More on security here.
Click SAVE. Your Datasource is now connected and ready to use.
Listing Charges and Refunds
Next, add a new API under the Stripe Datasource. If you're still viewing the Datasource, you can use the + New API button in the top right to add an API to it. Or go to the Queries tab and click + to add a new API, then select the Stripe Datasource. You can also use
cmd-shift-+(mac) orctrl-shift-+(windows) to quickly add a new API.You should see the URL prefilled with https://api.stripe.com with a blue bar around it, indicating that this API is part of a Datasource and will inherit the Authentication settings.
Configure the API as follows:
Name getCharges Method GET URL /v1/charges Body Type FORM_URLENCODED Key #1 limit Value #1 20 Click RUN and you should get back a
200response with a list of any Charges in your account.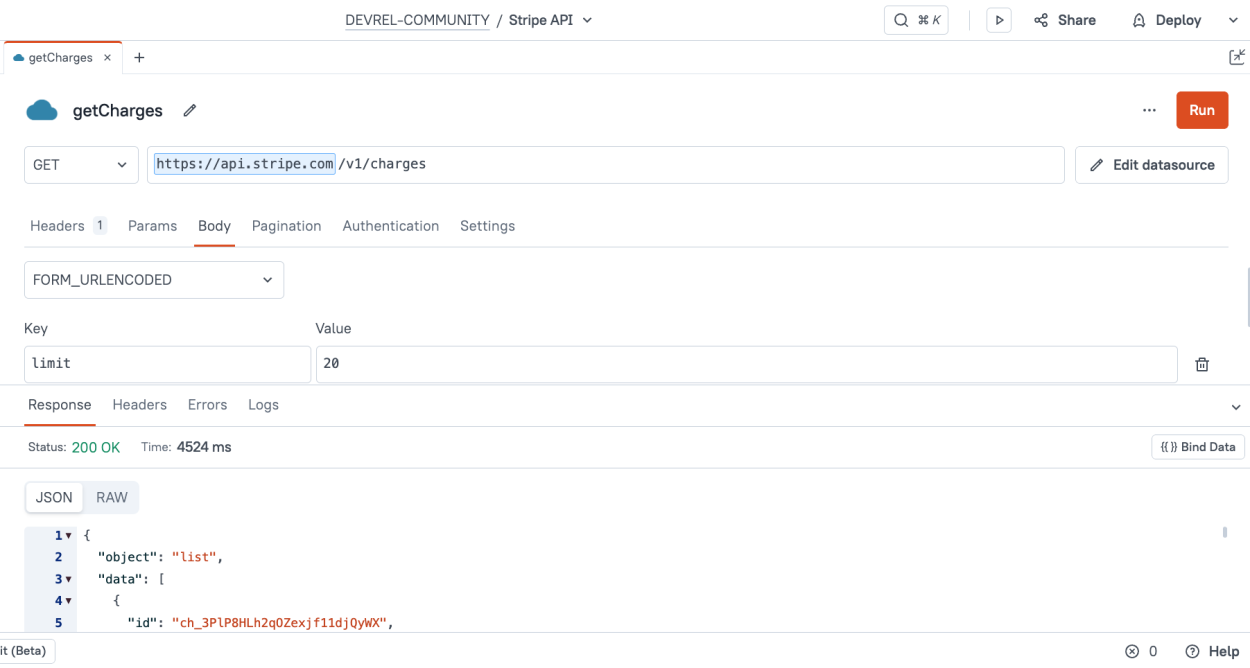
The response can be accessed at
getCharges.data. In this case, the response is an object containing another property calleddata, containing the array of Charges.Displaying Data in a Table Widget
Now switch over to the UI tab and drag in a Table Widget and name it
tbl_charges.Then set the Table's Data to:
{{getCharges.data.data}}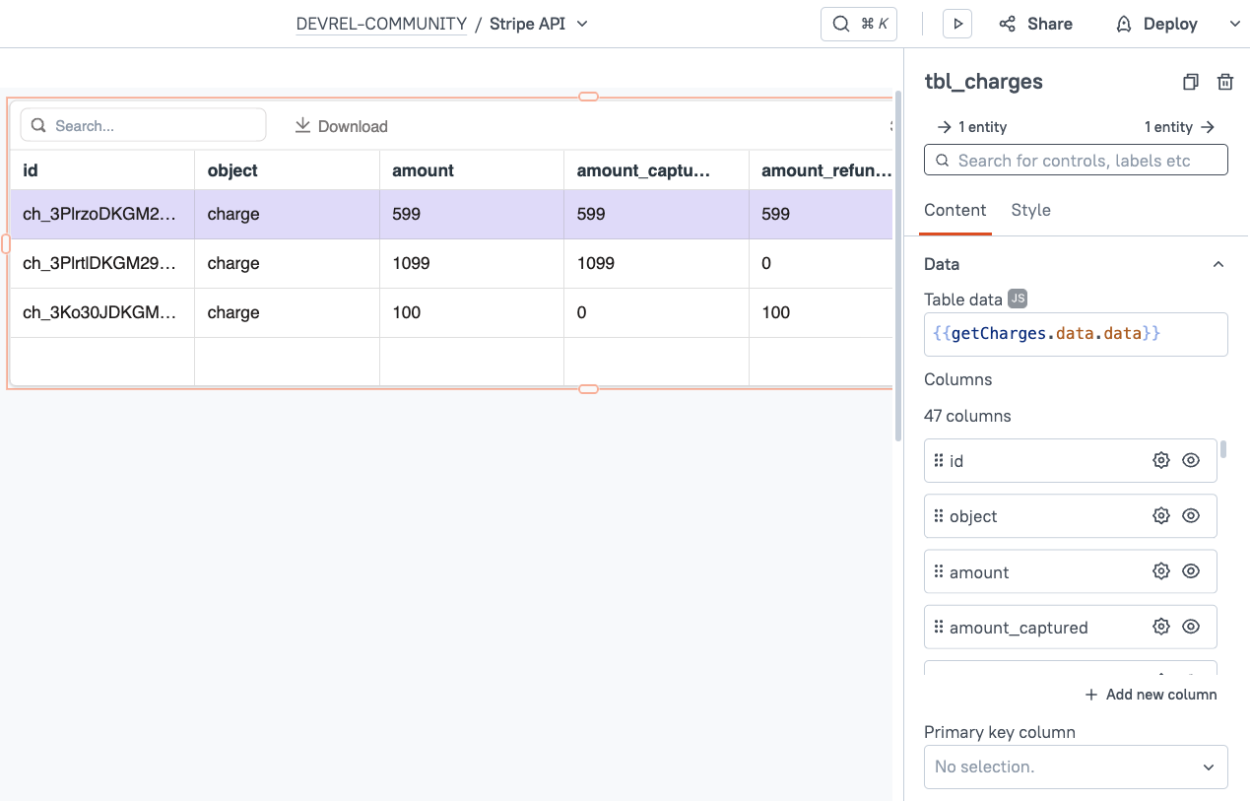
Listing Refunds
Now follow the same steps to add the
getRefundsAPI. Use the same settings at above, except the URL is/v1/refundsthis time.Then drag in another Table Widget, name it
tbl_refunds, and connect it togetRefunds.data.data.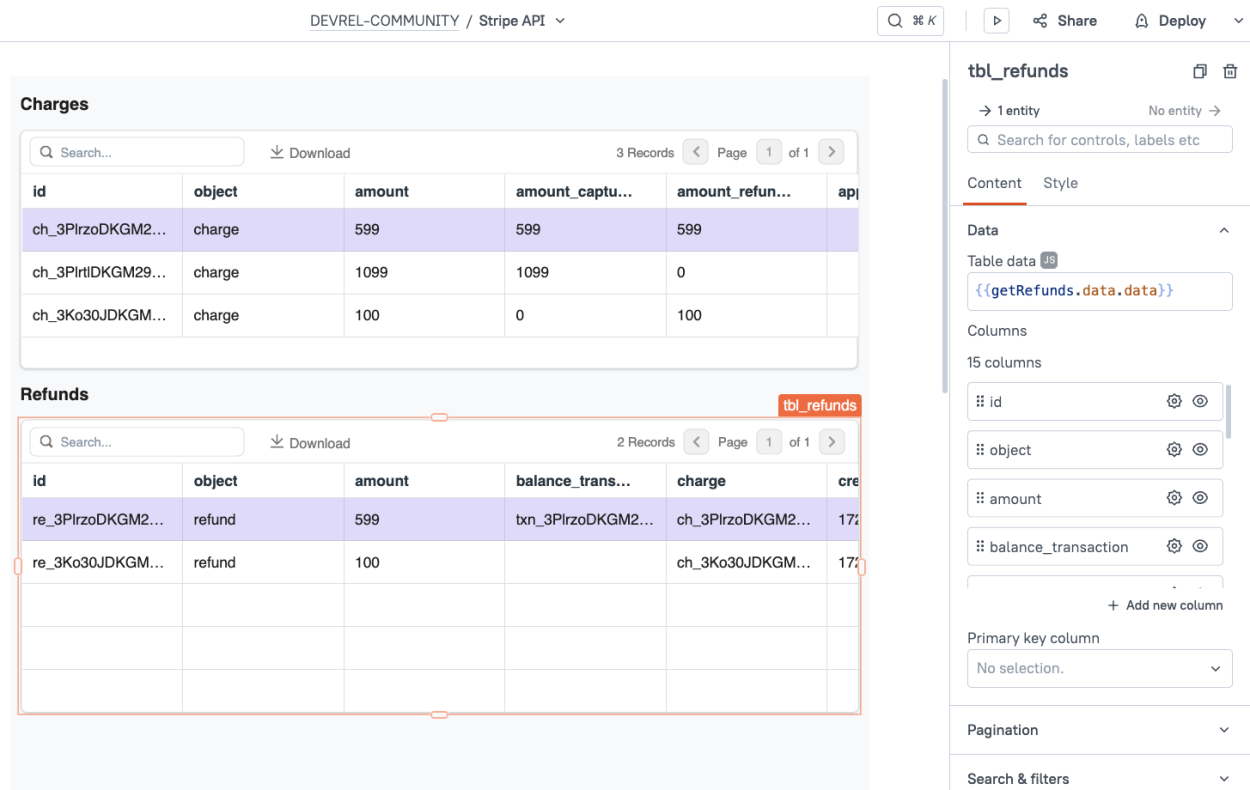
Creating a Refund
Select the
tbl_chargesTable, and click the + add new column button, then set the column type to Button. You may want to also drag the new column to the top of the list to make the button easier to see without scrolling.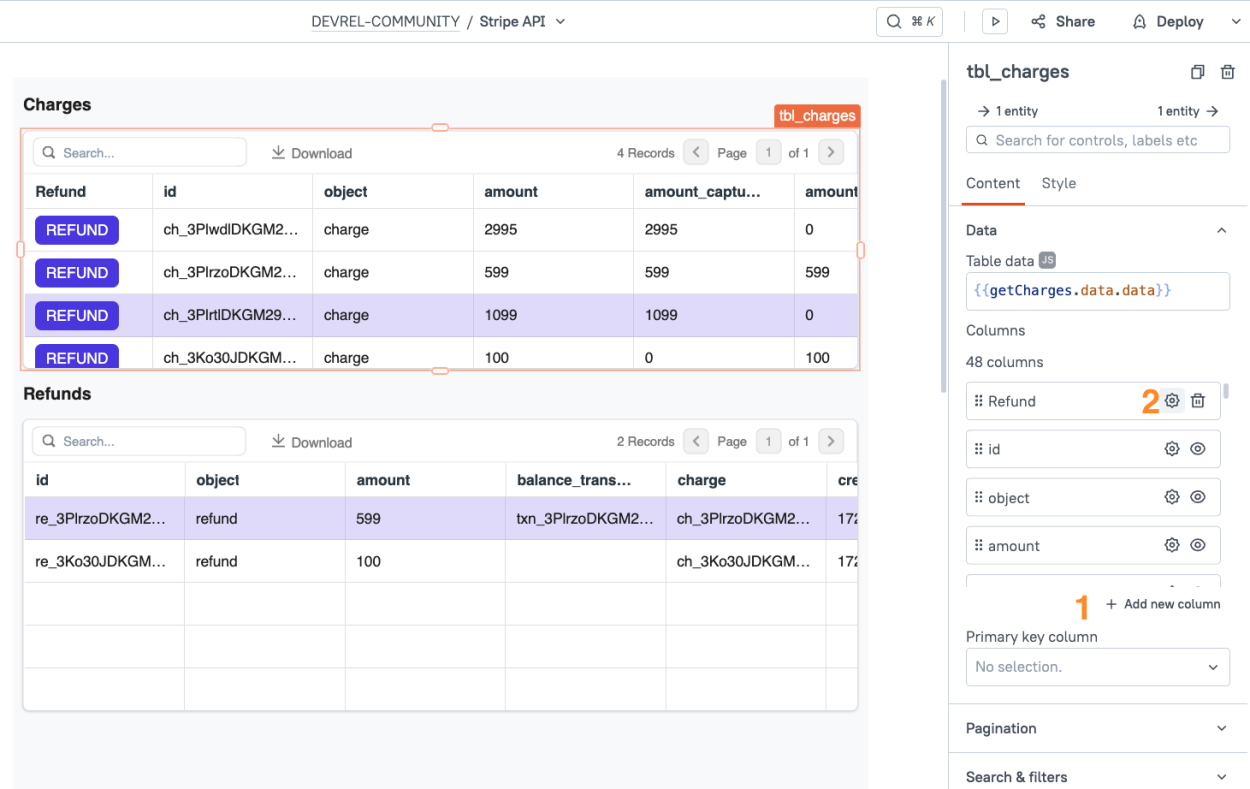
Now add a POST API under the Stripe Datasource and name it
createRefund.Set the Body Type to
FORM_URLENCODEDand add the following parameter:Key charge Value {{tbl_charges.triggeredRow.id}}Then go to the API's Settings tab and turn on Request confirmation before running API.
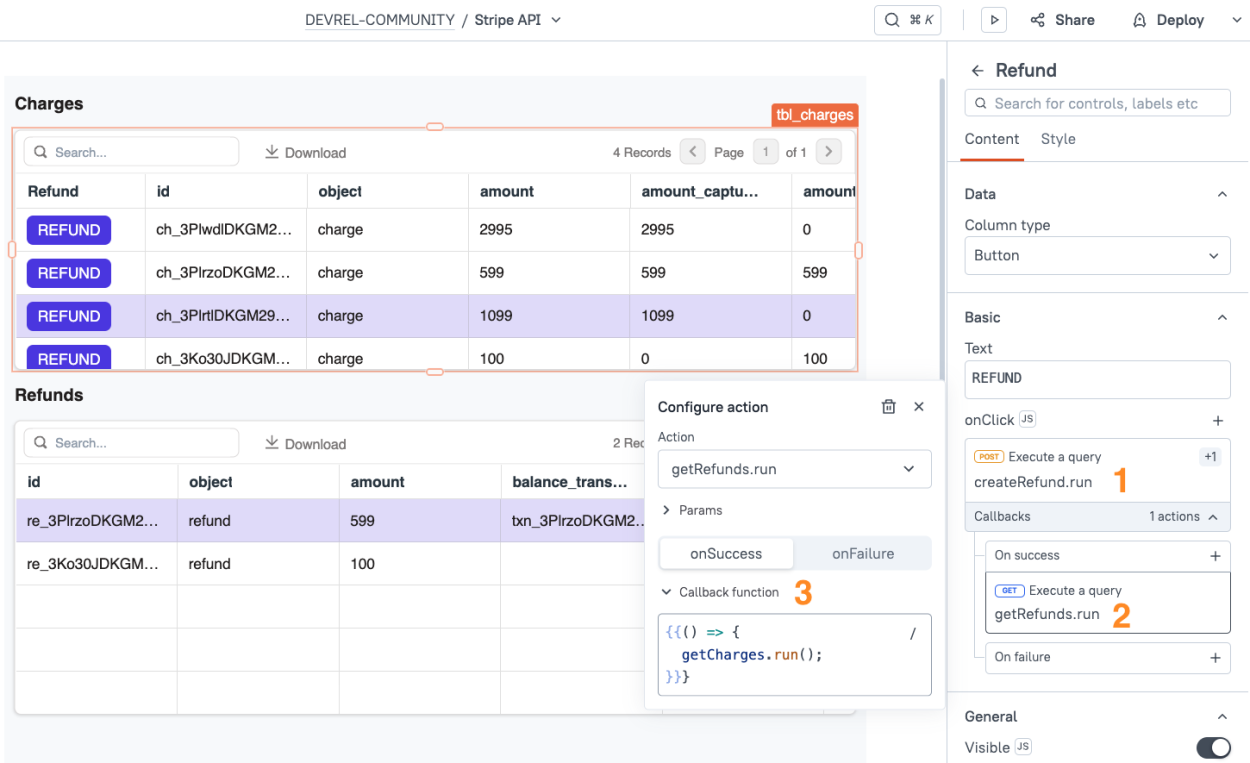
Lastly, connect the Button to the API. Select the
tbl_chargesTable and enter the settings for the Refund Button column.- Set the onClick event to trigger the
createRefundAPI - Set the createRefund callback to run the
getRefundsAPI, so you can see the new refund in the refunds table. - Set the getRefunds callback to run the
getChargesAPI, so you can see the refunded amount on the charge.
Your app should be ready to test out!
Select a charge that has not been refunded and click the REFUND button. You should see the confirmation dialog. Click Yes to confirm and you should see both the new record in the Refund table, and the updated refund amount in the Charges table.
- Set the onClick event to trigger the
Refunding a Payment Intent
Newer Stripe stores may be using Payment Intents, instead of Charges. You can use the same createRefund API to refund Payment Intents as well. Just change the Key from
chargetopayment_intent. And instead of getCharges, set up an API and table for the/v1/payment_intentsendpoint.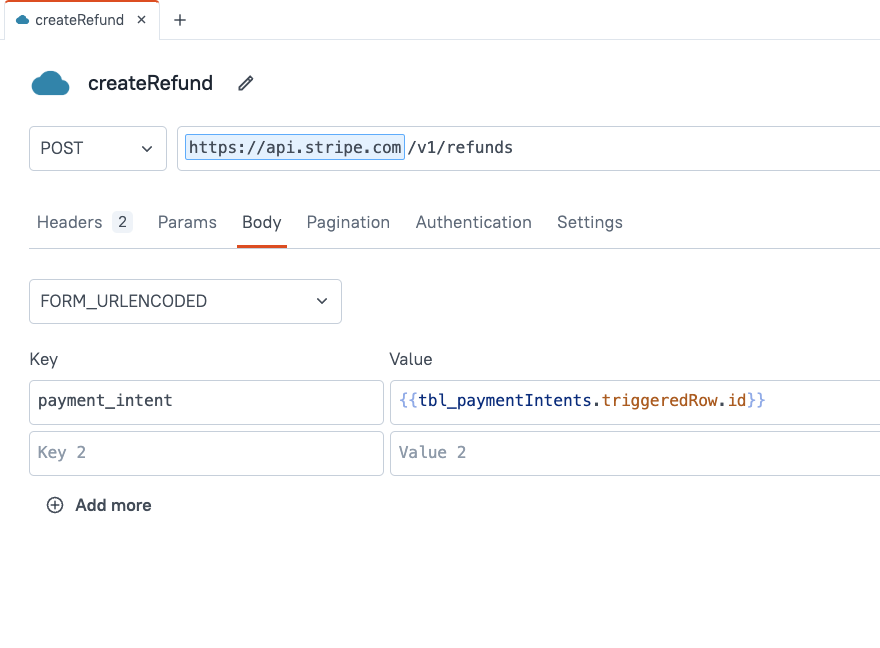
Payment Intents work a little differently, so you won't be able to refund an intent unless it's in the right status. See the Stripe API Docs for more details.
Conclusion
Connecting to the Stripe API is easy and secure, using an Authenticated API Datasource in Appsmith. In just a few minutes you can have a datasource set up, and start working with any of the Stripe endpoints to manage Customers, Payments, Refunds, Disputes, or any other resource.