


Appsmith's UI builder uses a drag-and-drop canvas, so little to no coding is required to design an app. But to do things like add business logic, filter data, and conditionally disable or hide widgets, JavaScript is used extensively throughout the editor. You can write JavaScript just about anywhere you would write plain text in Appsmith, or in place of toggle settings, widget color and style properties, or just about any other setting.
This guide will cover the various places and syntaxes for using JavaScript in Appsmith. It is intended for users who have a basic understanding of JSON and JavaScript functions, and will focus more on practical applications. We'll cover bindings, expressions, functions, variable mutation and the Appsmith storeValue function, and many other essential parts of the JavaScript environment in Appsmith. Let's get started!
Bindings {{}}
Double curly braces, or mustache syntax {{}}, is used to wrap JavaScript code anywhere it is used throughout the editor, except for in a JSObject (the full page JS editor). Anything inside the {{}} should be valid JavaScript, or JSON, but other text can be outside the bindings.
Drag in a new text widget and note the default binding of:
Hello {{appsmith.user.name || appsmith.user.email}}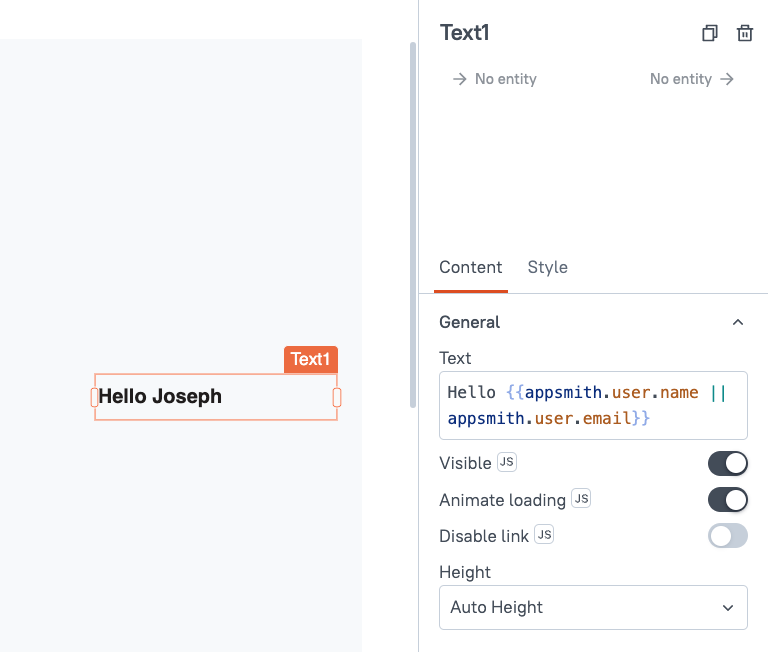
The Hello text is hard-coded, and joined with the evaluated value of the expression inside the double curly braces. In this case, an OR || operator is used to return the user's name, or the email if the name is not available.
Next, drag in a datepicker widget and go to the default date setting. Click the (JS) button above the input to switch from the calendar picker to JavaScript mode.
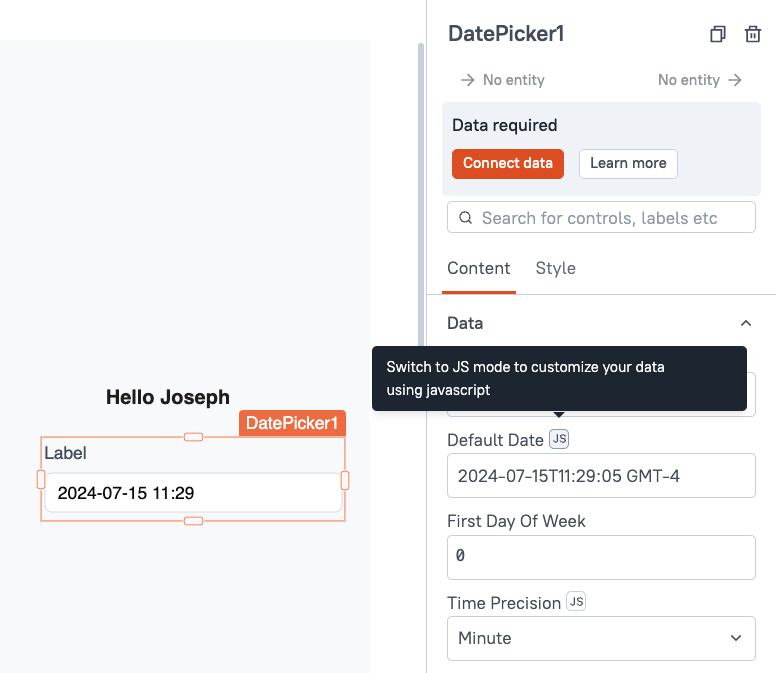
With JS mode enabled, the date can now be set with an expression. Just replace the default date text with mustache syntax and start writing JavaScript.
Let's say you wanted the default date to be 30 days from today. You could use plain JS and the new Date() method, but Appsmith includes the moment.js library to assist when working with dates. Using moment, the value can be calculated with:
{{moment().add(30,'days').format('YYYY-MM-DD')}}More on using other libraries in a few sections...
In general, the JavaScript used inside a widget setting or property is usually an expression, and not a full function. Expressions are just snippets of JS that evaluate to a value, like appsmith.url.params or appsmith.user.email.includes('@appsmith.com') (returns true or false based on the user).
Functions can also be used, but the widget property input isn't meant for writing full code. It works fine for short expressions, but to write multiple lines of code, a JSObject should be used.
JSObjects
Now that we have some basics out of the way, it's time we get to the full JS editor in Appsmith: JSObjects. Click the JS tab of the left sidebar, then add a new JSObject. The default code snippet provides a few examples of how to declare variables and functions.
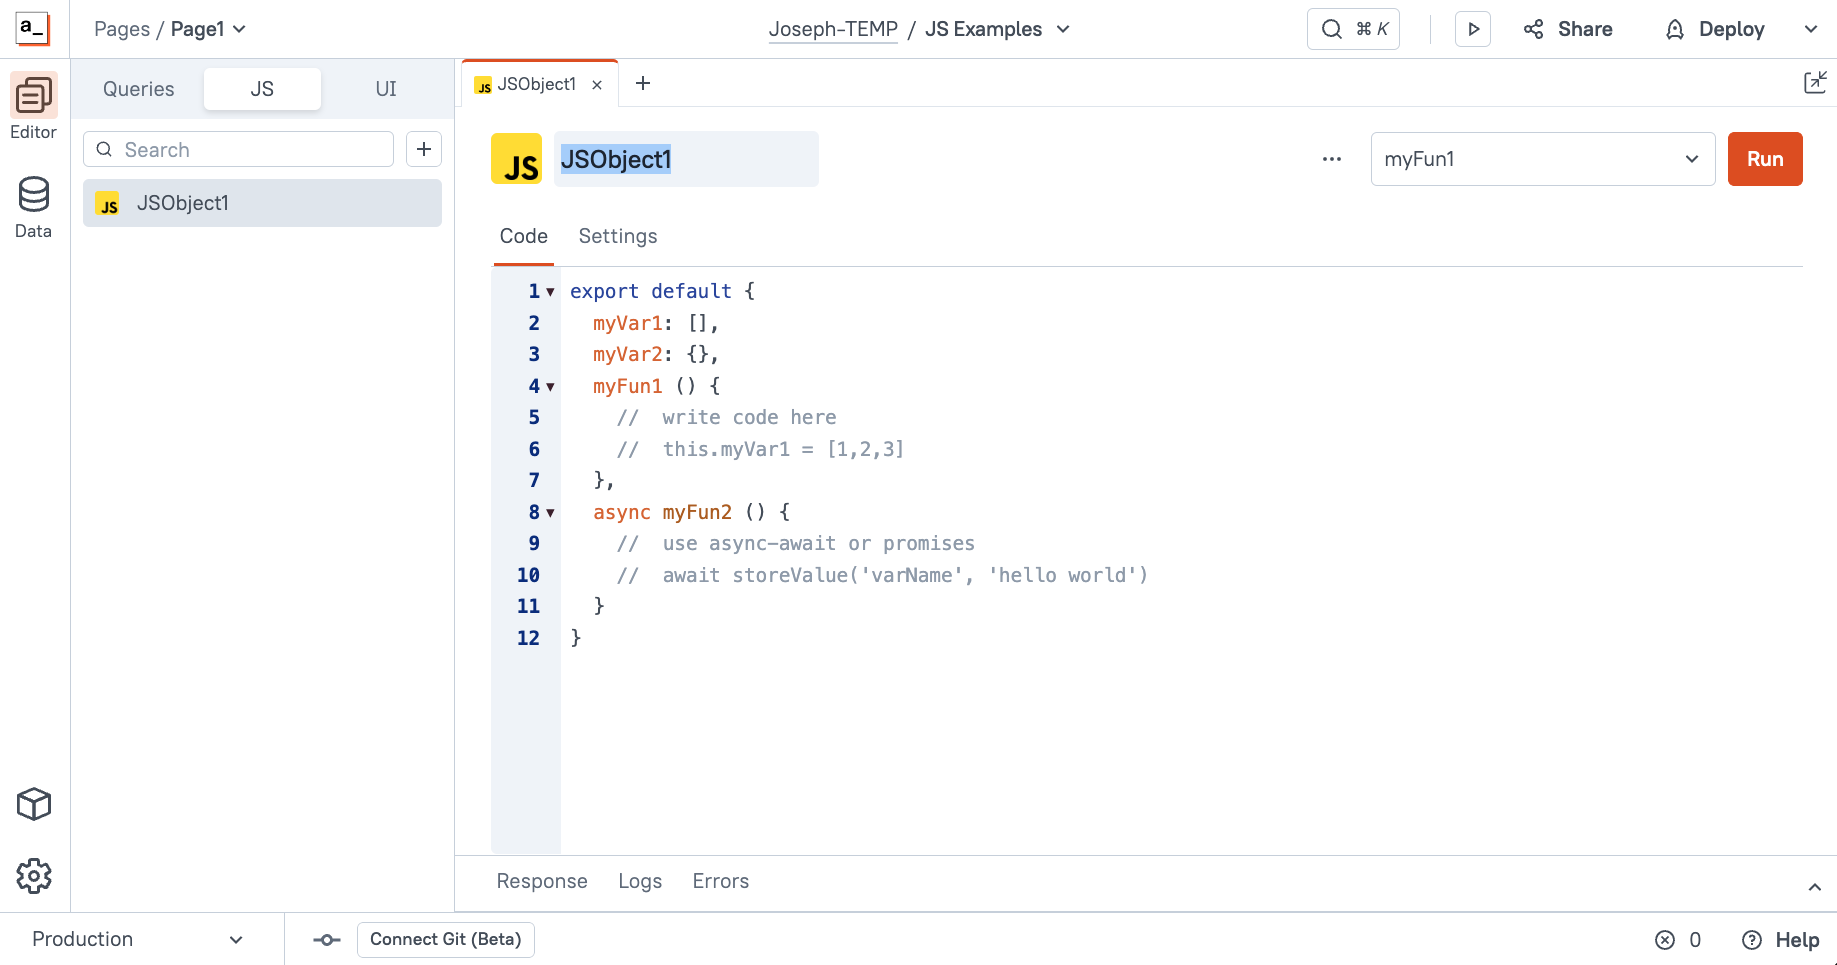
Notice how all the code is wrapped in export default { }, and there's no mustache syntax. The contents of the JSObject gets exported to the global context of your app, so it will be available to reference anywhere else you write JavaScript. All code should be inside the export default { }, and should be a valid object structure of key:value pairs or named functions.
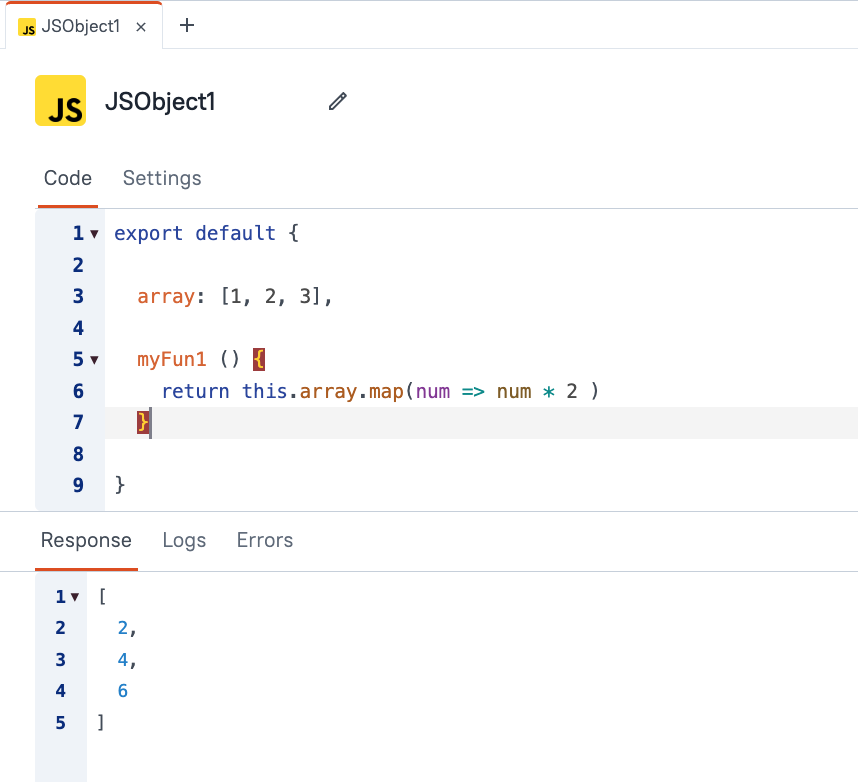
Since this is an JavaScript object, each value is separated by commas, instead of semi-colons that are used for line endings in a JavaScript file. And when declaring variables, there's no var, let, or const; just the key : value pair of property names and values. Named functions can be added using the following syntax:
export default {
    myFun1 () {
        //    write code here
        //    this.myVar1 = [1,2,3]
    }

}
The function keyword is not needed, just the name itself.
Arrow function can also be used, but this causes issues with the linter and auto-complete. So as a best practice, arrow functions should not be used as the top level property. However, it's fine to use arrow functions inside a regular named function.
The Appsmith Object
Anywhere you write JavaScript in Appsmith, the Appsmith Object will be available to provide context and details about the current user, app, page, and other data. This was used in the first example to show the user's name. The Appsmith object also contains data about the app's theme, which can be used to help style your app dynamically, instead of hard-coding the colors and other style options.
Head back to the text widget and go to the Style tab. Click the (JS) mode button on the Text color and enter:
{{appsmith.theme.colors.primaryColor}}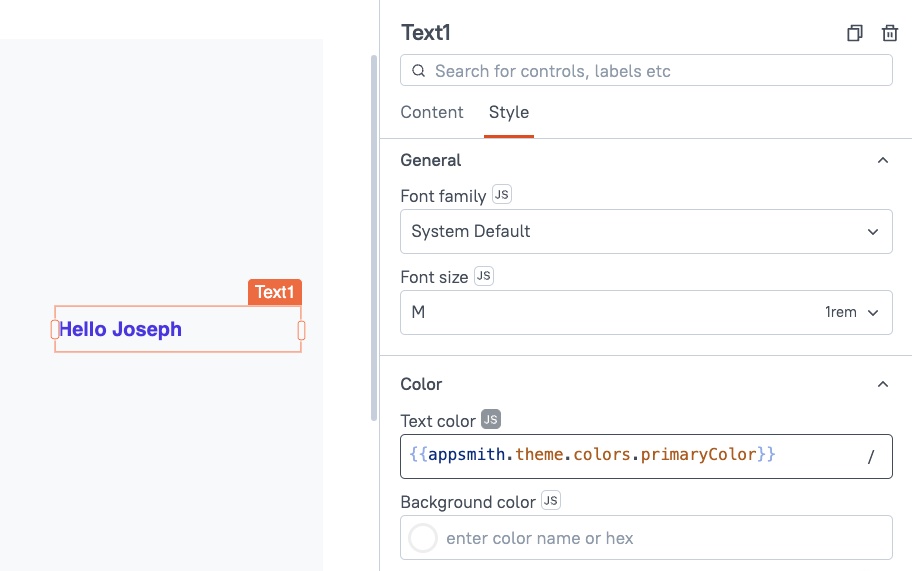
Now the text color will match the app's theme, and if you update the theme later, the text will change with it.
Transforming And Filtering Data
Now let's connect some data to transform and filter. Go to the Queries tab of the editor and add a new query, then choose REST API. Paste in this URL for some mock user data, and click RUN.
https://randomuser.me/api?results=100&inc=name,email,picture,nat,phone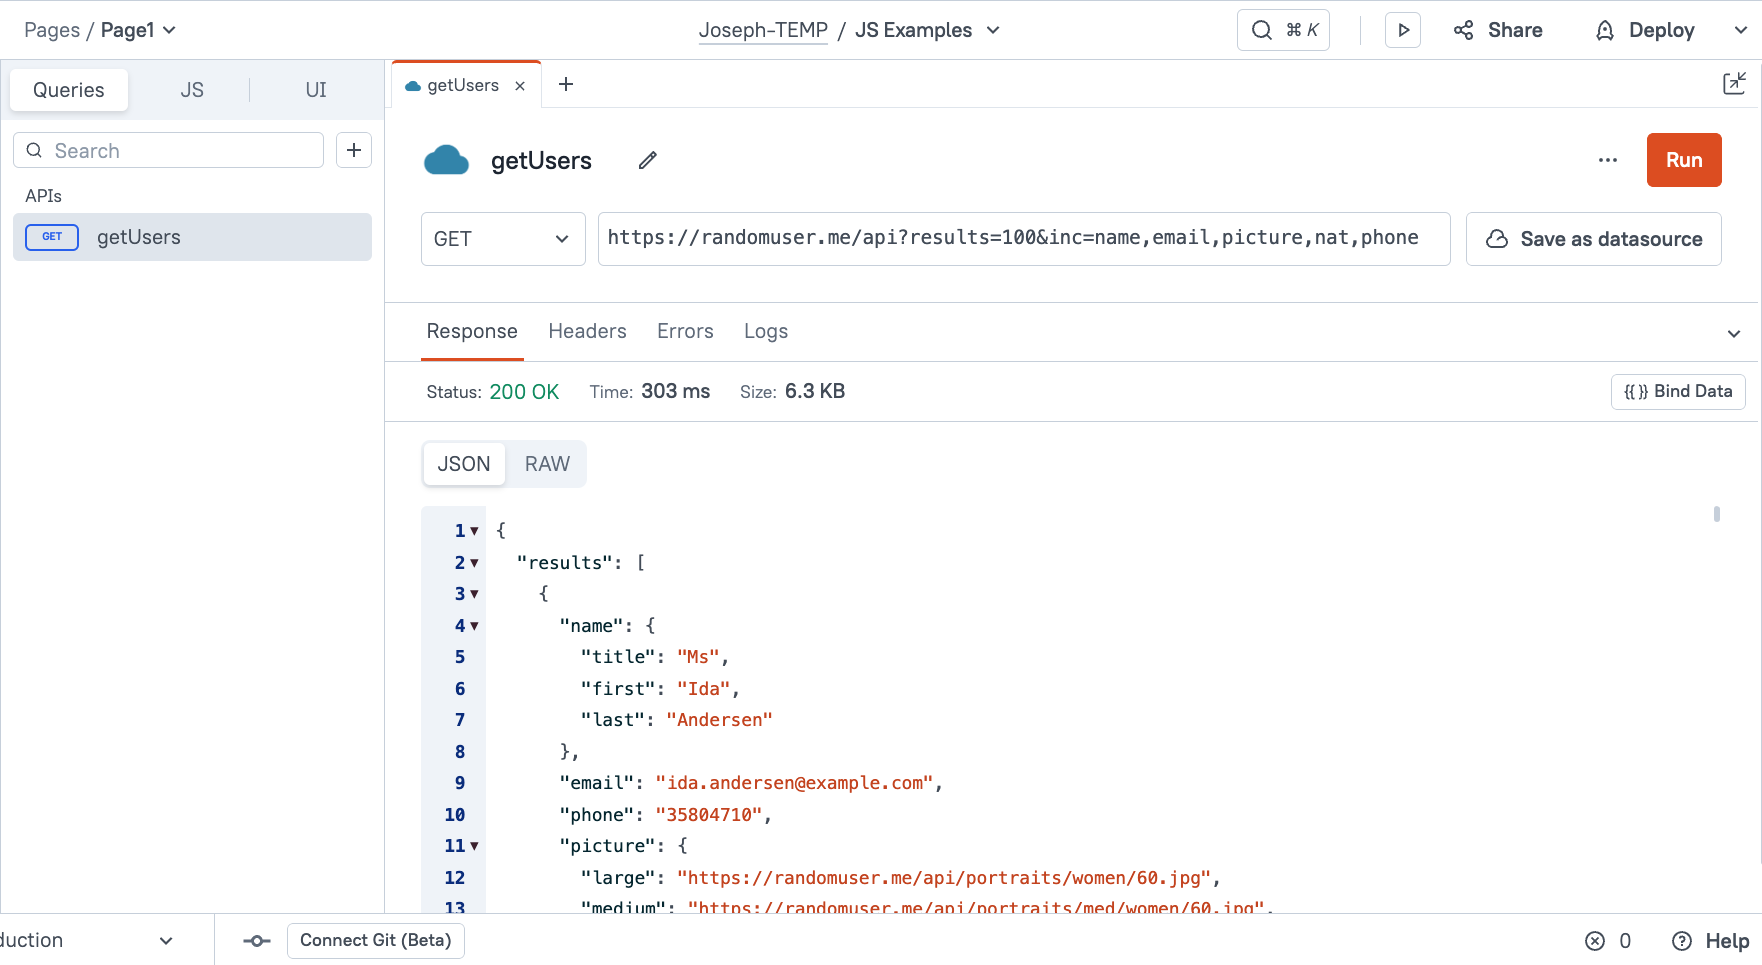
You should get back a 200 response with an object containing a results array.
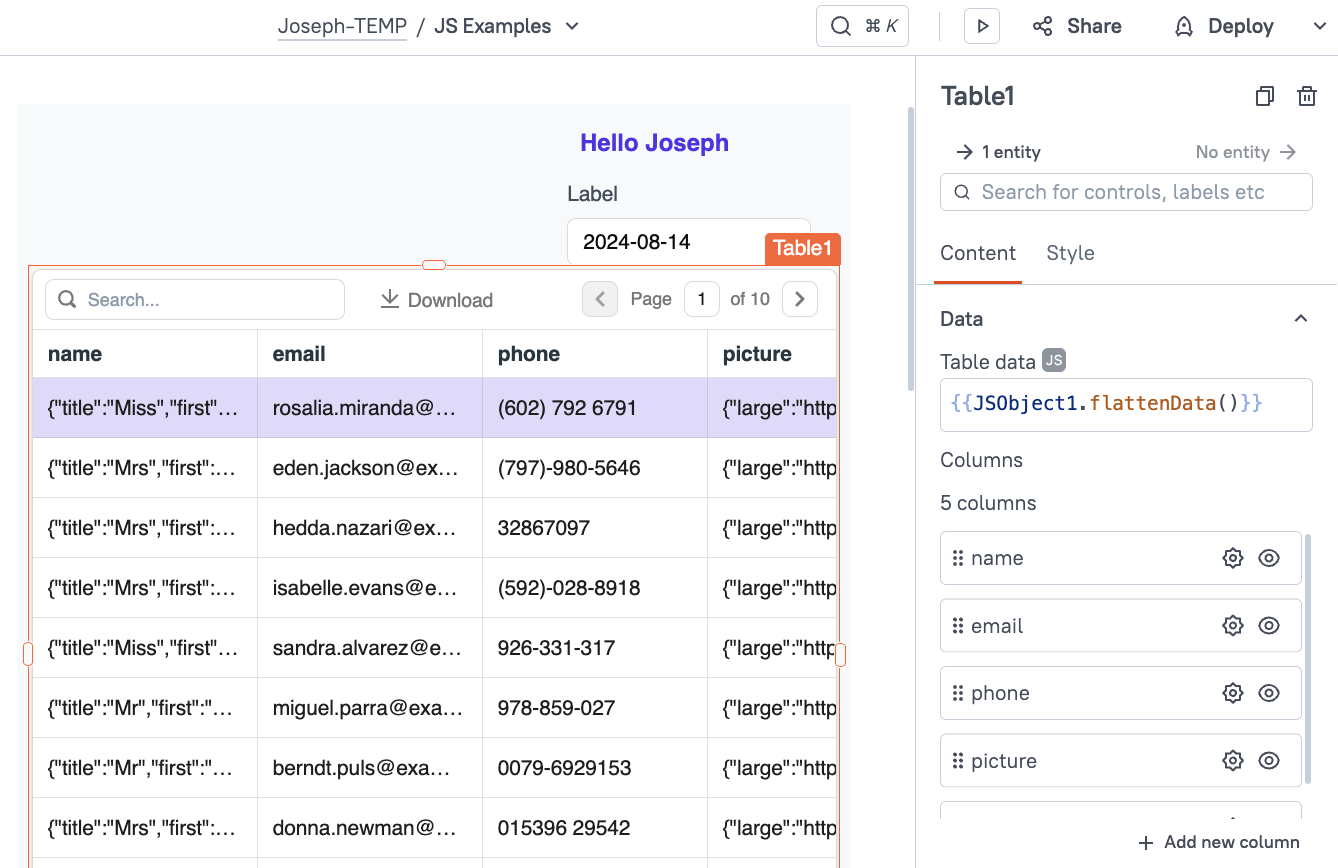
Now, back on the UI, drag in a new table widget and connect the data by referencing the API name. All APIs and database queries have a .data property that contains the response. In this case, the API returns an object, with the records nested in results property.
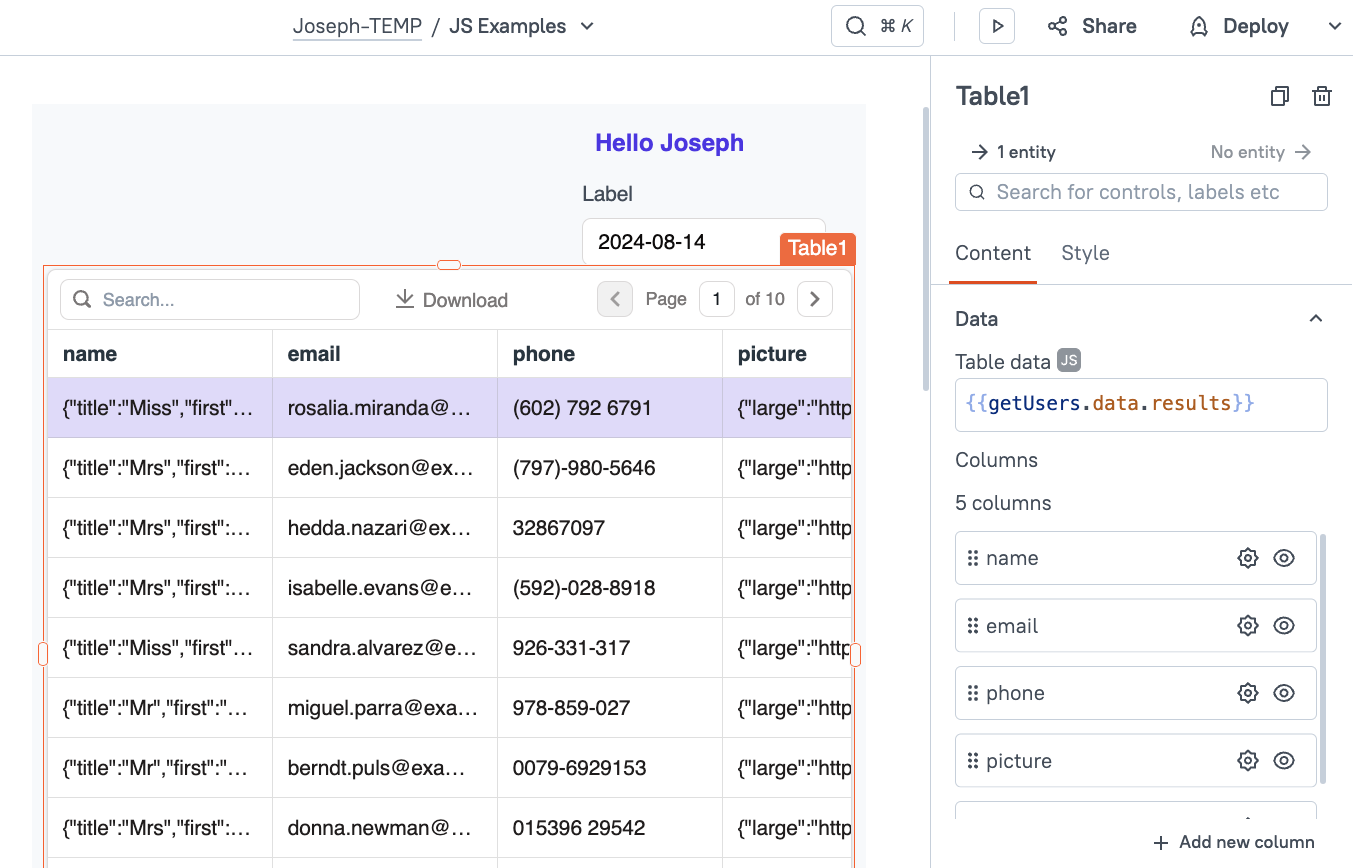
The data from this mock API also has some nested properties. The name is an object with properties for the title, first and last name. This doesn't display well in the table widget. Let's flatten it with some JavaScript!
Back in the JSObject, add a flattenData() function that returns the same getUsers.data.records that the table widget is displaying.
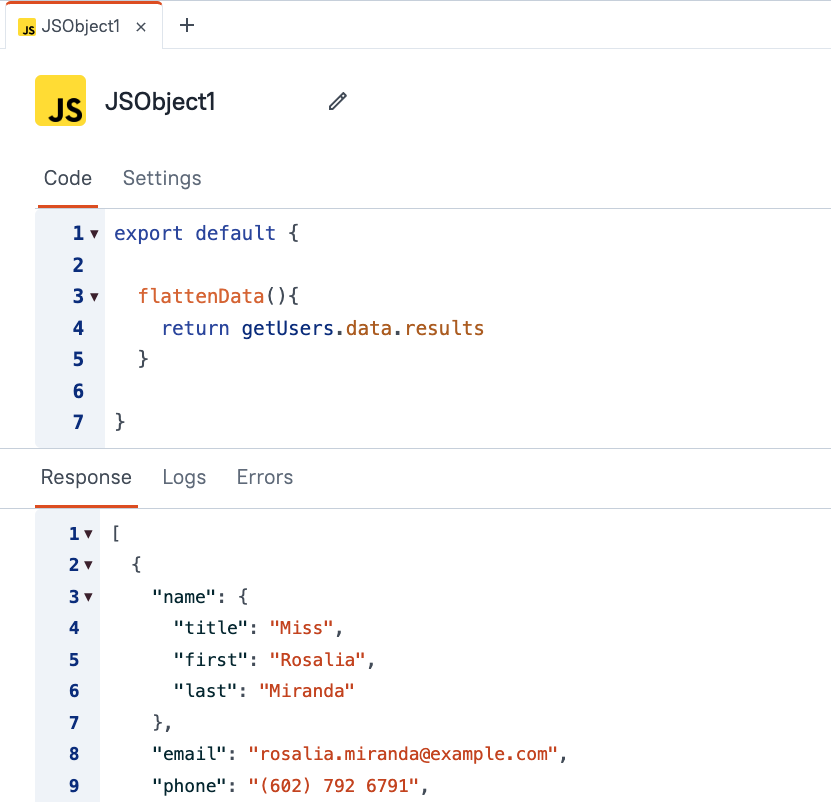
Then, update the table widget to display the function result, instead of directly displaying it from the API. You can reference it using dot notation with the JSObject name (JSObject1) and the function name. JSObject1.flattenData()
At this point, the data still looks the same, but now we can add to the function and transform the data.
To flatten out the data, we can create a new object and use the spread operator to fill it with the same values, then overwrite the name property to a string (first + last).
export default {

    flattenData(){
        const rawData = getUsers.data.results;
        return rawData.map(user => ({
            ...user,
            name:`${user.name.first} ${user.name.last}`
        }) )
    }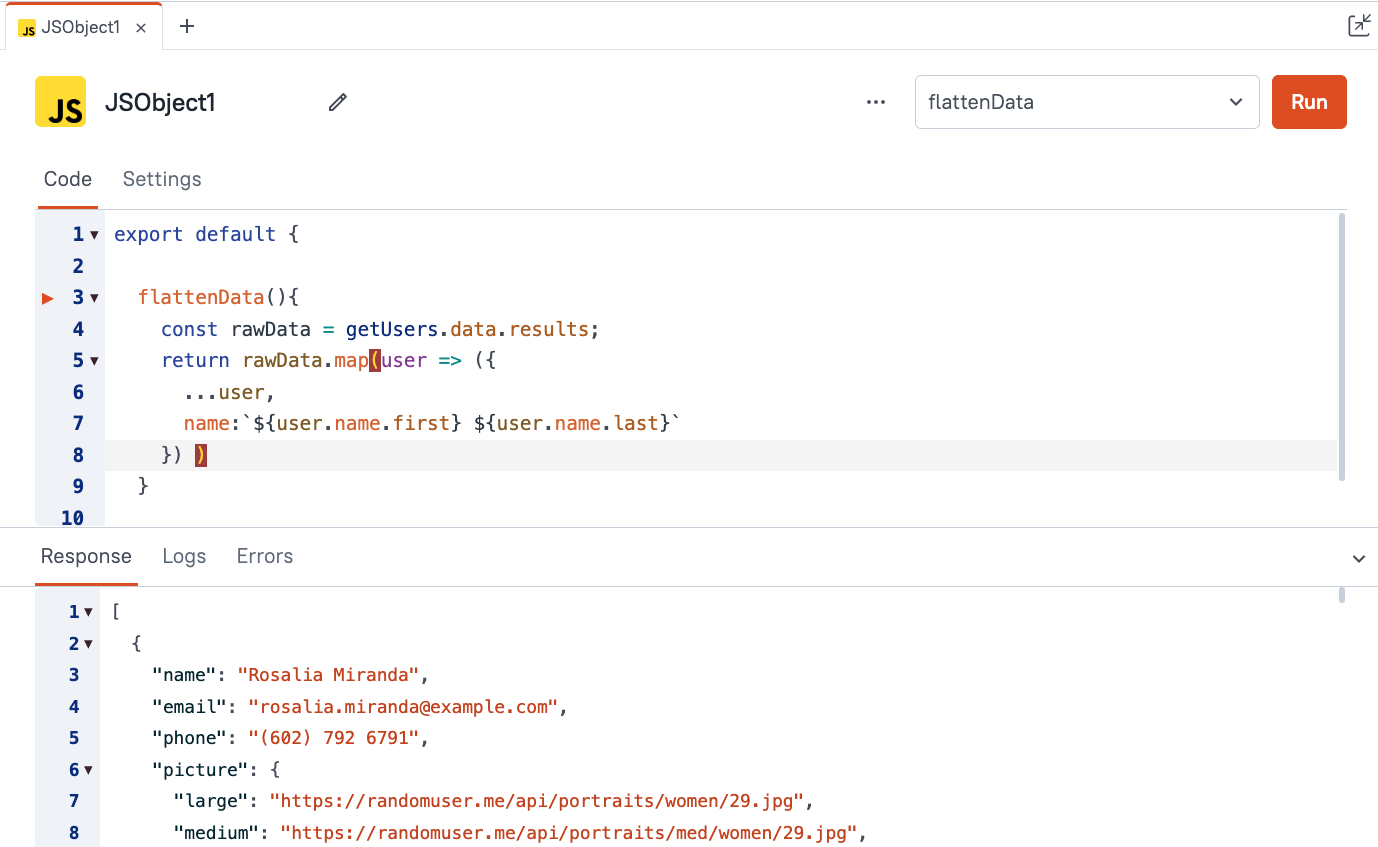
This is returning an object, so the object's curly braces have to be wrapped in a parenthesis to keep it from being interpreted ad the opening and closing of a multi-line function. Alternatively, you could write:
export default {
flattenData(){
const rawData = getUsers.data.results;
return rawData.map(user => {
return {
...user,
name:`${user.name.first} ${user.name.last}`
}
} )
}
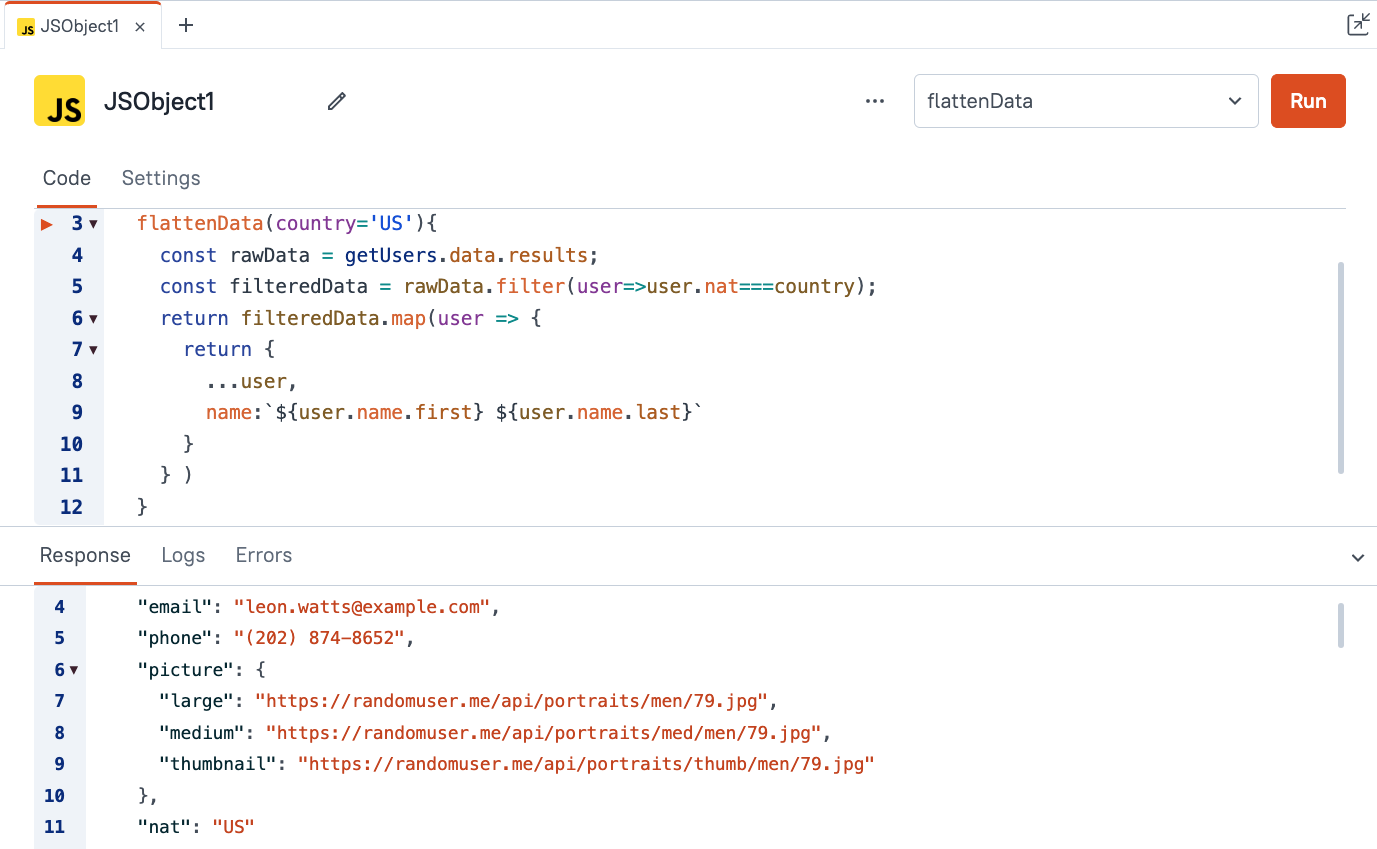
}Next, let's filter the data using the nat (nationality) property. This is actually a country code, so we can filter on a string, like US, BR, FR, etc.
First, update the flattenData function to take a country parameter and set the default to 'US' or some other country code. Then use the filter array method to filter the data before flattening it.
export default {
    flattenData(country='US'){
        const rawData = getUsers.data.results;
        const filteredData = rawData.filter(user=>user.nat===country);
        return filteredData.map(user => {
            return {
                ...user,
                name:`${user.name.first} ${user.name.last}`
            }
        } )
    }
}
Global Functions
Next, let's take a look at Global Functions in Appsmith. These are methods built into Appsmith to provide extra functionality and user interactions. They can be called in JavaScript functions, or connected to Events like button clicks.
Triggering Global Functions From A Widget
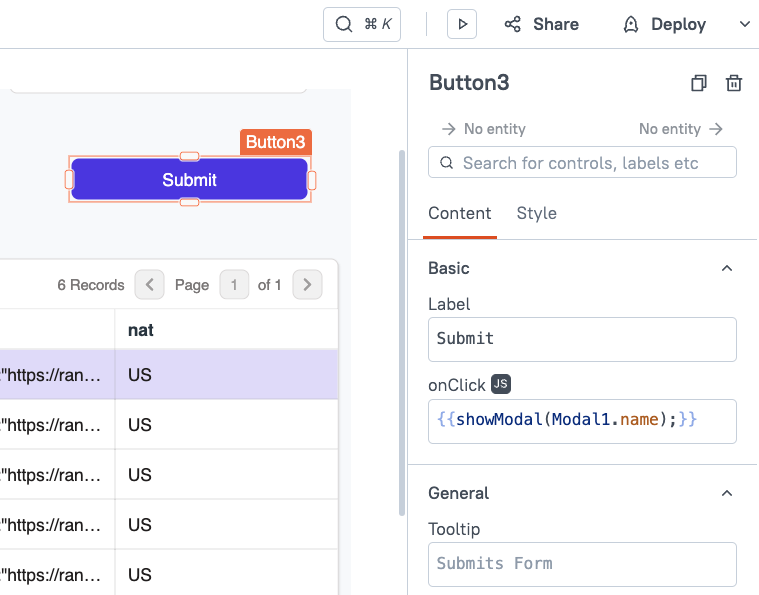
One possible action is to show a modal. Drag in a modal widget and drop it anywhere on the canvas. Now, close the modal and drag in a button widget. In the button's onClick setting, select Show Modal, and then select Modal1.
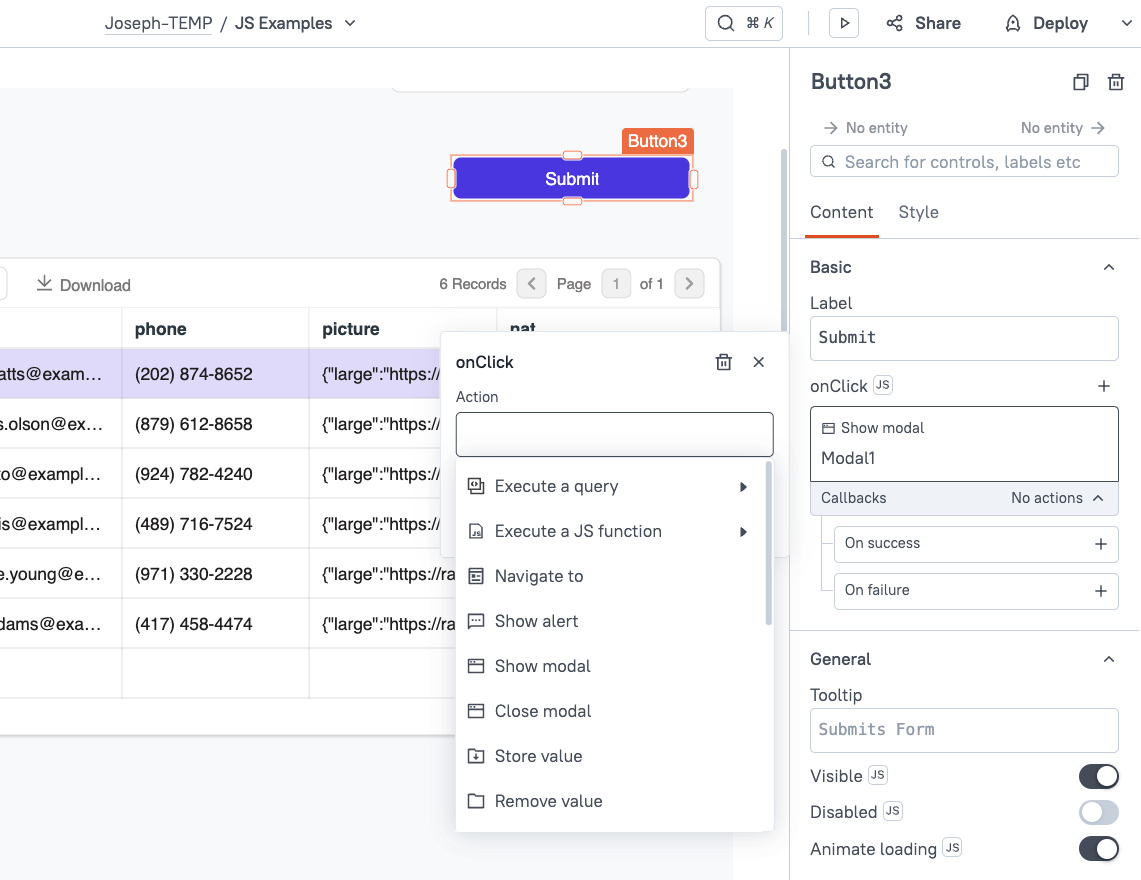
Once you've selected an action from the list, click the (JS) mode button and see the underlying code. This dropdown writes the JavaScript as you select different options. Then you can toggle to JS mode and view the code, or even modify it!
Triggering Global Functions From JavaScript
Global Functions can also be called from a JSObject function. Here's a function that will select a random user from the getUsers API and display the email in a popup alert message.
    randomEmail(){
        const users = getUsers.data.results;
        const randomNum = _.random(0, users.length - 1);
        const randomUser = users[randomNum];
        showAlert("Random email: " + randomUser.email, "success")
    }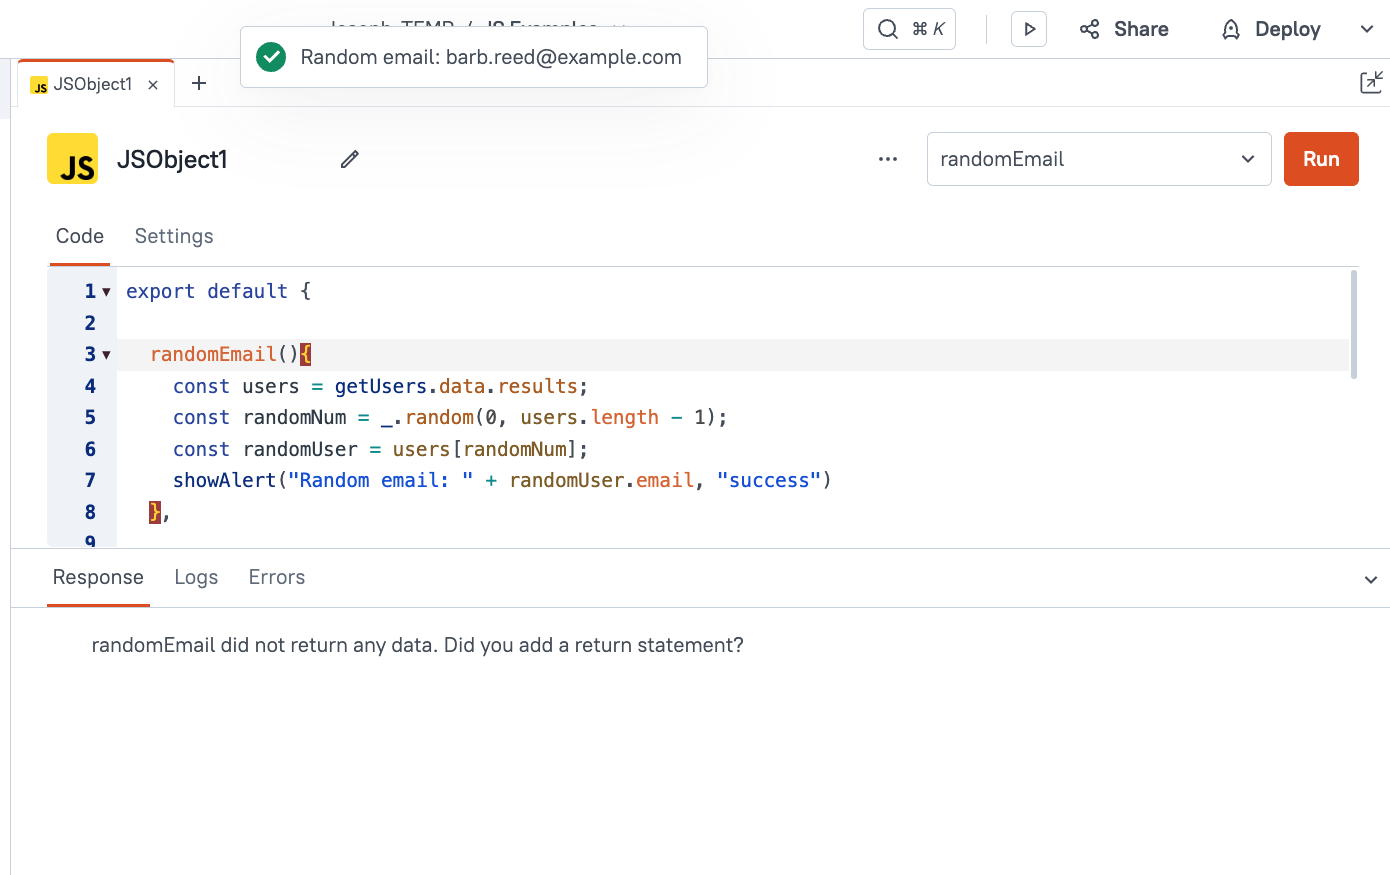
This example is using Lodash to generate the random number. Lodash is another library included by default in Appsmith. Its methods can be accessed using the underscore character.
See the docs for more examples of how to use each global function and what parameters are required.
Async JavaScript
Appsmith supports writing asynchronous functions using async/await, promises, and .then() syntax. This allows you to chain functions, APIs, and Queries together to run them in a specific order and wait for completion between each step. You can also define different logic based on success or failure of a particular step of the function.
For this example, I'll be building on top of an app I made using Mockoon's API Playground. This app is just 4 APIs for CRUD, and a single table widget, with no JSObjects yet. To follow along, you can build your own CRUD app with Mockoon, using this video as a guide, or copy the starter template from here.
Action Selector and Callbacks
The Action Selector is used throughout various widgets, to bind Actions (Queries, APIs, and functions) to Events (button click, input text change, select dropdown change, etc). It can be used to bind a single event to a single action, but it also has options for callback functions. This is a powerful tool that handles the async JavaScript for you, allowing you to chain actions together and add different logic for handling success or failure of the first action.
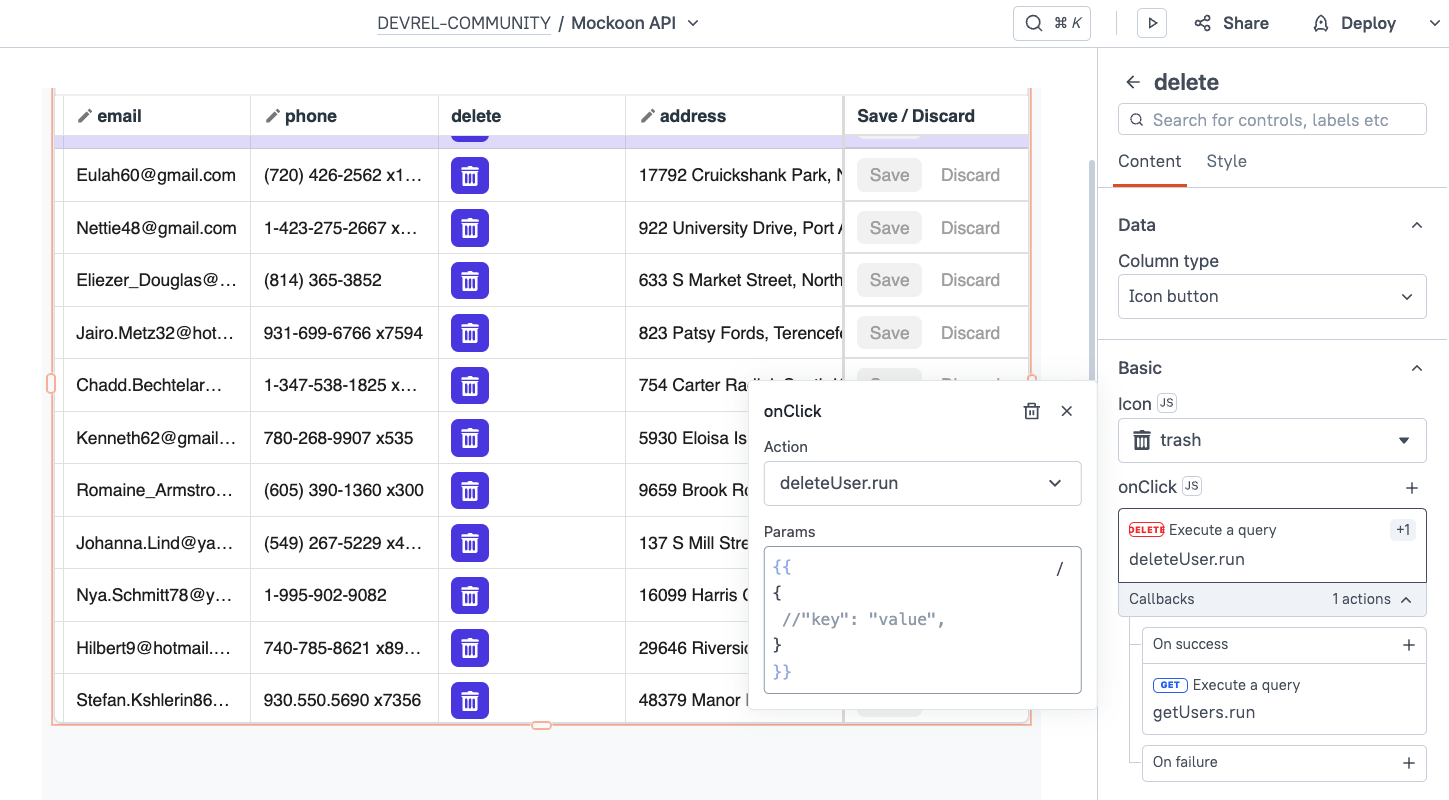
Here you can see the onClick event of the table widget's delete button. The Action Selector is first calling the deleteUser API, then, On Success, it runs getUsers to refresh the table with the new record deleted. You could also add an On failure callback to show an alert if the delete failed.
Additionally, inside each callback, you can expand the action and add a third level to the logic. At this third level, the action input is a JS code input box only. The dropdown action selector is only available on the first two levels.
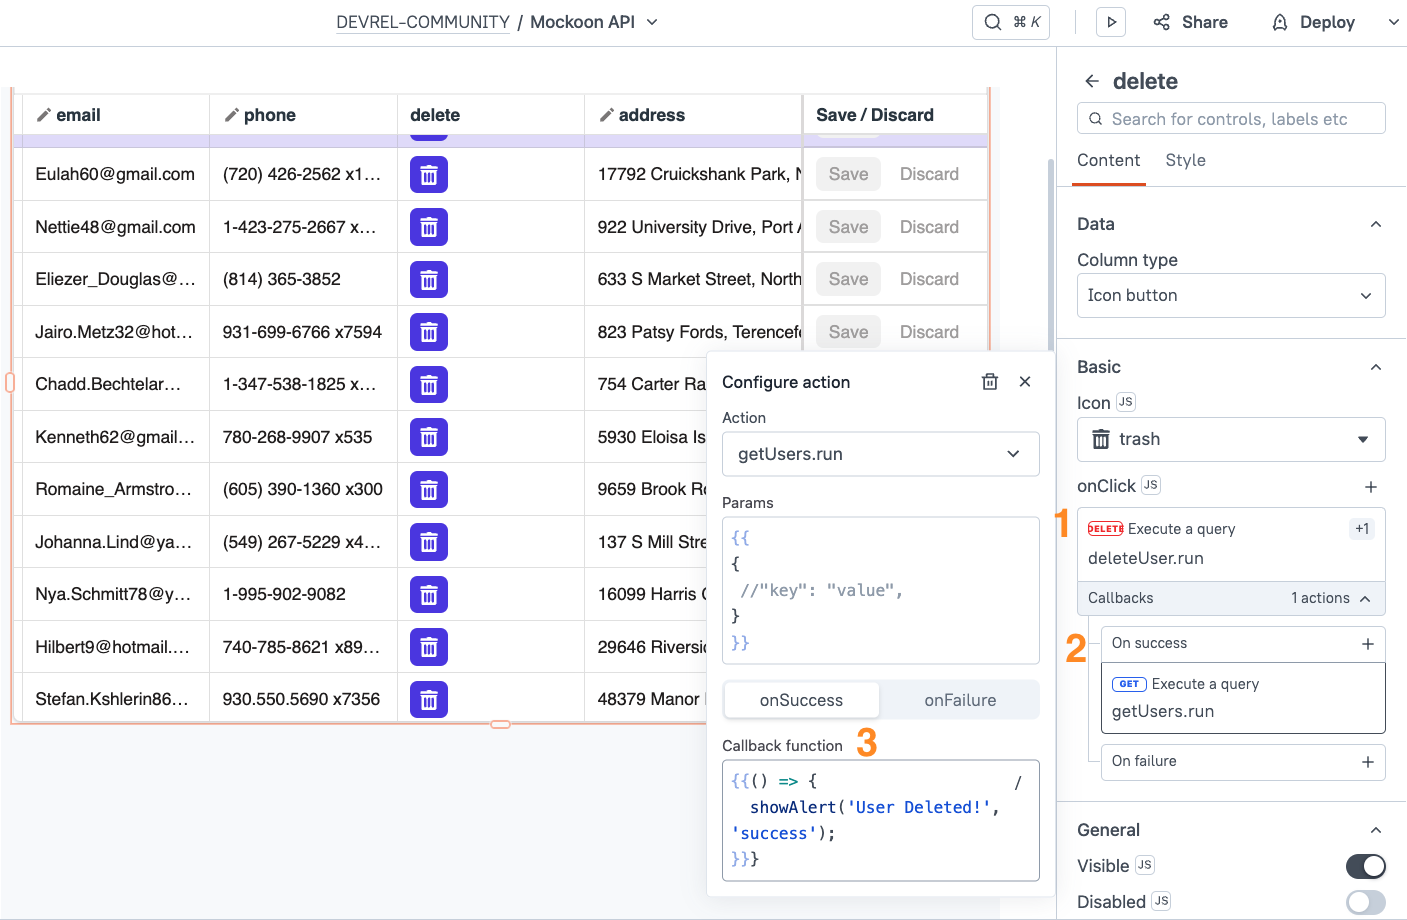
If you switch the onClick action over to JS mode, you can see the code that was written for you while linking the 3 different actions.
{{deleteUser.run().then(() => {
 getUsers.run().then(() => {
   showAlert('User Deleted!', 'success');
 });
});}}
Writing Async JavaScript
And that brings us to writing your own async JavaScript. As you can see in the last section, the .then() syntax works for writing async JavaScript. However, the newer async/await syntax is easier to read and write, so I'll be using it for the examples in this guide. For more info on using other methods, see this video.
Currently the table has a delete button on every row of the table. It's possible the user could click the wrong row and end up deleting a record accidentally. We could turn on the Require confirmation option in the Delete APIs settings, but that only shows the API name, not the record being deleted. So let's add a new modal for delete confirmations.
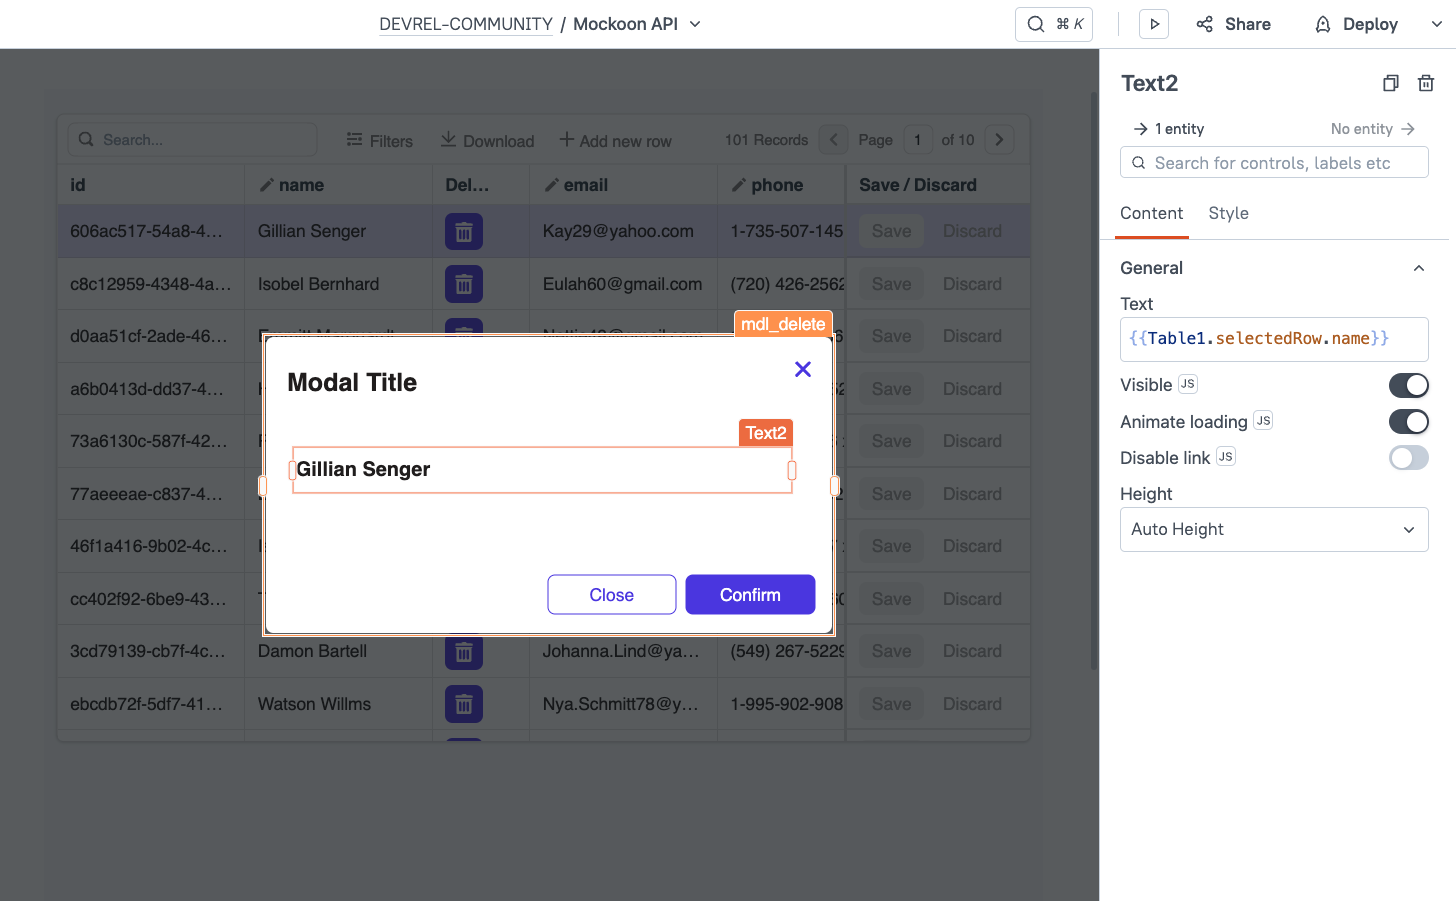
Drag in a modal and name it mdl_delete. You don't have to name every widget, but it helps to name anything you'll be referencing in code later so you don't get them mixed up. I like to use this naming convention.
Next, add a text widget to the modal and bind it to the table's selected row.
Next, change the delete button in the table widget to show the mdl_delete modal, instead of running the delete query directly.
Now, back to the delete modal. Let's think about what we want the confirm button to do. It should delete the record, and close the modal. But it also needs to refresh the table to show the deleted record. That's 3 steps, so we could use the Action Selector in the button's settings. But what if we also want to show a success message?
To add more logic, we can move the async JS to a JSObject. First, create a new JSObject and add an async function to confirm the delete API.
    async confirmDelete () {

        try{
            closeModal(mdl_delete.name);
            await deleteUser.run();
            await getUsers.run();
            showAlert('Record deleted!', 'success')
        }catch(error){
            showAlert('Delete failed!', 'error')
        }
    }
Then, change the modal's Confirm button to call this function.

Passing Parameters
Parameters can be used in API or Database Queries by passing an object to their run method, then accessing the parameters with QueryName.params.paramName. For instance, instead of using the table widget's triggeredRow to get the ID of the record to delete, we could pass it as a parameter.
First, update the confirmDelete() function to pass an object to the deleteUser.run() method.
    async confirmDelete () {

        try{
            closeModal(mdl_delete.name);
            await deleteUser.run({id:Table1.triggeredRow.id});
            await getUsers.run();
            showAlert('Record deleted!', 'success')
        }catch(error){
            showAlert('Delete failed!', 'error')
        }
    }
Then, update the deleteUser query to get the ID from it's parameters.
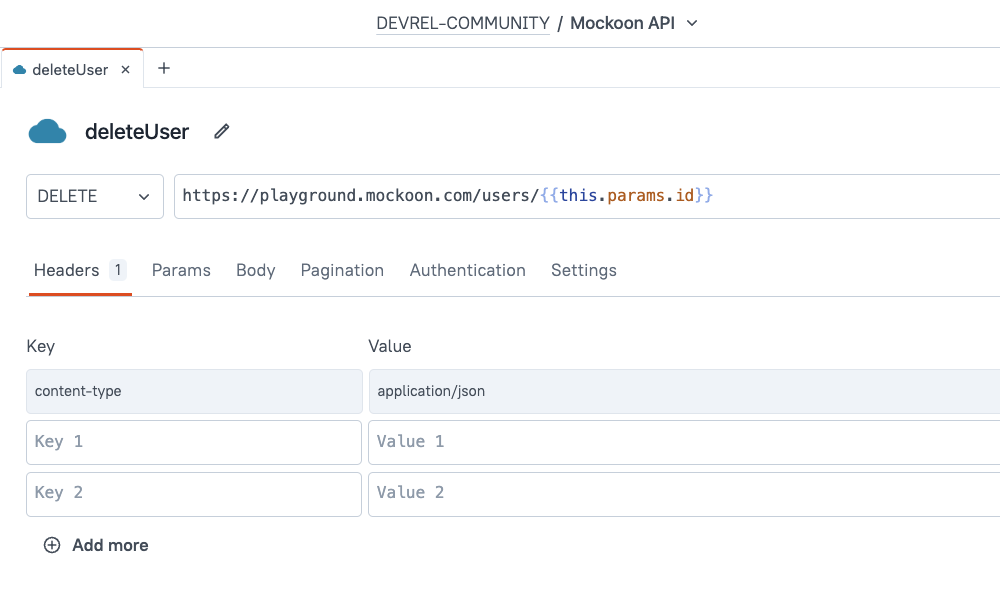
JS Libraries
Next up, let's check out JS Libraries in Appsmith. We've already used a few of the included libraries, but you can also import your own from a CDN like JSDelivr. To get started, click the Libraries icon on the bottom of the left sidebar, above the settings icon.
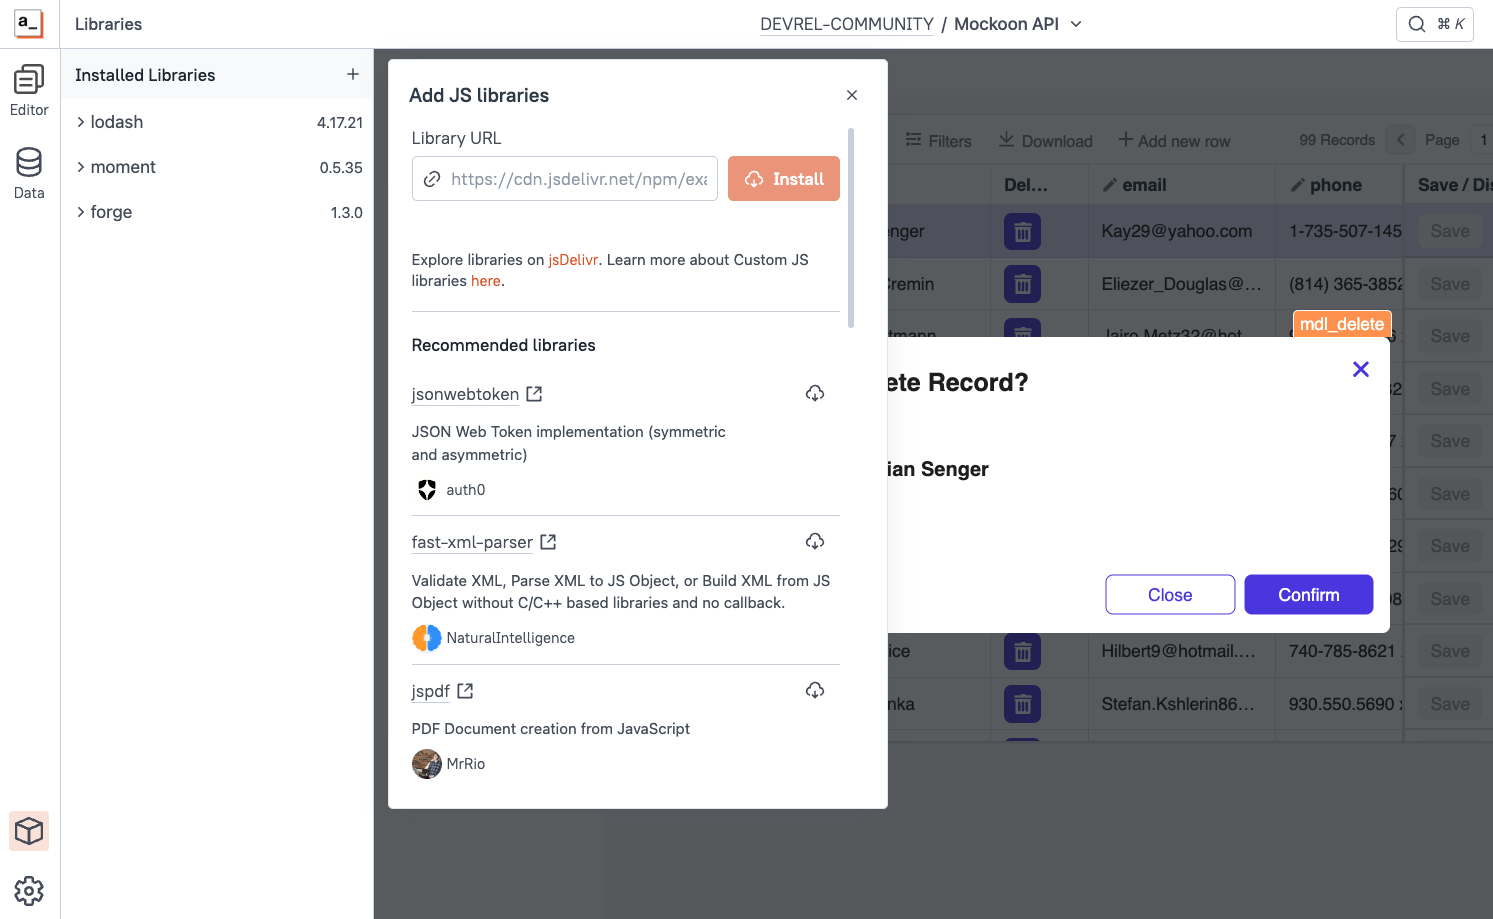
Many common libraries are available to install with a single click using the download button, or you can paste in a link to a CDN of a JavaScript library in ESM or UDM format.
NOTE: For security, libraries that require access to the DOM or window object are blocked. However, these libraries can be safely used in a custom widget.
Adding an External Library
In the original app from the video, I disabled editing the ID and let the database assign a value. This time, let's insert the ID from the client side.
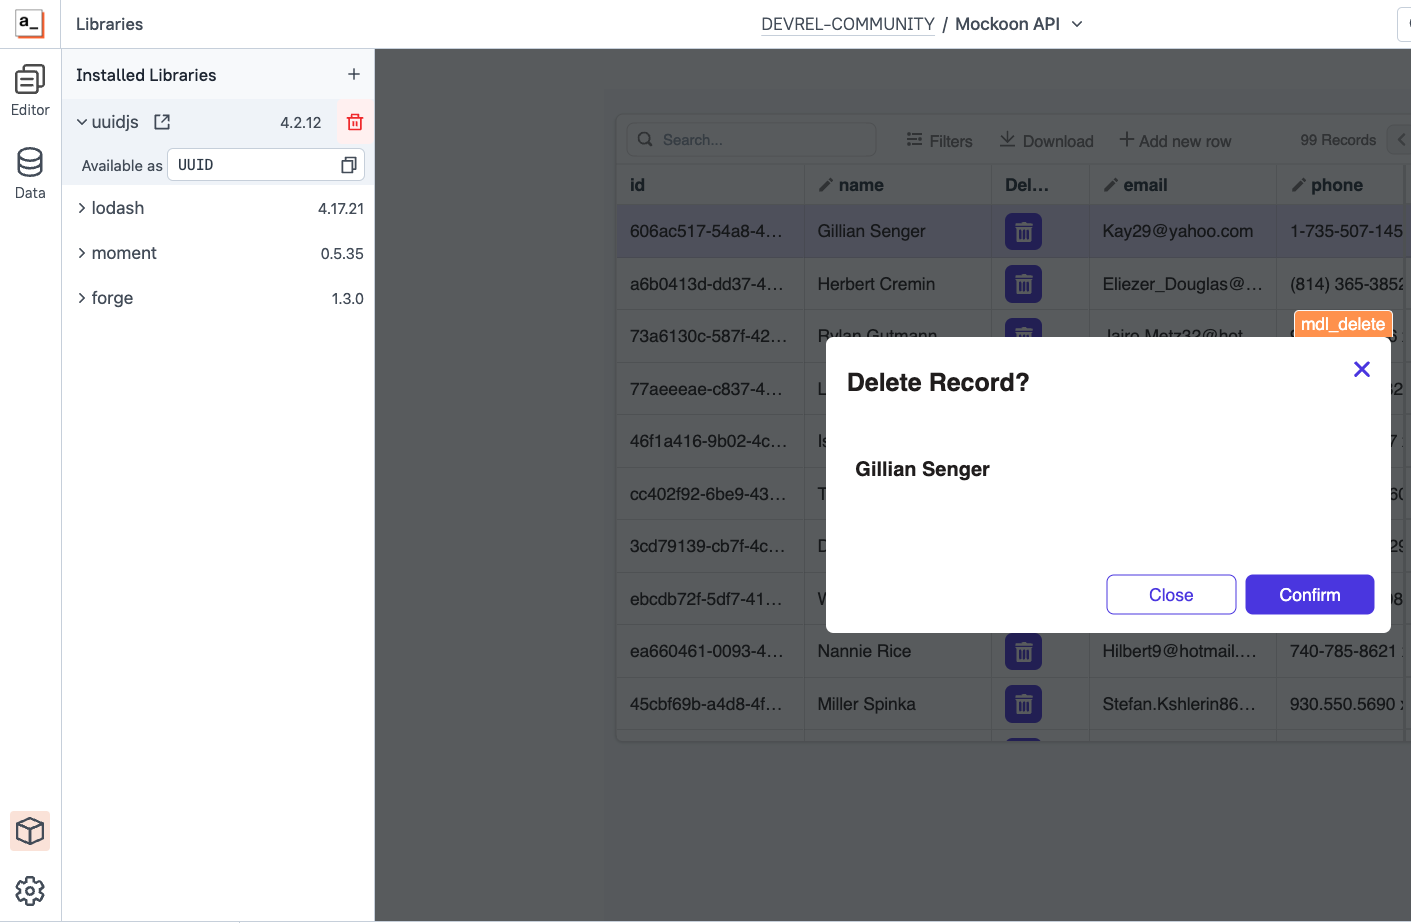
Scroll down and click install on UUIDjs. This library can be used to generate a UUID on the client side. After installing it, you should see the library added to the list of libraries installed in the current app. Notice the > arrow to expand the details, where you can see the name used to reference the library in a JSObject.
Head back to Table widget, and scroll down to the Adding a row section. Now go to the Default value input for the new row. Here you can supply an object with any properties you would like to pre-fill when creating a new row from the table widget.
Next, enter an object with an id property, and use the UUID library to generate a new ID.
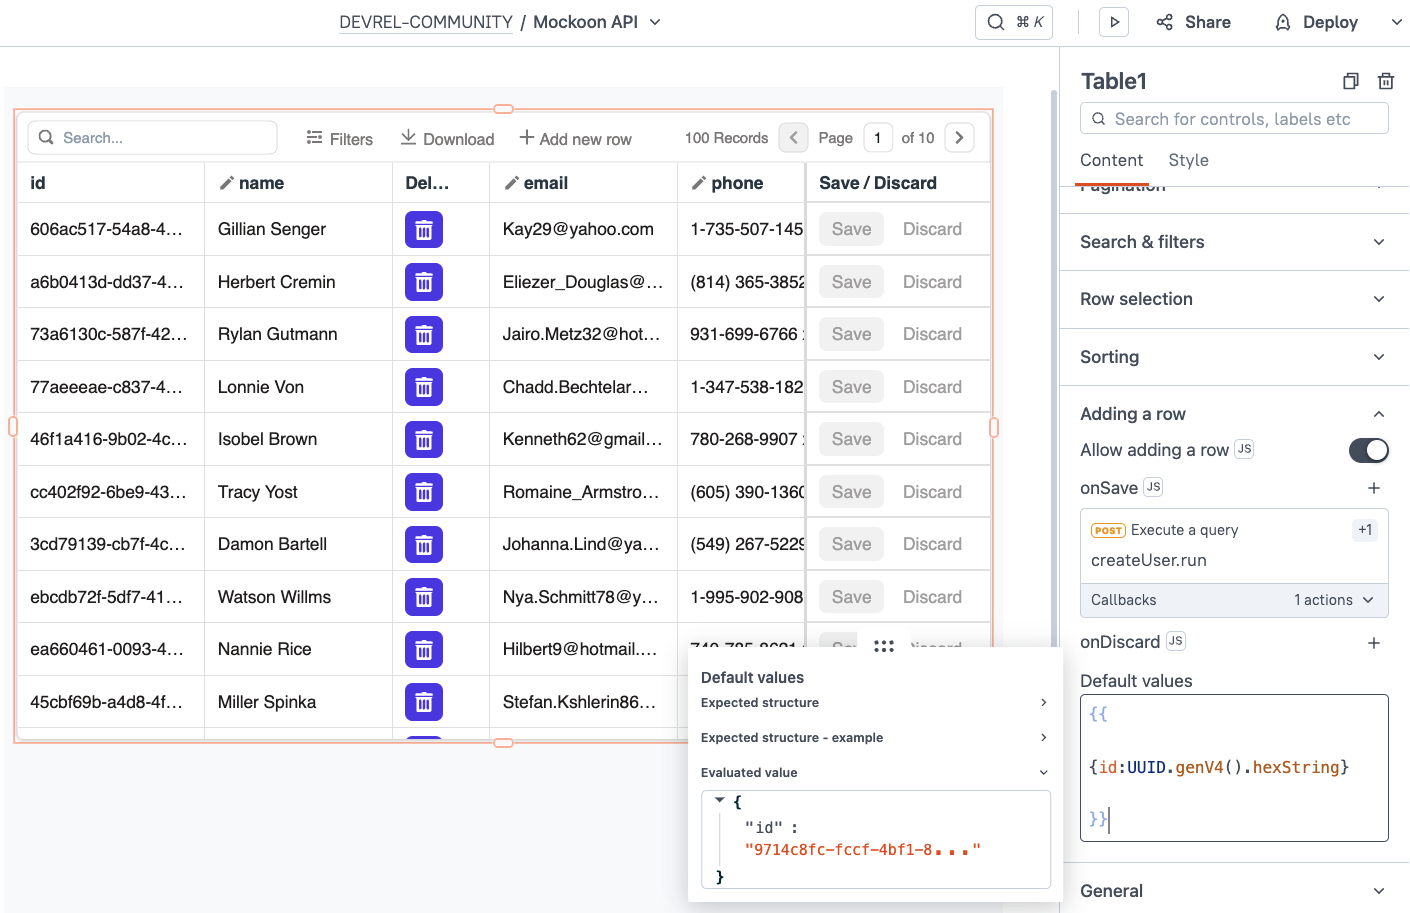
Now when a new record is started, the ID will be pre-filled with a newly generated UUID.
StoreValue vs Variable Mutation
Appsmith provides two different methods for storing data on the client side, the Appsmith store, and JSObject variables. Both are mutable, but the similarities don't go much further than that. There are pros and cons to both methods so it's important to be familiar with both before choosing a method.
Appsmith Store
You may have noticed the storeValue() method in the list of Global Functions earlier. This method writes data to the Appsmith object using key:value pairs. It's similar to the browser's local store, but it can store any JSON data type instead of just strings.
For example to save the ID of the currently selected row to the Appsmith store, you would use storeValue('id', Table1.selectedRow.id). Once stored, the value can be referenced at appsmith.store.id.
JSObject Variable Mutation
The other option is to declare a variable in a JSObject, then mutate it to store new values. These variables get defined on page load, and can be updated using the assignment operator.
Here's the same ID storing task performed with a JSObject variable.
export default {

    selectedId: null,

    tableRowSelect(){
        this.selectedId = Table1.selectedRow.id
    }

}
When to use Variable Mutation vs Store Value?
Both accomplish the same basic storage task, but there are some major differences around performance and user experience. Here's a table to break down the differences.
| Store Value | Variable Mutation | |
|---|---|---|
| Performance | Much slower, especially on large datasets | Faster |
| Volatility | Persists on page refresh, browser close/re-open. Option to not persist via 3rd param. | Resets to value defined in JSObject with every page refresh |
| Access across pages/apps? | yes, on same domain (all on your self hosted instance, or all on our cloud) | No. Accessible from the same page only. |
| Synchronous? | No. Requires async functions if you want the next step to access the new value. | Yes, synchronous. No async functions needed. |
| Removable? | Yes. You can reset the entire Appsmith store, or just remove that one key value pair when updating the store. | No. You can set the value to null, undefined, or an empty string, but you can not programmatically remove the variable from a JSObject. |
In general, I default to using Variable Mutation first, and only choose storeValue when I need the persistence. For more examples of using the Appsmith store and variable mutation, check out this video.
Conclusion
As you can see, JavaScript can be used extensively in Appsmith to add new features, functions, and business logic. This guide has covered all the major aspects of using JavaScript in Appsmith, though it is just touching the surface on each topic. For for a more in-depth look at each section, check out the Appsmith JavaScript Book.


This post is simply great, and I'm pretty sure it will be useful for anyone starting with Appsmith, and even those who are more advanced, I'll save it to keep it as a reference. Thanks, Joseph
Thanks Oscar! Glad you liked it. Let me know if there are any other topics you'd like us to cover.