


How To Set Up a Google Calendar Datasource in Appsmith
Goal
The goal of this tutorial is to show users how to completely set up and use the Google Calendar API within their Appsmith applications.
Prerequisites
A Google Account
An Appsmith App
Overview
In this short tutorial, I'd show you how to configure your google calendar API, and set it up on your Appsmith instance as an authenticated data source.
Want to skip straight to the template? Check it out here!
Getting your Client ID and Client Secret from the Google Cloud Platform
If you're planning to use Google Cloud Platform (GCP) services or APIs, you'll need to set up a project and obtain credentials, which include a Client ID and Client Secret. These credentials are essential for authenticating your application and authorising access to GCP resources. We'll guide you through the simple steps to get your GCP Client ID and Client Secret below.
Create a GCP Project
Before obtaining your Client ID and Client Secret, you'll need a GCP project. If you don't have one already, follow these steps:
- Log In: Go to the Google Cloud Console.
- Create a Project: Click on the project dropdown in the top bar, then select "New Project."
- Project Details: Enter a name for your project and choose an organisation (if applicable).
- Create: Click the "Create" button to create your project.
Enable APIs and Services
To use GCP services and obtain credentials, you need to enable APIs and services for your project:
- In the Cloud Console, navigate to the project you've just created.
- Enable APIs: Click "APIs & Services" > "Library" in the left sidebar.
- Search for Services: Use the search bar to find the "Google Calendar API" and click on it.
- Enable: Click the "Enable" button for the Google Calendar API.
Create OAuth 2.0 Client Credentials
Now, it's time to generate your Client ID and Client Secret:
- In the Cloud Console, navigate to the project you created.
- Create Credentials: Click "APIs & Services" > "Credentials" in the left sidebar.
- Create Credentials: Click the "Create Credentials" button and select "OAuth client ID."
- Configure the OAuth consent screen: You'll be prompted to set up a consent screen if you don't have any. Follow the instructions and provide the necessary information. After this, click "APIs & Services" > "Credentials" in the left sidebar again and follow along.
- Choose Application Type: Select "Web application".
- Add redirect URL: Add this url - https://app.appsmith.com/api/v1/datasources/authorize as the redirect URL.
- Create: Click "Create" to generate your OAuth 2.0 Client ID and Client Secret.
Retrieve Client ID and Client Secret
Once you've created your OAuth 2.0 Client ID, you'll see your credentials listed under the "OAuth 2.0 Client IDs" section in the Credentials page. Here, you can find your Client ID and Client Secret.
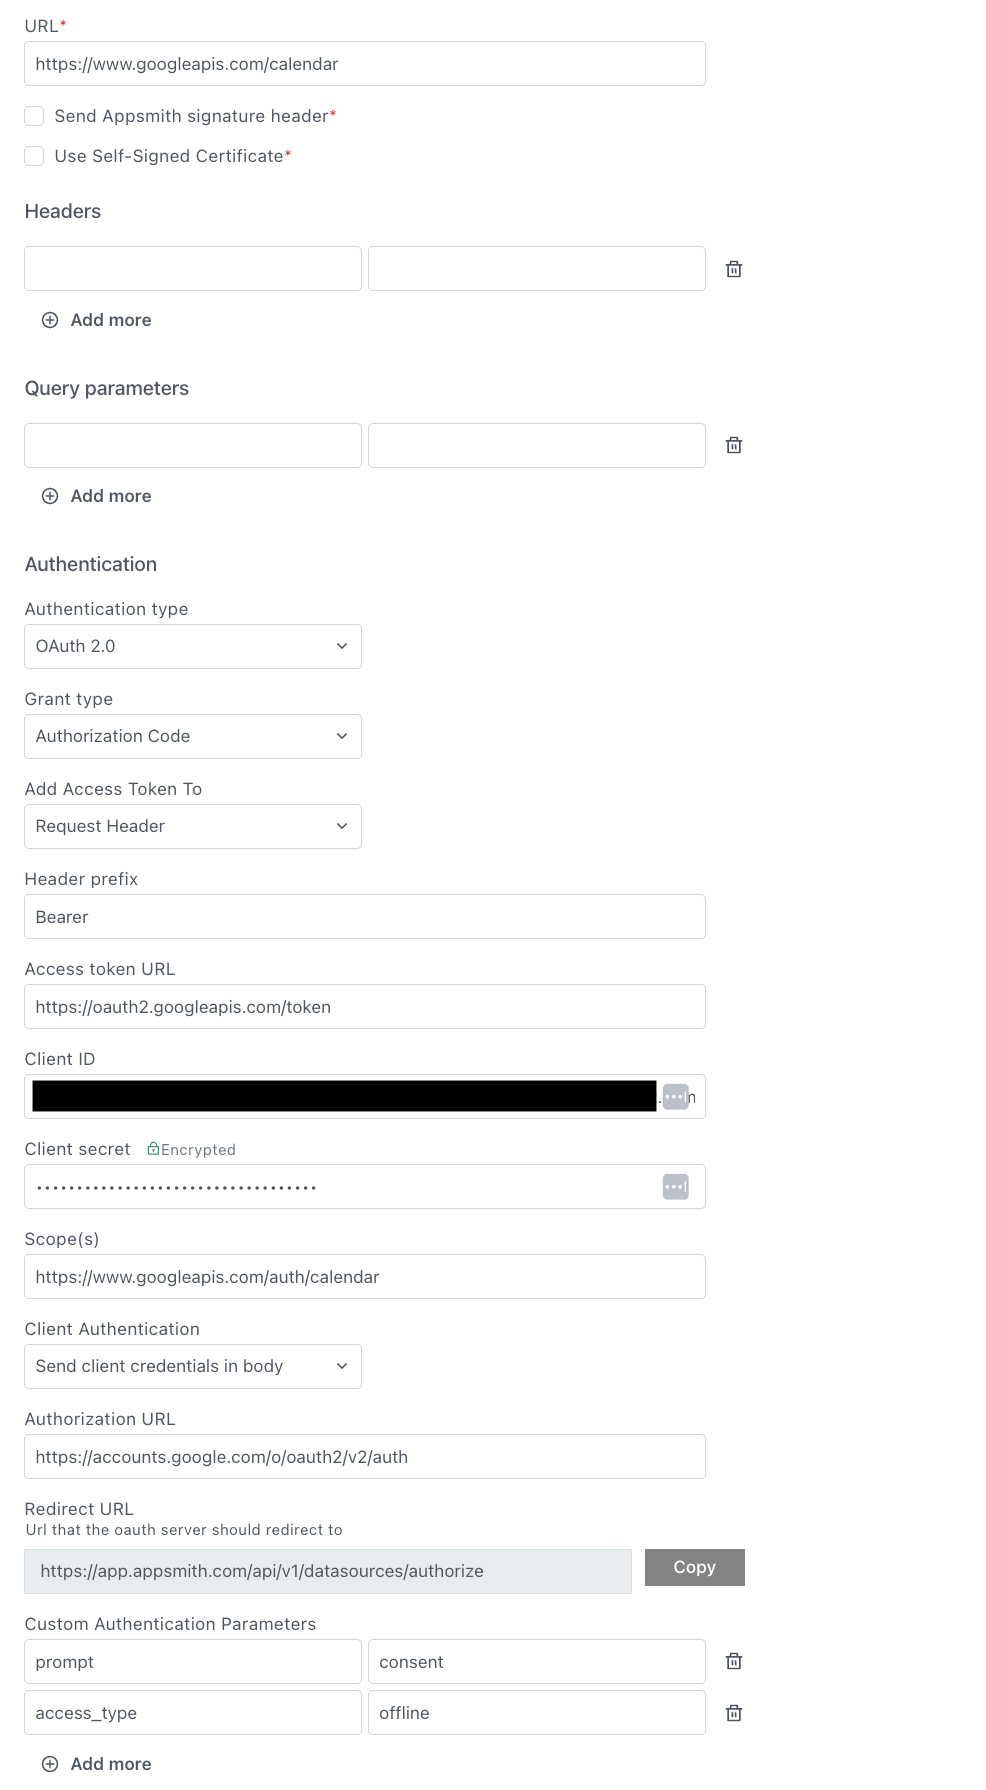
Configuring Authenticated Datasource
If you're an existing user, you can sign in to Appsmith or sign up for a new one (it's free!). We’ll walk through different steps to list our events!- First, you’ll have to create a new application on Appsmith.
- A new application opens up an application titled Untitled Application 1; you can rename it by double-clicking on the existing one.
- Next, you’ll have to create a new data-source to interact with Google Calendar: To do this create a new API by clicking on the "Add Datasource" icon on the left navigation.
- Add a new Authenticated API and save it as a data source with the following URL: https://www.googleapis.com/calendar
- You can also set the name of the data source; in this case, we’ll call it GCalender.
- Now, navigate to the GCalender data source and set the following configuration: Authentication Type: Oauth 2.0 Grant Type: Authorization Code
- Add Access Token URL: https://oauth2.googleapis.com/token this token allows users to verify their identity, and in return, receive a unique access token in return.
-
Add the Client ID and Client Secret from Google Cloud Platform
Lastly, set the following config:
- Scope: https://www.googleapis.com/auth/calendar
- Authorisation URL https://accounts.google.com/o/oauth2/v2/auth
- Custom Authentication Parameters - prompt: consent, access_type: offline
- Save and Authorise the first time around!
Conclusion
If you're interested in building a meeting scheduler similar to Calendly using Appsmith and the Google Calendar API, Appsmith provides a helpful template to get you started. You can find the template here. This template will assist you in creating a streamlined scheduling solution for your meetings, making it easier to manage your appointments and events efficiently.
With the steps outlined in this tutorial and the provided template, you'll be well on your way to creating powerful and productive applications that leverage Google Calendar data for better scheduling and time management. Happy coding!

![Thumbnail for the [FTW] Building a Calendar Widget Using Fullcalendar.js & the Google Calendar API 🗓️ video](/sites/default/files/styles/card_image/public/video_thumbnails/fSG_-tS0tUZYnK_KGq62_rsVZejErRRnMuhOL8HEl8k.jpg?itok=eqB2GYof)
Actually, the booking logic is quite complex. I did a PoC prototype once, where I connected Easy!Appointments as a backend service. The idea was to simplify the process and just query Easy!Appointments by API and populate the list of free timeslots / manage bookings from the Appsmith interface.