
Send Your Data As a CSV Attachment in an Email
Goal
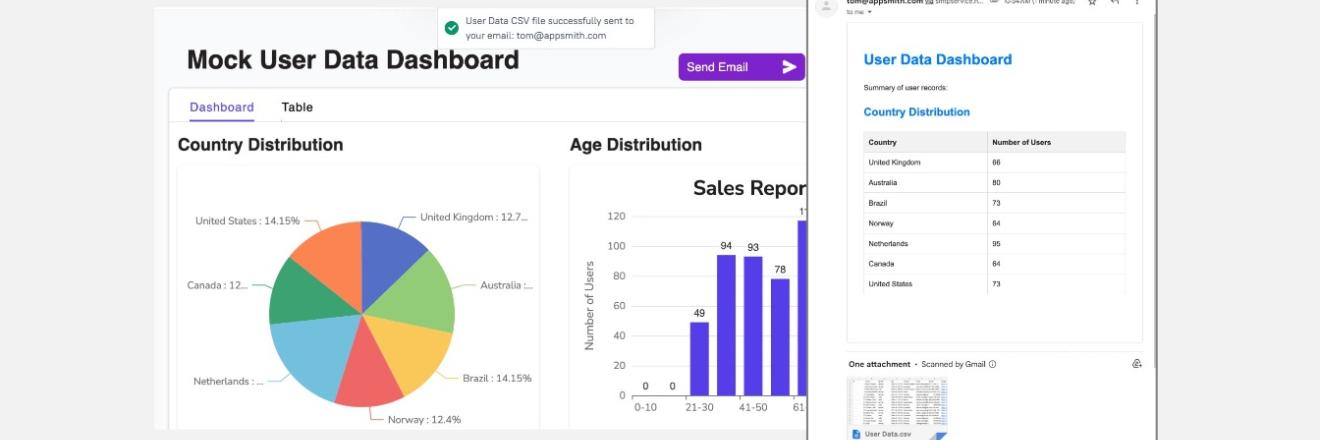
While creating applications, displaying data in dashboards or table formats is common. Appsmith's Table widget makes it easy to download this data as CSV or Excel files. However, there are scenarios where you need to share these data sets as file attachments via email.
In this tutorial, I will guide you through the process of sending an email with a CSV attachment using Appsmith. I will also show you how to create a customized HTML Email template with dynamic data embedded within the content.
Additionally here is the template you can Preview, Play around with and Fork to your Workspace as well.
https://community.appsmith.com/template/send-email-data-csv
Prerequisites
An Appsmith App
A SMTP Email Server
Overview
This tutorial will introduce the following concepts:
- Converting Data to CSV
- Encoding CSV to Base64 Format
- Handling characters that are not part of HTML's default Latin-1 character set
- Configuring Email Query with dynamic HTML body
- Sending a CSV attachment with the Email
Configure Datasources
Connect Data (Ignore if already done)
- Navigate to Datasources in Appsmith.
- Integrate your API or database, start querying your data, and connect it to your widgets.
SMTP Datasource
- From the Datasources integration page, click on SMTP.
- Configure your SMTP server. Refer to the SMTP configuration documentation for detailed instructions.
Convert Data to CSV
Create a JSObject function to convert your JSON array (queried from your API or database) to a CSV format.
/* Function to convert JSON Data to CSV using native Javascript */
	arrayToCSV(data) {
		const headers = Object.keys(data[0]);
		let csv = headers.join(',') + `\n`;
		csv += data.map(obj => {
			return headers.map(key => {
				const value = obj[key];
				if (typeof value === 'string' && value.includes(',')) {
					return `"${value}"`;
				}
				return value;
			}).join(',');
		}).join(`\n`);
		return csv;
	}
Alternatively, you can use the PapaParse library for this conversion:
- Add PapaParse to your external libraries. Follow the external libraries documentation for installation.
- Install PapaParse using the jsDelivr link: PapaParse jsDelivr
- Use
Papa.unparse(data)to convert your data to CSV.
At this point, you will have a variable containing your CSV data returned by using either of these above functions.
Encode CSV to Base64 Format
To send your CSV as a file attachment, your Email Query accepts it only in base64 format.
You can use the codebtoa(csvData), to convert your CSV data to a base64 encoded value.Handling Non-Latin-1 Characters
If your data includes characters outside the Latin-1 character set, base64 encoding may fail. To handle this, create a JSObject called Utils and add a function to escape these characters.
escapeOtherUnicodeCharacters(str) {
		// Convert the string to an array of characters
		return Array.from(str)
		// Map each character to its Unicode code point
			.map(char => {
			const codePoint = char.codePointAt(0);
			// If the character is outside the Latin-1 range, escape it
			if (codePoint > 255) {
				return `\\u${codePoint.toString(16).padStart(4, '0')}`;
			} else {
				return char;
			}
		}).join('');
	}
You should identify which all columns in your data can have this type of characters and run the function for them.
In my App, I had identified the parameternamein my dataset to contain such characters, and wrote a.mapfunction to loop through the data records and escape the string by callingUtils.escapeOtherUnicodeCharacterson it.let data = getAllUsers.data.map(function(item) { return { ...item, name: Utils.escapeOtherUnicodeCharacters(item.name || "") } });Function to trigger the Send Email Query
Create a JSObject called Actions to combine all the above steps and call the Send Email Query.
export default {
	/* Convert the Data to CSV file */
	exportAllData() {
		let data = getAllUsers.data.map(function(item) {
			return  {
				...item,
				name: Utils.escapeOtherUnicodeCharacters(item.name || "")
			}
		});
		let csvData = Utils.arrayToCSV(data); // You can either use a native Javascript function
		csvData = Papa.unparse(data); // Or use PapaParse library
		return csvData;
	},
	/* Run the Send Email Query */
	async sendEmail() {
		let csvData = this.exportAllData();
		let base64Data = btoa(csvData);
		await sendEmailData.run({ base64Data })
			.then(function() {
			showAlert("User Data CSV file successfully sent to your email: " + appsmith.user.email, "success")
		})
			.catch(function(error)  {
			showAlert("Error occurred while sending email: sendEmailData.data" + , "error")
		})
	}
}
Here,
sendEmailDatais the query created on your SMTP datasource, andbase64Datais passed as an input.SMTP Email Query
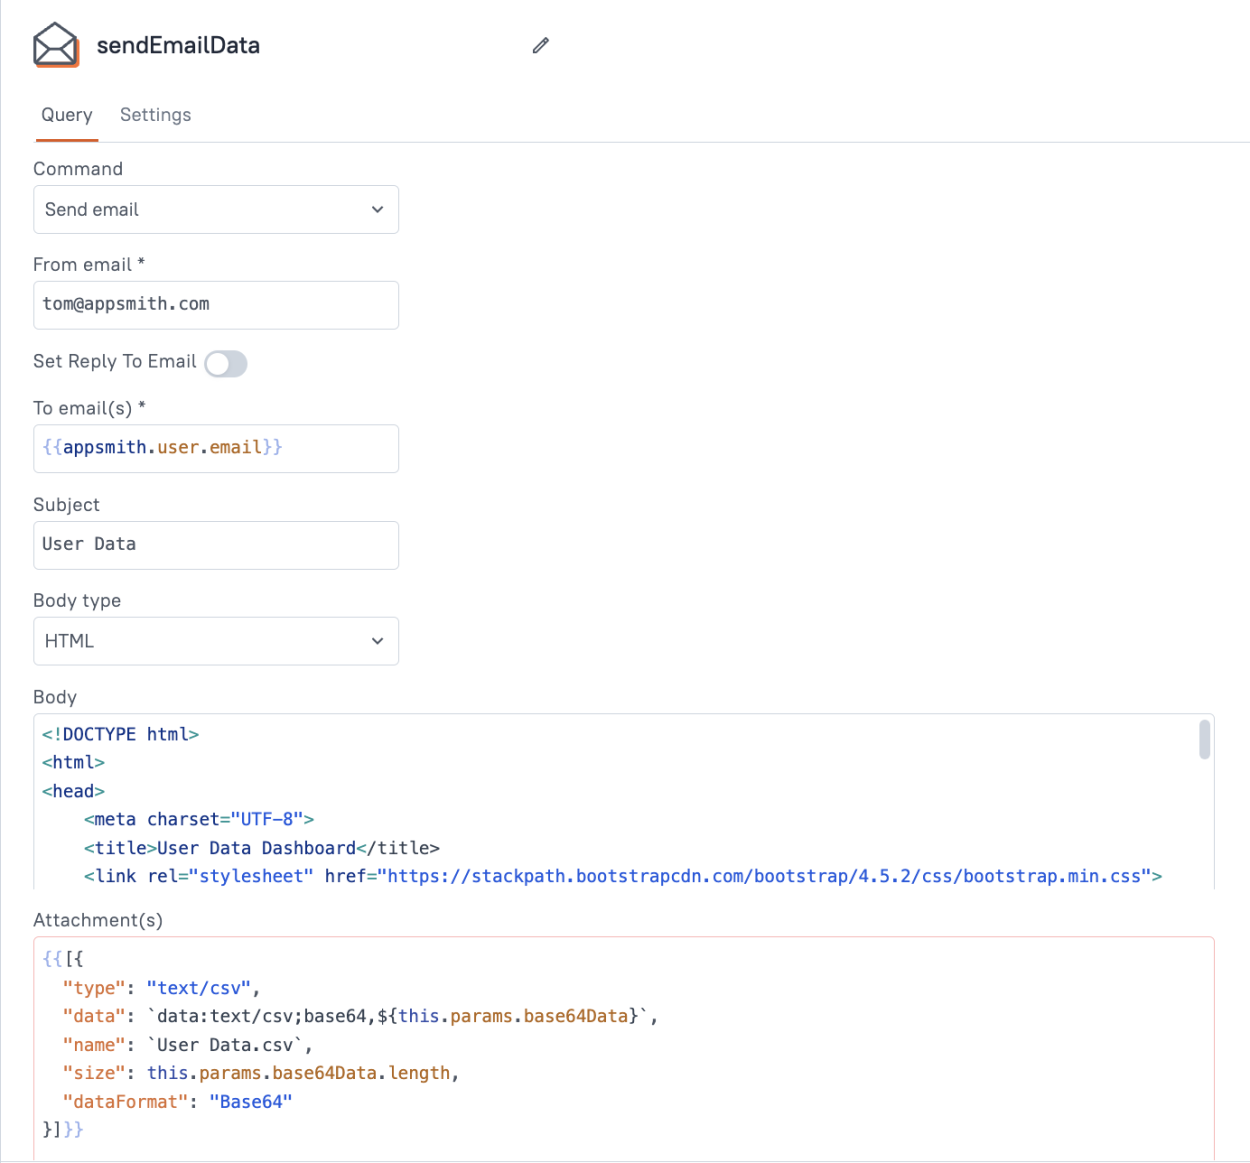
Configure your email query as below to send the email body in HTML format for a customized and themed email.
HTML Template
Below you can see the HTML I am using included with styling from top CSS libraries like bootstrap in addition to the style sheet I have added. The HTML can also have dynamic content, like data bindings embedded inside from the widgets or JSObject functions. I am using one of my JS functionsActions.getDashboardData()to dynamically retrieve certain data sets from my User Data and set them as<td>(or Table Data cell elements).<!DOCTYPE html> <html> <head> <meta charset="UTF-8"> <title>User Data Dashboard</title> <link rel="stylesheet" href="https://stackpath.bootstrapcdn.com/bootstrap/4.5.2/css/bootstrap.min.css"> <style> body { font-family: Arial, sans-serif; line-height: 1.6; background-color: #f8f9fa; padding: 20px; } .container { max-width: 800px; margin: auto; background-color: #ffffff; padding: 30px; border: 1px solid #dddddd; border-radius: 5px; box-shadow: 0px 0px 10px 0px rgba(0,0,0,0.1); } h1, h2 { color: #007bff; margin-bottom: 20px; } p { margin-bottom: 20px; } table { width: 100%; border-collapse: collapse; margin-bottom: 20px; } th, td { border: 1px solid #ccc; padding: 8px; text-align: left; } th { background-color: #f2f2f2; } </style> </head> <body> <div class="container"> <h1 class="mb-4">User Data Dashboard</h1> <p class="mb-4">Summary of user records:</p> <h2>Country Distribution</h2> <table class="table table-striped"> <thead class="thead-light"> <tr> <th>Country</th> <th>Number of Users</th> </tr> </thead> <tbody> {{Actions.getDashboardData().countryChartData.map(item => `<tr><td>${item.name}</td><td>${item.value}</td></tr>`).join("")}} </tbody> </table> <h2>Age Distribution</h2> <table class="table table-striped"> <thead class="thead-light"> <tr> <th>Age Range</th> <th>Number of Users</th> </tr> </thead> <tbody> {{Actions.getDashboardData().ageChartData.map(item => `<tr><td>${item.name}</td><td>${item.value}</td></tr>`).join("")}} </tbody> </table> </div> </body> </html>Attachments
In the Attachments field, send an array where each object is configured with the necessary parameters. Here’s an example configuration:
{{[{
  "type": "text/csv",
  "data": `data:text/csv;base64,${this.params.base64Data}`,
  "name": `User Data.csv`,
  "size": this.params.base64Data.length,
  "dataFormat": "Base64"
}]}}
In this example,
this.params.base64Datareferences the base64 data passed from thesendEmailDataquery.Run the function to Send Email
Finally, add a button to your Appsmith interface. Drag and drop a button widget, then configure its
onClickevent to trigger thesendEmailfunction we set up earlier.Now, deploy your app. By clicking this button, you will initiate the process of sending an email with the CSV attachment to your users.
Conclusion
You should now have a working App that sends an Email with CSV attachments on the click of a button. Awesome!!
This process is highly beneficial for various use cases, such as:
- Data Sharing: Easily sharing data with team members or clients via email.
- User Notifications: Informing users with detailed data reports directly in their inbox.
- Custom Alerts: Sending customized alerts and notifications that include comprehensive data summaries.
- Automated Reporting: This functionality along with our Workflows feature will allow you to regularly send automated reports to stakeholders with the latest data.
In case you want to try this app live, you can use it and fork it here:
https://community.appsmith.com/template/send-email-data-csv