

Setting Up a Custom JS Library Repo
Goal
Create a repo to house and serve custom JS libraries in UMD format.
Prerequisites
NPM
Git
Github account
Overview
Appsmith's ability to add custom JS libraries is incredibly powerful and can instantly supercharge your application. Custom libraries enable us to write less code, standardize on common tools, and get safer and more performant results. However - what if the code you want isn't on NPM? What if you want to reuse custom code entirely?
It is actually much easier than you may think. By creating a repo with some simple scripts, you can not only create your own library of reusable code, but you can also have it served from a CDN automatically using GitHub and JSDelivr. Your custom library can be used across any of your apps, and best of all, when you add functionality or make improvements, all your apps will get those updates too.
Lets take a look.
Note: if you want to see this in action, checkout the Appsmith Foundry repo. We use this to power our own tools and templates.
Create a new repository.
First off, you need to create a new Git repository. There isn't much need to go into details on this step, but here is a link in case you need it.
- Go to GitHub and create a new repository.
- Clone the repository to your local machine.
Once we have the repo created and cloned to your local, you can finish most of the setup there.
Create the folder structure.
We need to create two folders - one to hold the library code itself, and one to hold the UMD version once it is processed.
- Create a folder called
librarieswhere the library code will go. - Create a folder called
dist- this is where the UMD version will go.
You will create and manage your library code in the
librariesfolder, and the scripting will process and create the UMD version for you.- Create a folder called
Create a
.gitignorefile.When we run
npm, it will download the modules we need to run our build. Typically, we don't want or need these to take up space in our repo so we will create a.gitignorefile. This will tell git to ignore the files and folders in the list.**/node_modules **/.DS_StoreNote: if you use a Mac, you will recognize the
.DS_Storefiles created by the system. This will ignore them so they don't sneak into your repo. If you aren't using a Mac, that line won't do anything. But - it's good to have in case another developer later on is a Mac user.Set Up a Build Process.
You will need a build tool like Webpack or Rollup to generate a UMD build. For simplicity, we'll use Rollup in this example. This will compile our scripts (including any imported modules), remove extra code, bundle them, and put them in a UMD wrapper to ensure they are widely usable. This creates a single file that we can import as a Custom Library.
- Initialize NPM : In the root of your repository folder, run
npm init. This will create apackage.jsonfile and set us up to add the needed NPM libraries. It will also be the way we manage our code build process. -
Install Rollup: Install Rollup and its plugins by running:
npm install --save-dev rollup @rollup/plugin-node-resolve @rollup/plugin-terser @rollup/plugin-multi-entry
- Initialize NPM : In the root of your repository folder, run
Create a Rollup configuration file.
So, now we need to create a script that will use the Rollup library to parse our
librariesdirectory and "rollup" the scripts there. We also want to make sure that the output is written to thedistdirectory for our eventual use.In the root of your repo, create a file named
rollup.config.jswith the following content:import multiEntry from '@rollup/plugin-multi-entry'; import resolve from '@rollup/plugin-node-resolve'; import { terser } from 'rollup-plugin-terser'; import path from 'path'; import fs from 'fs'; // Dynamically generate the input configuration for Rollup. // This is going to parse the folders in the `libraries` directory. const libraryFolders = fs.readdirSync('libraries').filter(function (file) { return fs.statSync(path.join('libraries', file)).isDirectory(); }); // We expect that each library will have a single `index.js` file that will be processed. const inputConfig = libraryFolders.map(folder => `libraries/${folder}/index.js`); // Generate output configuration for each library const outputConfig = libraryFolders.map(folder => ({ input: `libraries/${folder}/index.js`, output: { file: `dist/${folder}.umd.js`, format: 'umd', name: folder.replace(/-\w/g, m => m[1].toUpperCase()), // Convert kebab-case to CamelCase }, plugins: [ multiEntry(), resolve(), terser(), ] })); export default outputConfig;This is an example configuration that will create a UMD build for each
index.jsfile in yourlibrariessubfolders.Add your build script.
You can easily add a command to call your build script in the
package.jsonfile. This will let you run your build process (with whatever other scripts you like) in a simple way."scripts": { "build": "rollup -c" }This runs the
rollupcommand, which will use the default configuration file we created to process the repo. Simple!Create your first library.
In order to create a library, we need to:
- Create a folder in the
librariesdirectory. The name of this folder will be the name of your library. - Inside this new folder, create an
index.jsfile. Put your Javascript in here. This can be as simple as a JSObject in your app.
You should now have a directory structure like this:
- dist
- libraries
    - myLibraryName
        - index.js
.gitignore
package.json
rollup.config.js
Note: our rollup script will only parse the
index.jsfile in the library folders.- Create a folder in the
Run your build script.
Run the build script with
npm run build. This will create a UMD build in thedistdirectory.Thats about it. Your UMd file is generated and ready to go... pretty easy.

Version control and continuous integration.
Commit the changes (including
package.json,rollup.config.js, and thedistfolder) and push them to your GitHub repository. Optionally, you can set up a GitHub Action to run the build process automatically on every push to the main branch.Generate your JSDelivr link.
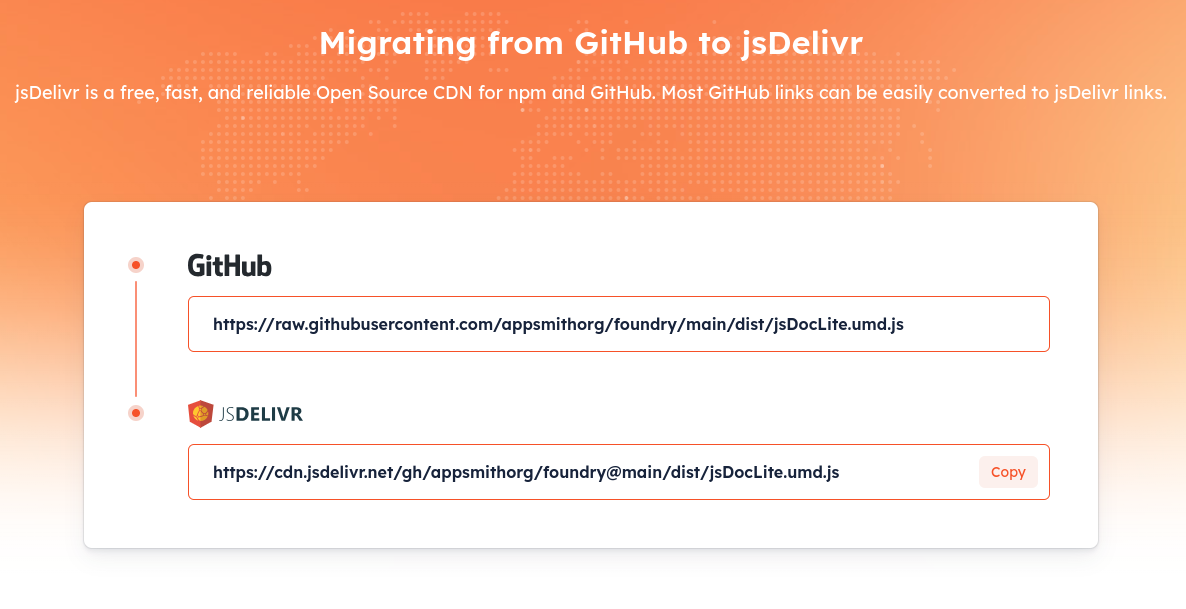
In order to add your library to Appsmith, you will want to generate the JSDelivr link. JSDelivr acts as a wrapper around Github repositories, and can easily serve the files. You have two basic options:
-
There is a basic pattern you can follow to load any version of your files:
// load any GitHub release, commit, or branch https://cdn.jsdelivr.net/gh/[USER]/[REPO]@[VERSION]/[FILE] // Example : load jsDocLite https://cdn.jsdelivr.net/gh/appsmithorg/foundry@main/dist/jsDocLite.umd.js - You can also use this tool on JSDelivr to generate the link:
Note: JSDelivr only supports public, open source files. If you have proprietary code, you will need to serve the UMD file another way.
-
Bonus step : auto-generate documentation for your library
At this point, you can use your link to add your custom library to any Appsmith app. Best of all, when you want to update the code, it will be updated across all the apps that use it! But... why stop there. Why don't we add some other enhancements?
Caring is sharing, and you will probably want to share your custom library with other people on your team or by your customers. Adding some basic documentation is a great step towards ensuring better apps. So, how can we make this easier?
- First of all, you are already adding good comments in your code, right? Of course you are! That means you can use JSDoc or something similar to auto-document your code!
- Also, since we know what the format of the JSDelivr link will be, we can add that into the docs as well.
- We can add an optional default image in the folder, and have that added to the docs.
- Finally, we can create a command to generate the docs, and automate it with Github actions or simply as part of your local build.
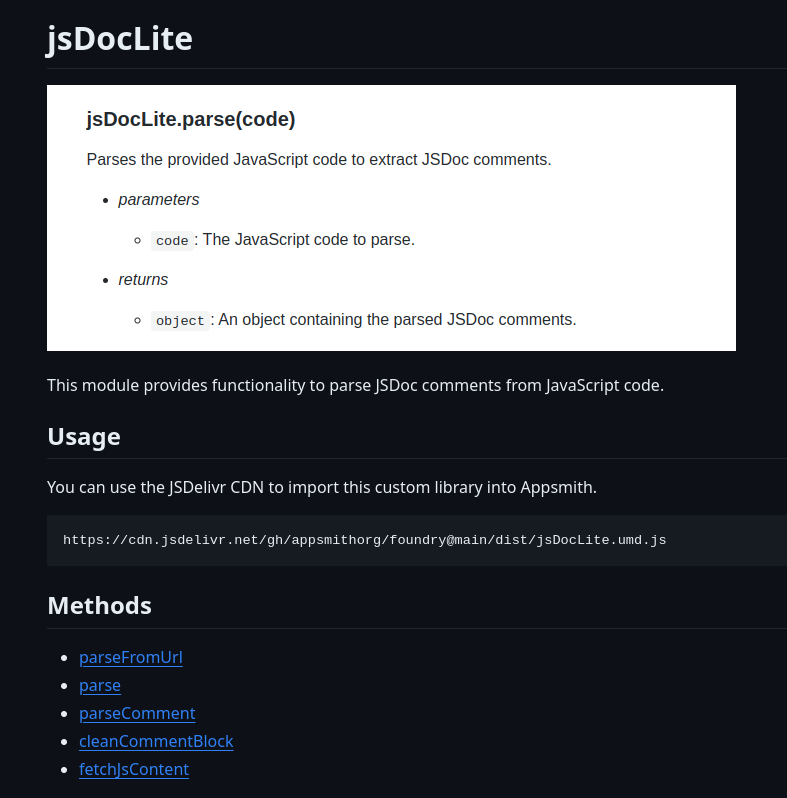
I won't go into the details of that here, but this is precisely what we do in the Foundry repo we use for our team. the custom libraries in that repo all have a README file with automatically generated documentation. Every time we change the code, we regenerate the docs as part of the UMD build. You can see the repo for details, but the results are pretty good:
Conclusion
On the surface, this seems like a complex idea - creating a collection of custom libraries, delivered by CDN, with automatic documentation. This tutorial seems like it is long with many steps. However, the reality is that there is actually a very simple and elegant solution available. Give it a shot and let us know how it goes.
FAQ
What if I'm not familiar with using GitHub or JSDelivr?
If you're new to GitHub or JSDelivr, it might seem a bit overwhelming at first, but don't worry! GitHub is a platform where developers store their code, and it has lots of tutorials to help you get started. JSDelivr is a service that lets you deliver files stored on GitHub directly to your web applications. Think of GitHub as a library where your code lives, and JSDelivr as a delivery truck that brings the code right to your app's doorstep.
Can I use this method for libraries that aren't in UMD format?
This tutorial focuses on setting up a repository for libraries in UMD (Universal Module Definition) format because it's compatible with most module systems and environments. If your library isn't in UMD format, you might need to adjust the build process to convert it into UMD or another format compatible with your project's requirements.
What if I need to use a private repository for my custom JS library?
Using a private repository for your custom JS library is totally doable, but remember, JSDelivr only supports public repositories for free. If your code is private and you still want to serve it over a CDN, you'll need to look into other CDN services that support private content or consider making your repository public if it doesn't contain sensitive information.
In the comments : should we add custom libraries to the community library?