


Sending Emails has become a crucial part of almost any internal tool (from password reset emails to transactional emails). Because of this, Appsmith provides an SMTP plugin as part of its supported data sources, and also for your instance configuration.
Simple Mail Transfer Protocol (SMTP) is a set of commands that handles the transfer of emails. When you send an email, it will be forwarded from your email client (in this case, Appsmith) to the SMTP server. The server will then transfer the mail to the recipient’s email server.
This allows you to configure your self-hosted instances in such a way that gives your users the ability to reset their passwords. To take it one step further, you can also use the SMTP data source (on both self-hosted instances and cloud versions of Appsmith) to send transactional emails (e.g., when a user adds a product to your product catalog, when a product is deleted from your database, or when a specific thing happens within your application... The possibilities are endless!!!)
In this short article, you'll learn how to properly configure the SMTP data source provided by Appsmith, and understand what every field in the configuration stands for. For the purpose of this guide, we'll be using Mailtrap as our SMTP Provider (you can learn more about how to create a Mailtrap account and get your credentials here)
Note: This guide will only address using the SMTP data source to send emails. If you're interested only in configuring your instance to send password reset emails, please check this article.
Configuration
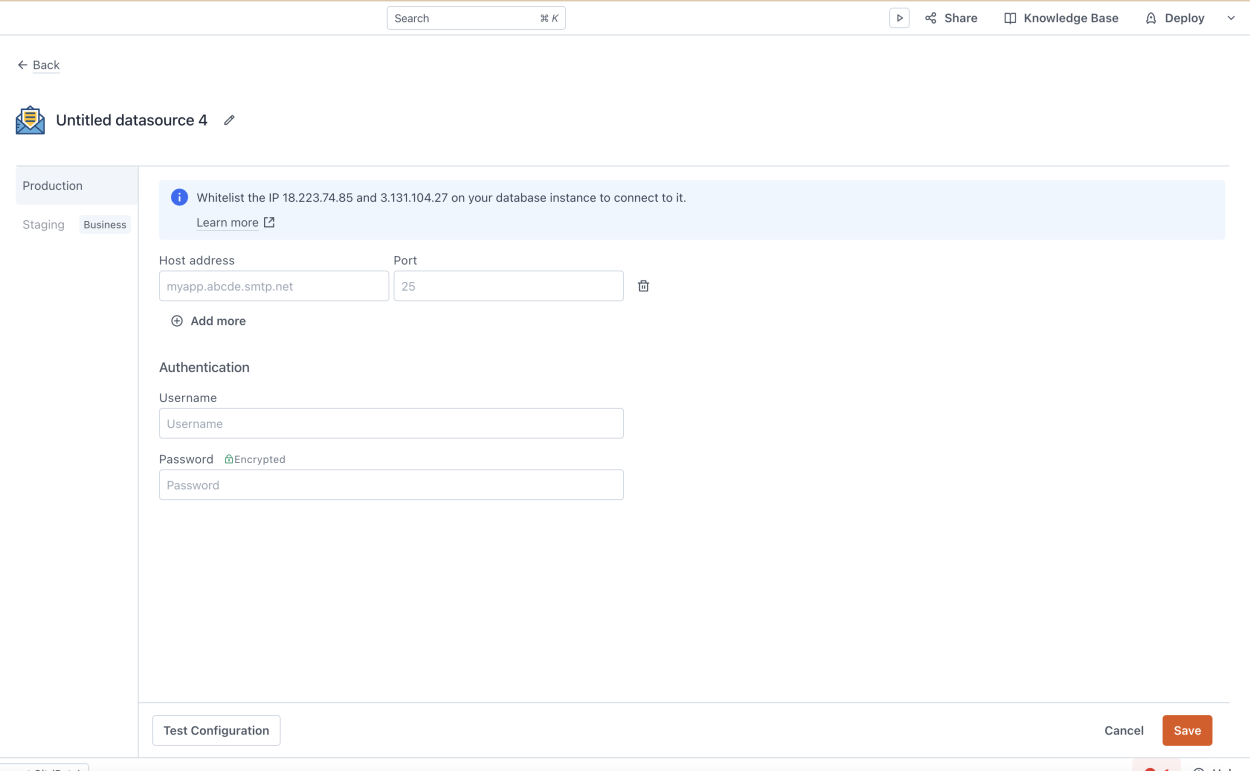
To be able to send email from your client (Appsmith), it needs to be connected to an SMTP Server (which will handle the transfer of the email to the recipient server). Regardless of which SMTP Server you decide to use, there are basically 4 details you'll need to successfully connect Appsmith to your SMTP Server:
- Host Address: This is the address of the SMTP Server you've chosen. Because we're using Mailtrap, the host address will look something like
sandbox.smtp.mailtrap.io. If you're using Gmail as your SMTP Server, the host address will look likesmtp.gmail.com. - Port: Ports play a crucial role in routing the right information to the right places. In our case, the port provided by Mailtrap is
2525. If you're using Gmail as your SMTP Server, they have two ports:465 (SSL)/587 (TLS). We won't be getting into the details ofSSLandTLSconfiguration but for Appsmith, please use the587port. - Username: The username will be provided to you by the SMTP Server (in our case, Mailtrap will generate this information as part of the credentials). If you're using Gmail as your SMTP Server, the username is most likely your email address (e.g. olawale@gmail.com).
- Password: This password will also be provided to you if you're using Mailtrap. If you're using Gmail as your SMTP Server, you'll need to generate an App Password for your Gmail account.
Once you have all the information ready, input it into the SMTP data source and click the "Test Configuration" button in the lower left corner. Once the Test is successful, click the "Save" button on the lower right corner, and you're good to go!
Send Emails
Now that you've successfully configured the SMTP data source, it's time to start sending emails. There are several input fields involved here, and because this is a "Deep Dive", we'll look into them one after the other and provide examples:
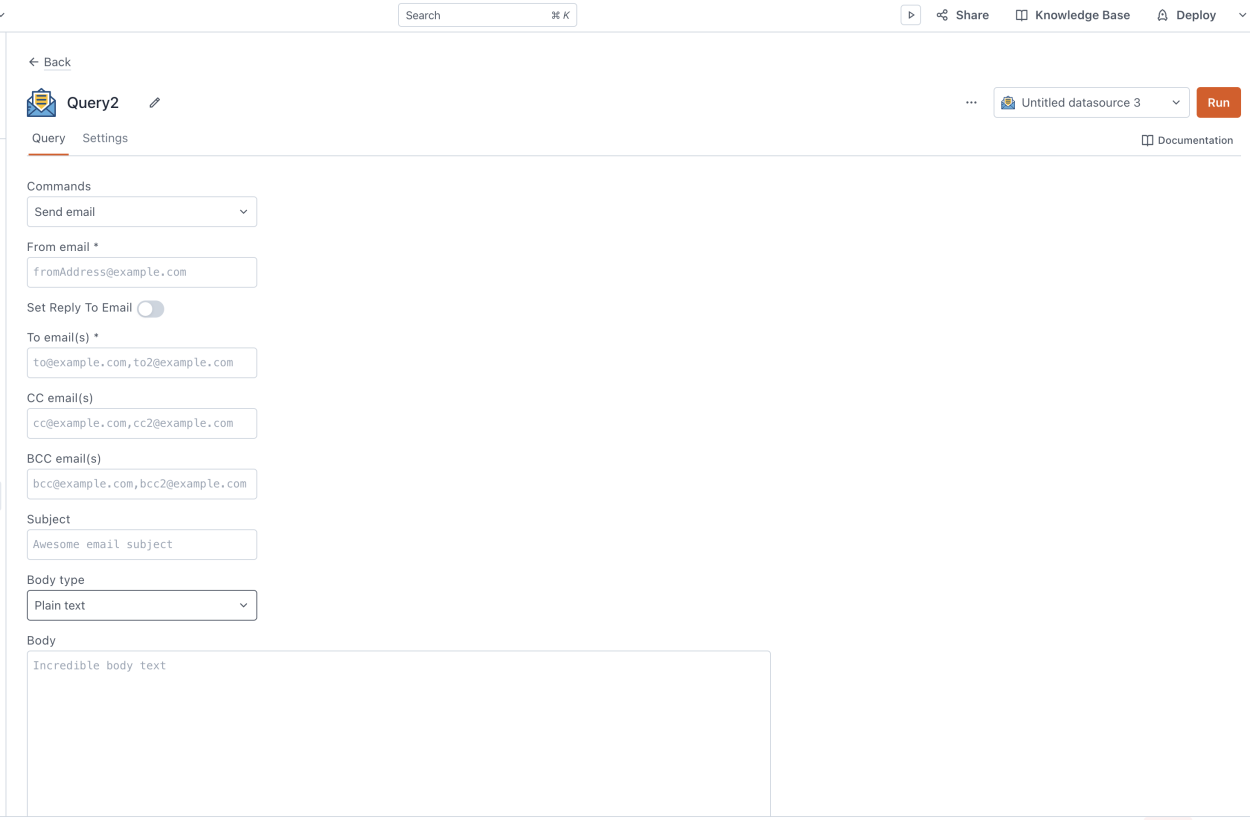
All basic fields have been described in our official documentation (You can learn more about the Appsmith email data source here) in detail. What we'll be focusing more on is the Attachments Field. When sending an email, you might want to attach images or files to the email. This can be done by using the following steps.
- Drag a File Picker widget to the canvas which will be used to upload the file you would like to attach to the email.
- Bind the Filepicker widget to the Attachments field using
{{Filepicker_Widget.files}} - Once a file (or multiple files) has been uploaded through the file picker widget, it will automatically get attached to the Email.
Note: If you're sending to multiple emails, you'll need to specify those emails in a comma-separated format in the To email(s) field like so: olawale@appsmith.com,support@appsmith.com. This will send the email to olawale@appsmith.com and support@appsmith.com. The same applies to other fields like CC email(s) and BCC email(s).

Thanks for the guide, really useful!
Hi,
Helpful tutorial but... I'm wondering if you've looked into a similar solution for office 365? My firm uses that, and I cannot seem to get Appsmith to authenticate as I keep getting "Authentication failure", and can't find the equivalent of a generate an App Password for your Gmail account for Microsoft.
Thanks!
In reply to Hi, Helpful tutorial but... … by drreech
Hi - I've not tested this, but I found some information that might help. Let me know if this works!
To set up Office 365 as an SMTP datasource in Appsmith, follow these steps to configure the SMTP settings accurately. This will allow you to send emails from your Appsmith application using your Office 365 account.
Step 1: Gather Office 365 SMTP Details
First, you need to have the correct SMTP server details for Office 365. Here are the general settings:
Step 2: Enable SMTP Authentication in Office 365
Ensure that SMTP authentication is enabled in your Office 365 account. This might require you to set up and use an app password, especially if you have two-factor authentication enabled.
Step 3: Configure SMTP Datasource in Appsmith
Now, let's configure the SMTP datasource in Appsmith:
Go to the Datasources section and click on
.
Choose SMTP from the available options.
Step 4: Send an Email Using SMTP
After setting up the datasource, you can send an email using a button or any other trigger in your Appsmith application.
Use the following template for the query:
Troubleshooting
If you encounter issues: