
Part 2: Deploying Strapi to the Cloud - Integrating Appsmith & Strapi
Goal
This is Part 2 of a series called Building Dynamic and Enterprise Dashboards with Appsmith and Strapi, where we explore how this dynamic duo can help you supercharge your data-driven applications with ease.
At the end of this session, you will have a working deployed Strapi headless content management system application in Google Cloud Platform ready to start serving data for your Appsmith application.
Prerequisites
A Google Cloud Platform Account with billing enabled.
The gcloud command line interface installed on your machine
Overview
Strapi is an open-source headless Content Management System (CMS) that provides a flexible and customizable platform for managing digital content and delivers your content seamlessly via REST APIs or GraphQL. Strapi can be hosted in any Cloud Platform and since Appsmith EE can be deployed to a serverless architecture we'll deploy both to the same infrastructure.
Enable APIs & Permissions
To run Strapi in GCP, a set of APIs has to be enabled so that the different services can connect to each other:
- Secret Manager API
- Cloud Build API
- Cloud SQL Admin API
- Compute Engine API
- Cloud Logging API
- App Engine API
- Identity and Access Management (IAM) API
- App Engine Admin API
Now, if you don't want to go one by one enabling them on the browser, you can enable them using the gcloud CLI or the Cloud Sheel in GCP running each of these commands separately or in a single command separated by commas.
gcloud services enable secretmanager.googleapis.com
gcloud services enable cloudbuild.googleapis.com
gcloud services enable sqladmin.googleapis.com
gcloud services enable compute.googleapis.com
gcloud services enable logging.googleapis.com
gcloud services enable appengine.googleapis.com
gcloud services enable iam.googleapis.com
gcloud services enable appengineadmin.googleapis.com
Now, let's initiate our App Engine service so we can configure it's service account permissions. App Engine is the serverless service we will use to deploy Strapi to the Cloud
You can do this manually by searching for "App Engine" in the search box at the top and initiating the app in the region of your choice, but remember, this region is key since most of the services we'll use should be in the same region, also, select the default App Engine service account. But the easiest way is using gcloud again, by just running:
gcloud app create --region=us-centralYou can also easily do this with
gcloudby running the following command (you can again, pass the region of your choice as a parameter, for this demo we'll useus-central):gcloud app create --region=us-centralNow that App Engine is initiated, we can give its service account the permissions it needs to connect to the APIs and Services that Strapi will need to connect. go to AIM - Under service accounts and find the service account for App Engine, normally the name is
app-name@appspot.gserviceaccount.comfor example, in my case isappsmith-403817@appspot.gserviceaccount.com, you can also find the right service account by runninggcloud app describeThis will tell you the service account associated with your app. Now, edit this service account and add the following permissions
- Cloud SQL Client
- Cloud SQL Editor
- Storage Object Admin
- App Engine Deployer
- Logging Admin
You can also do this easily with the
gcloudCLI using thegcloud projects add-iam-policy-bindingcommand. Here's the structure of the command:gcloud projects add-iam-policy-binding YOUR_PROJECT_ID \ --member=serviceAccount:SERVICE_ACCOUNT \ --role=ROLESo in order to allow these permissions we would run:
gcloud projects add-iam-policy-binding YOUR_PROJECT_ID \
  --member=serviceAccount:appsmith-403817@appspot.gserviceaccount.com \
  --role=roles/cloudsql.client
gcloud projects add-iam-policy-binding YOUR_PROJECT_ID \
  --member=serviceAccount:appsmith-403817@appspot.gserviceaccount.com \
  --role=roles/cloudsql.editor
gcloud projects add-iam-policy-binding YOUR_PROJECT_ID \
  --member=serviceAccount:appsmith-403817@appspot.gserviceaccount.com \
  --role=roles/storage.objectAdmin
gcloud projects add-iam-policy-binding YOUR_PROJECT_ID \
  --member=serviceAccount:appsmith-403817@appspot.gserviceaccount.com \
  --role=roles/appengine.deployer
gcloud projects add-iam-policy-binding YOUR_PROJECT_ID \
  --member=serviceAccount:appsmith-403817@appspot.gserviceaccount.com \
  --role=roles/logging.admin
Replace
YOUR_PROJECT_IDwith your actual Google Cloud project ID. These commands will add the specified roles to theappsmith-403817@appspot.gserviceaccount.comservice account in the project. Now, we are ready to create the database.Create a Database
To run Strapi you will need a database to store the data, Strapi supports multiple databases and in my experience, the best in the context of GCP is to use Cloud SQL.
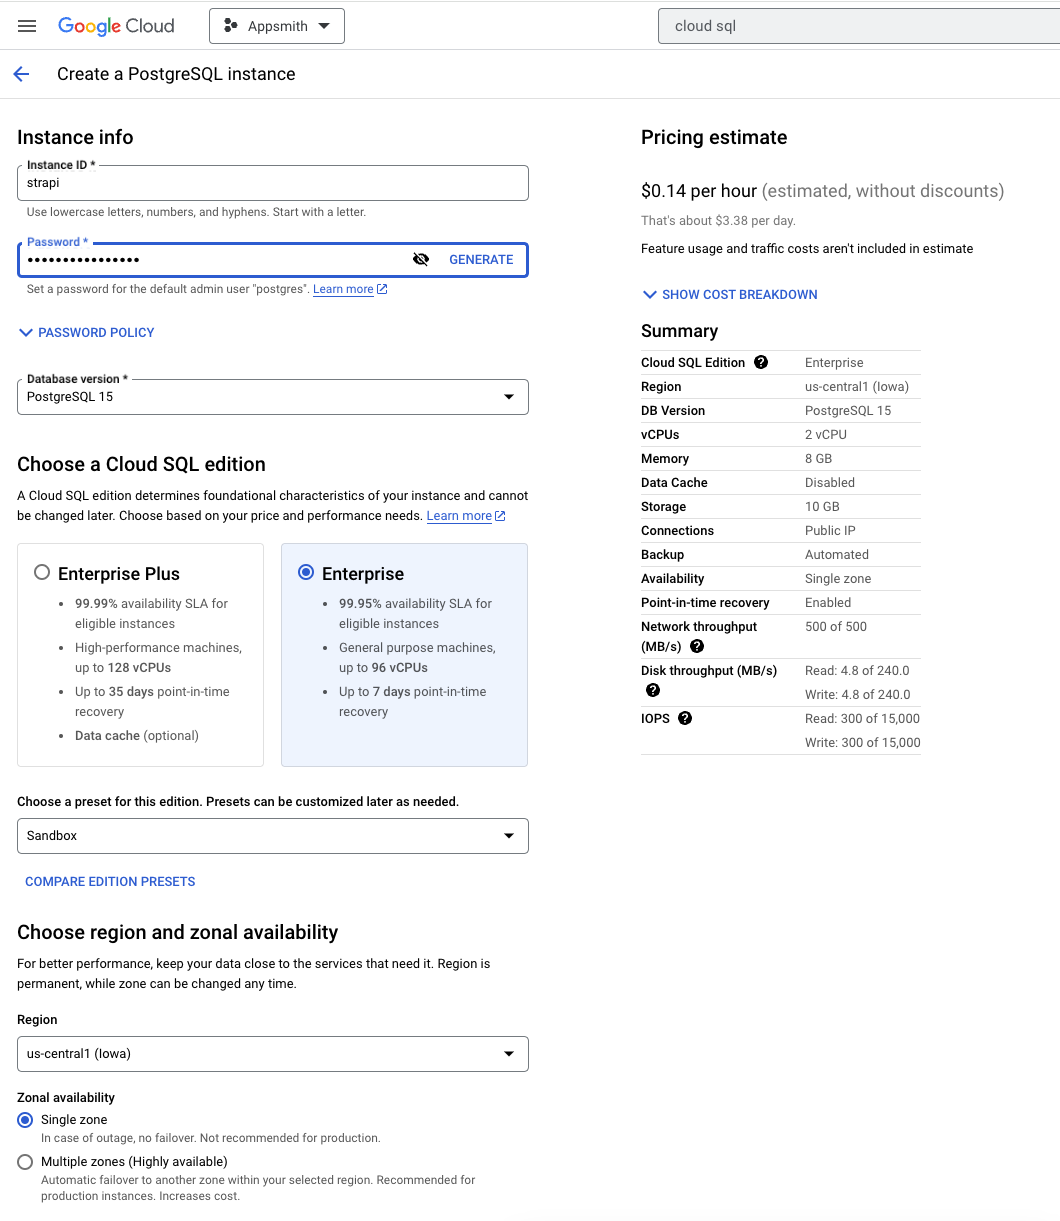
Go to Cloud SQL (https://console.cloud.google.com/sql/instances) and Create a New Instance, then select "PosteSQL" and on the next screen, you will define the instance characteristics
- Instance Name: The name of your choice, lowercase no spaces or special characters, in my case the name will be
strapi - Password: Define the default admin user "postgres" password. I recommend using the generator to create a strong password and store it since you will need it.
- Database Version: PostgreSQL 15 (14 tested to work fine as well)
- Cloud SQL Edition: Here it depends on your system availability requirements, for production I recommend Enterprise Plus, but for development Enterprise is fine
- Preset: Again, if it's production choose "Production", if it's development "Development" or "Sandbox" will work. I will choose Sandbox to avoid high costs.
- Region: Select the same region as the one you choose for the App Engine app, in my case us-central1.
You can also do this using the
gcloudCLI:gcloud sql instances create INSTANCE_NAME \ --database-version=POSTGRESQL_15 \ --tier=db-custom-2-8192 \ --region=us-central1 \ --availability-type=zonal \ --storage-type=SSD \ --storage-size=10GB \ --network-throughput=500MB \ --maintenance-window-day=1 \ --maintenance-window-hour=2 \ --backup-start-time=02:00 \ --activation-policy=ALWAYS \ --location-preference=us-central1 \ --failover-replica-name=INSTANCE_NAME-replica \ --root-password=YOUR_PASSWORDReplace the following placeholders:
INSTANCE_NAME: Provide a name for your Cloud SQL instance.YOUR_PASSWORD: Replace this with the desired password for the root user.
Last, now that we have a database, we need to give the service account permissions to access that Database, since Strapi will use the App Engine service account to read/write to the DB. You can easily do this by running:
gcloud projects add-iam-policy-binding appsmith-403817 \ --member=serviceAccount:appsmith-403817@appspot.gserviceaccount.com \ --role=roles/cloudsql.editor- Instance Name: The name of your choice, lowercase no spaces or special characters, in my case the name will be
Create a Cloud Storage Bucket
For Strapi CMS to store and retrieve assets such as images, videos and files we need to set up a Cloud Storage bucket, so go to https://console.cloud.google.com/storage and click "Create" to add a new bucket.
- Name: The name of your choice, lowercase no spaces or special characters, in my case the name will be
strapi-cms-gcp - Location Type: For Production projects, I recommend Multi-region or Dual-region at least, for Development, a single region is fine, I'm selecting the same us-central1 as the Database and App Engine.
- Storage Class: Select Standard, which is best for short-term storage and frequently accessed data.
- Object Access Control: Here you define how the objects's access rules will be defined. Uniform: Ensure uniform access to all objects in the bucket by using only bucket-level permissions (IAM) or Fine-grained: Specify access to individual objects by using object-level permissions (ACLs) in addition to your bucket-level permissions (IAM). Strapi supports both, I will select Uniform.
- Object Protection Policy: Here you can control how object deletion works, you can define object versioning or a retention policy by minutes, hours, days, etc. For the sake of a development environment, I will select "None" but for Production, I recommend a Retention Policy to comply with data practices.
You can also do this easily by using the
gsutilCLI which is part ofgcloudrunning the following 2 commandsgsutil mb -p PROJECT_ID -l us-central1 gs://strapi-cms-gcp gsutil uniformbucketlevelaccess set on gs://strapi-cms-gcpReplace
PROJECT_IDwith your project ID andstrapi-cms-gcpwith your desired bucket name.OPTIONAL: If your case is to use Strapi as a CMS to be accessible from the internet you will want the assets to have a public URL from the bucket, to do this you can run:
To grant public read access to a Google Cloud Storage bucket and its files for
allUsers, you can use thegsutiltool with theacl chcommand. Here's how to do it:gsutil acl ch -u AllUsers:R gs://strapi-cms-gcpThis command grants read (R) permission to
allUsers, which effectively makes the files in the bucket publicly accessible. Users can access and download objects in the bucket without authentication.Last but not least, you want to give the App Engine service account permissions to write/read this bucket, because Strapi will use the service account credentials to write and read the files on the bucket, to do that, you can go to the bucket's permissions tab by adding a New Principal and give the "Object Storage Creator" and "Object Storage Viewer"
You can also do that by using the CLI by running:
gcloud storage buckets add-iam-policy-binding gs://strapi-cms-gcp \ --member=serviceAccount:appsmith-403817@appspot.gserviceaccount.com \ --role=roles/storage.objectAdmi- Name: The name of your choice, lowercase no spaces or special characters, in my case the name will be
Database Connection Configuration
Install the PostgreSQL package by running
sudo npm install pg --saveand now, create a folder under theconfigfolder namedenvand inside of it created another folder namedproductionhere, we will put the configuration of our production environment like database connection, plugins config, etc. If you want to name your environment something different likestageortestthat's ok, just created a folder with that name.Now inside that folder create a file called
database.js(config/env/production/database.js) and put the following content:module.exports = ({ env }) => ({ connection: { client: "postgres", connection: { host: `/cloudsql/${env("INSTANCE_CONNECTION_NAME")}`, database: env("DATABASE_NAME"), user: env("DATABASE_USER"), password: env("DATABASE_PASSWORD"), }, }, });This will have our connection string using environment variables, we will configure these environment variables in the next steps.
Cloud Storage Connection Configuration
Install the Strapi Cloud Storage provider package by running
sudo npm install @strapi-community/strapi-provider-upload-google-cloud-storage --saveand create a file in the same environment folder we created in the previous step calledplugins.js(config/env/production/plugins.js) (read more about this package here)module.exports = ({ env }) => ({ upload: { config: { provider: '@strapi-community/strapi-provider-upload-google-cloud-storage', providerOptions: { bucketName: env('GCS_BUCKET_NAME'), basePath: env('GCS_BASE_PATH'), publicFiles: true, uniform: false, }, }, }, });An important note here: If your Cloud Bucket is set to use uniform Object Access Control, then change uniform
: true. Also, if you do not have the files publicly accessible, then setuppublicFiles: false.Lastly. we have to set up the
strapi::securitymiddleware to avoid CSP-blocked URLs. Edit./config/middlewares.jsand make sure to edit thestrapi::securityline with an object that looks like this:module.exports = [ 'strapi::errors', { name: 'strapi::security', config: { contentSecurityPolicy: { useDefaults: true, directives: { 'connect-src': ["'self'", 'https:'], 'img-src': ["'self'", 'data:', 'blob:', 'storage.googleapis.com'], 'media-src': ["'self'", 'data:', 'blob:', 'storage.googleapis.com'], upgradeInsecureRequests: null, }, }, }, }, 'strapi::cors', 'strapi::poweredBy', 'strapi::logger', 'strapi::query', 'strapi::body', 'strapi::favicon', 'strapi::public', ];What this does in short words, is allowing Strapi to preview the images that are uploaded to Cloud Storage.
App Engine Configuration
Now that our app has the necessary packages and configuration files, let's create the App Engine configuration file which will define how our Strapi CMS will run. Let's create a file called
app.yamlin the root of the Strapi project which is what App Engine reads to run the app.Before we do that, go to the Cloud SQL instance we created in Part 1 by visiting https://console.cloud.google.com/sql/instances on the instance dashboard you will see the connection name, you will need this to put on the
app.yaml, normally the structure isproject_name:region:instance_namein my caseappsmith-403817:us-central1:appsmith
Now with that connection name copied, create the
app.yamlfile and enter your credentialsruntime: nodejs18 instance_class: F2 env_variables: HOST: '0.0.0.0' NODE_ENV: 'production' DATABASE_NAME: 'postgres' DATABASE_USER: 'postgres' DATABASE_PASSWORD: 'CLOUD_SQL_PASSWORD' INSTANCE_CONNECTION_NAME: 'CLOUD_SQL_CONNECTION_NAME' GCS_BUCKET_NAME: 'CLOUD_STORAGE_BUCKET_NAME' GCS_BASE_PATH: 'cms' beta_settings: cloud_sql_instances: 'CLOUD_SQL_CONNECTION_NAME'- runtime: This is the version of the Node.js image we want to use,
nodejs18is recommended. - instance_class: The instance class defines the CPU/Memory configuration of the instance, read more about all the instance classes here (F2 is a basic 768MB memory and 1.2 GH CPU). For production I recommend B8.
- NODE_ENV:
production(if you defined another environment folder in the previous step then use that name instead of production) - DATABASE_NAME:
postgres(this is the default database that CloudSQL creates when you provision a new instance) - DATABASE_USER: 'postgres' (this is the default user that CloudSQL creates when you provision a new instance)
- DATABASE_PASSWORD: replace
CLOUD_SQL_PASSWORDwith the password you created in Part 1. - INSTANCE_CONNECTION_NAME: Replace
CLOUD_SQL_CONNECTION_NAMEwith the connection name you copied from Cloud SQL in the previous step. - GCS_BUCKET_NAME: Replace
CLOUD_STORAGE_BUCKET_NAMEwith the name of the bucket we created in Part 1. - GCS_BASE_PATH: This will be the prefix for your bucket URL files, you can define the one you prefer.
- runtime: This is the version of the Node.js image we want to use,
Google Cloud Build Command
Now that we have the configuration file in place that tells App Engine how to run Strapi, we need to configure the build command that GCP will run when we deploy the app, this is really simple, just locate the
package.jsonfile and edit thescriptsobject and add a new line for"gcp-build": "strapi build", so it will look something similar to this:"scripts": { "develop": "strapi develop", "start": "strapi start", "build": "strapi build", "strapi": "strapi", "gcp-build": "strapi build" },Last, let's add a new file in the root of the project called
.gcloudignorewhich tells Google what files or folders to ignore when deploying, similar to the.gitignore, to avoid pushing thenode_modulesfolder and other non-necessary files..gcloudignore .git .gitignore node_modules/ #!include:.gitignore !.env yarn.lock # If you're using YarnDeploy to App Engine!
After all of this hard work, we are now ready to deploy our application to Google Cloud's App Engine! The way we do this is simple, in the root of the application folder, using your terminal with the
gcloudrun:gcloud app deploy app.yaml --project PROJECT_NAMEReplace
PROJECT_NAMEwith your project's name, in my case, isappsmith-403817, you will see something like this:descriptor: [/Users/kevin/PROJECTS/strapi-googlecloud/app.yaml] source: [/Users/kevin/PROJECTS/strapi-googlecloud] target project: [appsmith-403817] target service: [default] target version: [20231109t220246] target url: [https://appsmith-403817.uc.r.appspot.com] target service account: [App Engine default service account] Do you want to continue (Y/n)? y Beginning deployment of service [default]... ╔════════════════════════════════════════════════════════════╗ ╠═ Uploading 34 files to Google Cloud Storage ═╣ ╚════════════════════════════════════════════════════════════╝ File upload done. Updating service [default]...done. Setting traffic split for service [default]...done. Deployed service [default] to [https://appsmith-403817.uc.r.appspot.com] You can stream logs from the command line by running: $ gcloud app logs tail -s default To view your application in the web browser run: $ gcloud app browse --project=appsmith-403817
Conclusion
CONGRATS!
Now you are ready to visit the Strapi instance by going to the URL mentioned on the console.
You can review my codebase as a reference; it's publicly available here: https://github.com/kevinblanco/strapi-googlecloud