

How to Integrate Salesforce Oauth2 with Appsmith
Goal
In today's dynamic business environment, effective management of customer relationships and sales activities is crucial for organizations seeking to maximize productivity and track project timelines accurately. Salesforce is a leading CRM platform that offers a comprehensive set of tools and functionalities. It empowers sales teams in monitoring and optimizing their sales activities, enabling seamless management of customer interactions and enhancing overall business performance.
Prerequisites
Have a Salesforce account with Admin settings permissions. Create a free account here.
Overview
This article delves into the process of integrating OAuth2 with Salesforce, utilising Appsmith as the preferred low-code development tool. Appsmith is a powerful platform that simplifies application development, enabling developers to rapidly create, integrate, and deploy applications without extensive coding knowledge. By harnessing the capabilities of Salesforce, OAuth2, and Appsmith, organizations can unlock a wide range of opportunities for seamless integration, enhanced security, and improved interoperability.
Appsmith's documentation about OAuth2 can be found here: https://docs.appsmith.com/core-concepts/connecting-to-data-sources/authentication/authentication-type/oauth2-authentication but, in this article, we'll break it down and showcase it easily for you.
Create a Connected App on Salesforce
First step would be to head over to your Salesforce domain. You need to ensure you have the privileges to access the Salesforce Setup page.
Once on the setup page, under Platform Tools, expand the Apps group, and click on App Manger.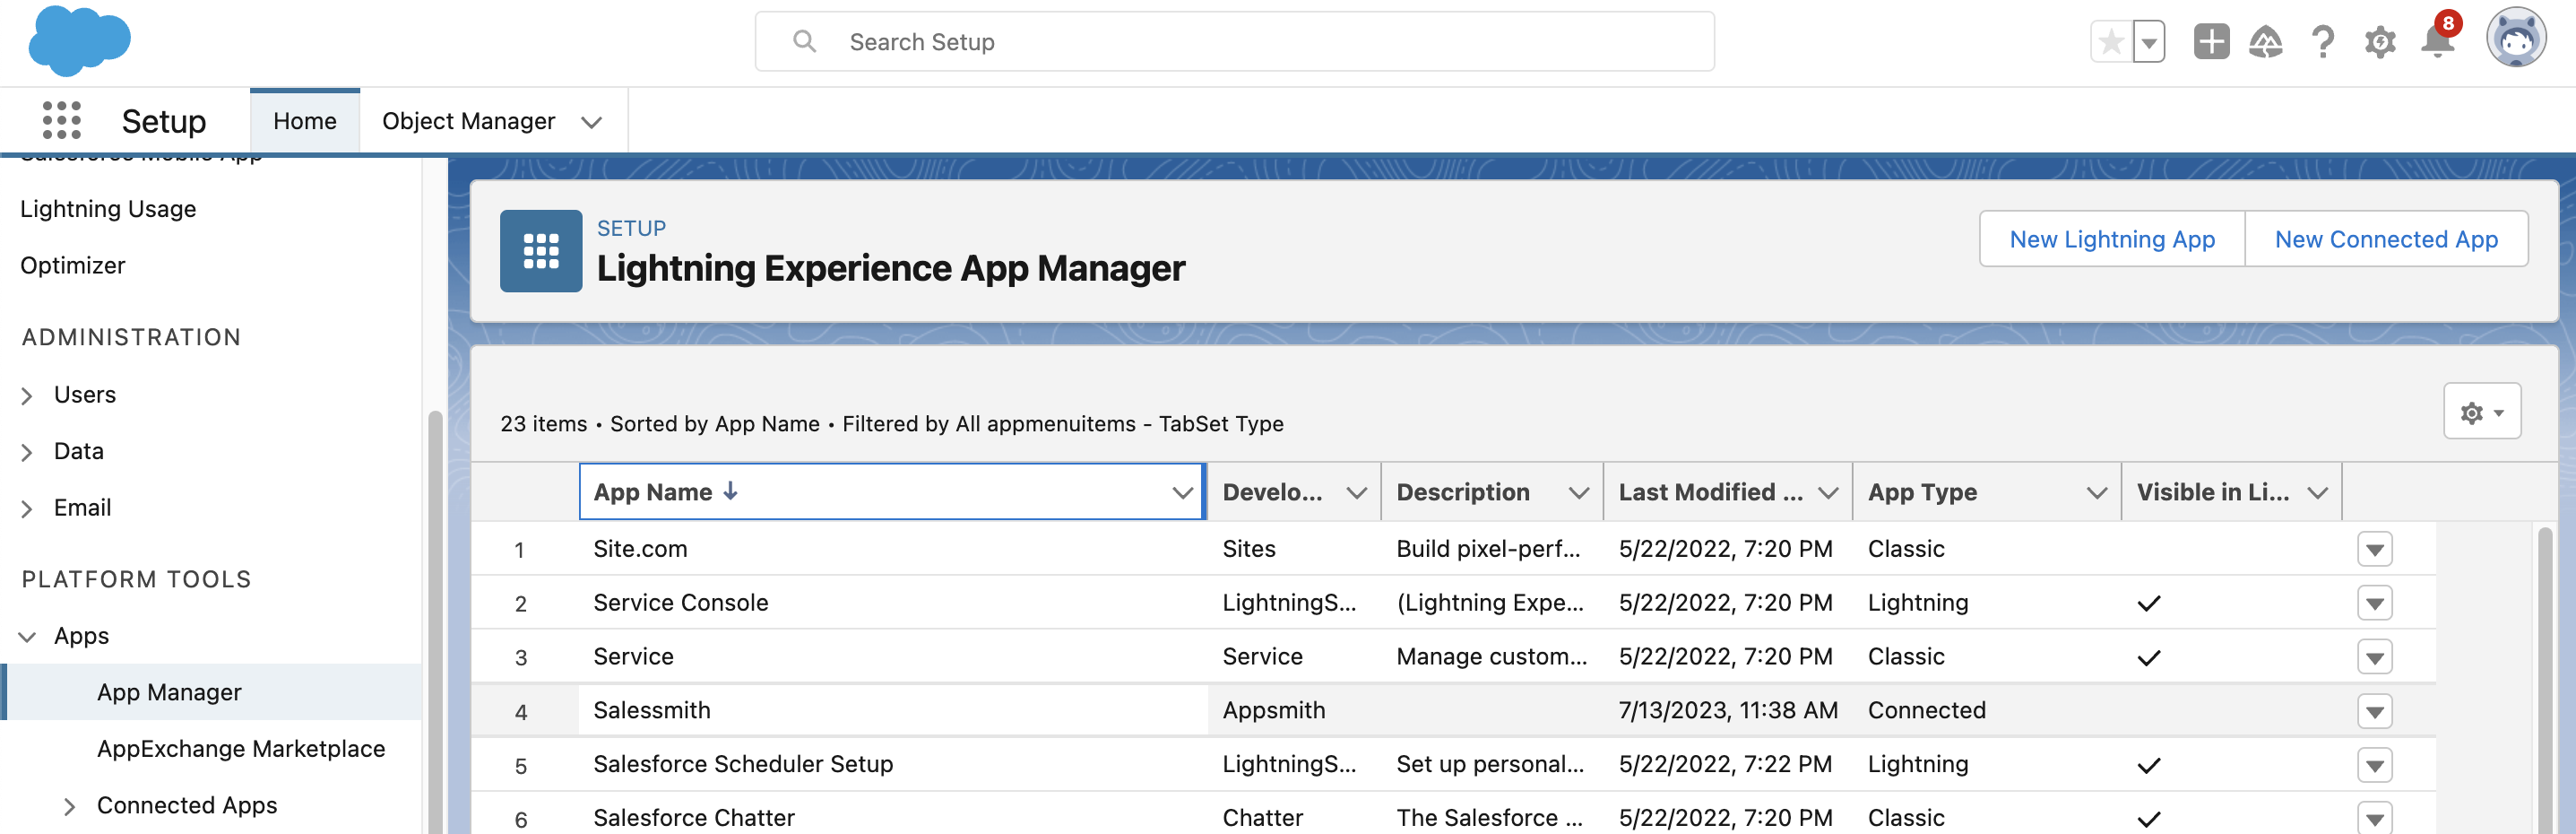
Next step would be to click and create a new Connected App
We use Connected type instead of Lightning type as our App only needs Salesforce API integration and does not require the widget components or UI layers Salesforce provides. We are using Appsmith platform for our widget and workflows to be built on top of Salesforce.Fill out the Connected App Name and Contact Email field. And within API (OAuth Settings), in the Redirect URL field, make sure to type the Appsmith redirect for Authentication which can be retrieved during the Datasource creation in the later step (Step 2). For now you can keep it as https://app.appsmith.com/api/v1/datasources/authorize, and we can cross verify later.
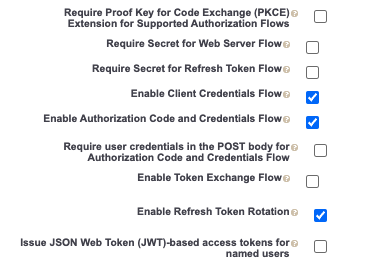
In the App Details page, locate the "OAuth Policies" section:
- Uncheck the "Require Secret for Web Server Flow" checkbox. This step is crucial for ensuring a OAuth flow with Appsmith.
- Uncheck the "Require Secret for Refresh Token Flow" checkbox. Disabling this option is essential for allowing token refresh without redirection to the Salesforce login page.
- Check the "Refresh Token Rotation" checkbox. This will ensure a new refresh token to be retrieved everytime refresh token flow is invoked.
With the specified checkboxes disabled, you should experience a connection without encountering redirection to the Salesforce login page.
Also add the Selected OAuth Scopes required from this Connected App. The scopes I am using in this tutorial is openid, api, offline_access and refresh_token, which is more than sufficient to read/write data from Salesforce as well to refresh token whenever it expires. If you need more help to define the scopes, here is the documentation.
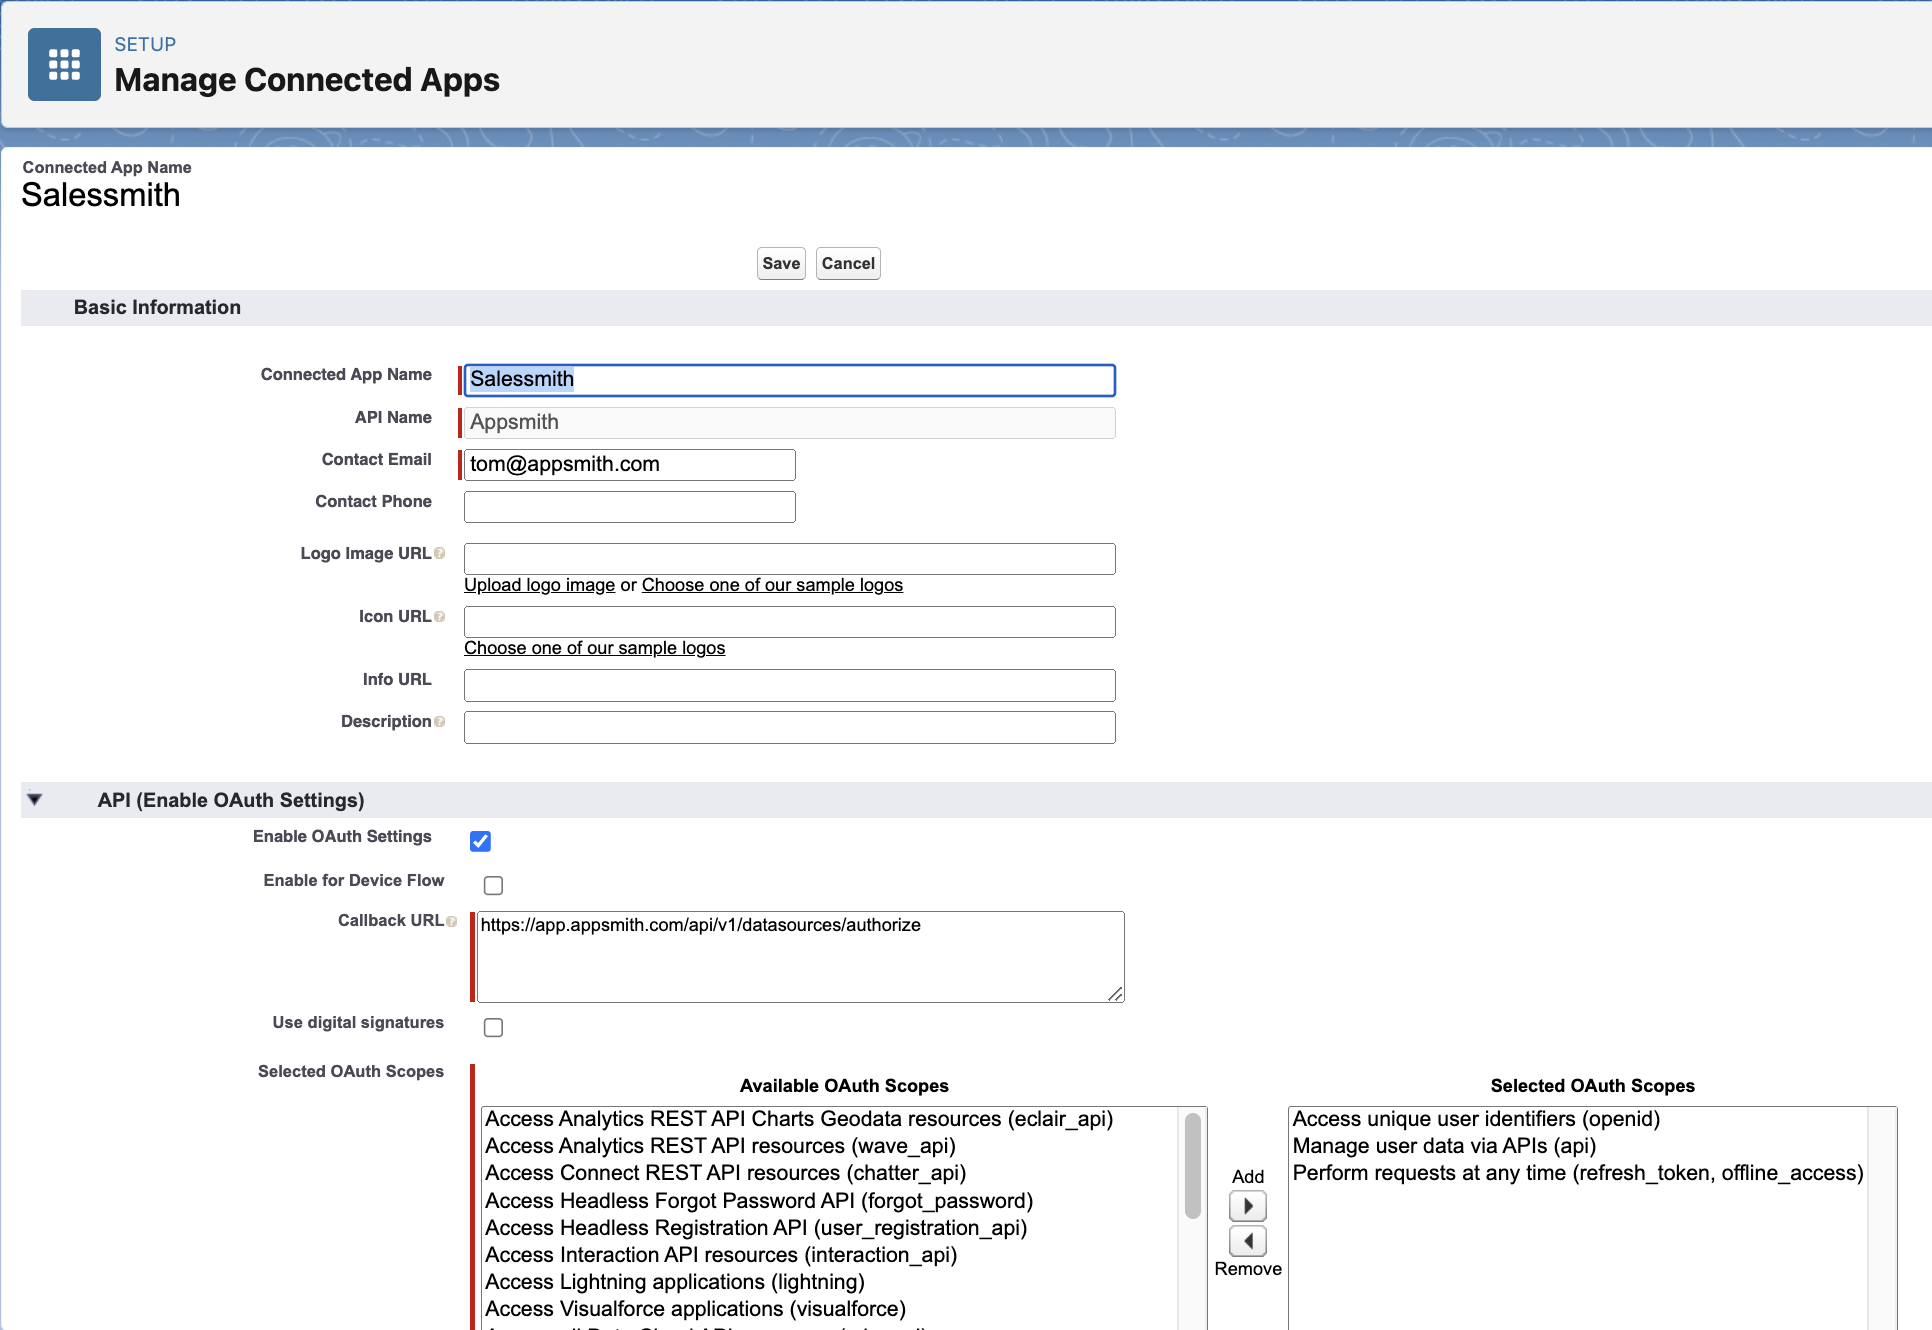
We can go ahead and save this new Connected App and you will be redirected to the view screen of this App.
Additionally we also need to set the validity of the refresh token from the Connected App's policies. Click on Manage, and you will be taken to the policy page of the Connected App. Click on Edit policies to make changes to it, and set the Refresh Token Policy to
Refresh Token is valid until revokedas seen below.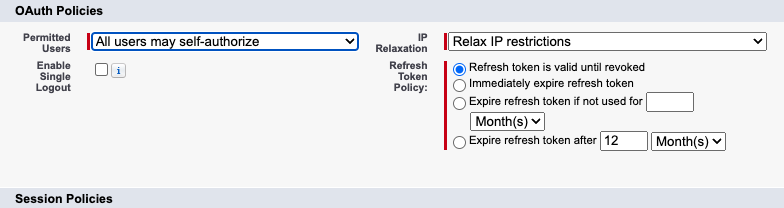
Now head back to the Connected App's main configuration page in View mode, and you will see a button called Manage Consumer Details. Click on that to be take to the Consumer Key and Secret page. Here you will find the Consumer Key (Client ID) and Consumer Secret (Client Secret). Copy and keep these details aside or keep this page open in the background to quickly use for the next set of steps.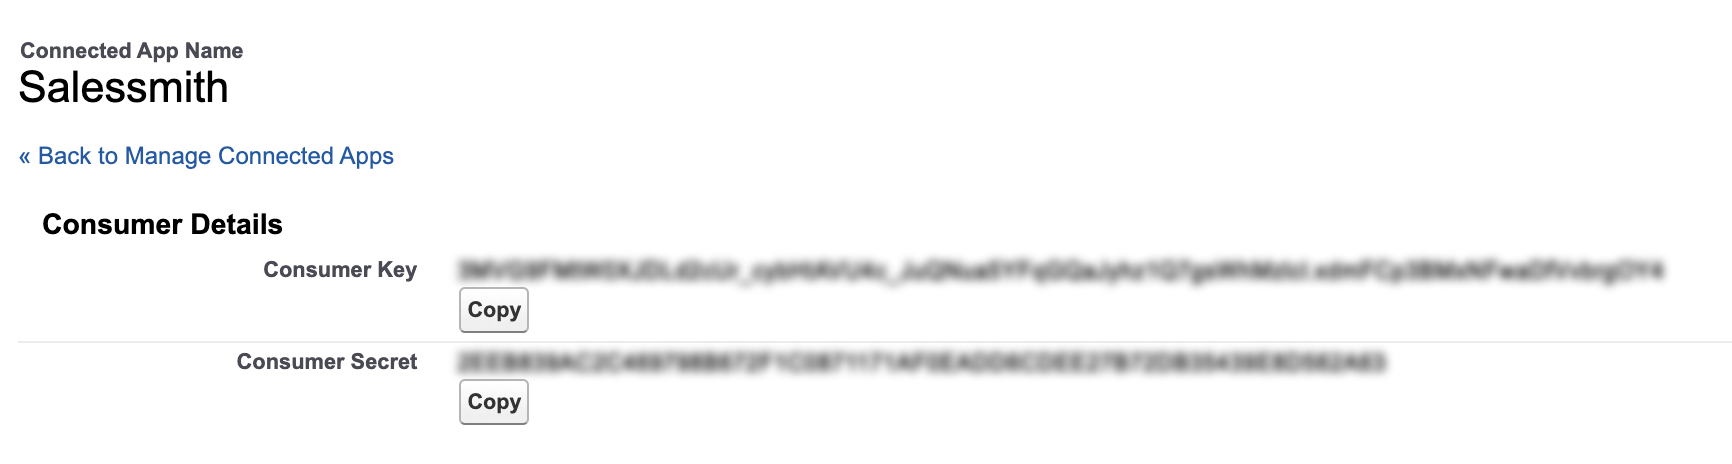
Now let's head to Appsmith to configure the OAuth2 Datasource for authorising Salesforce.
Register a New Datasource in Appsmith
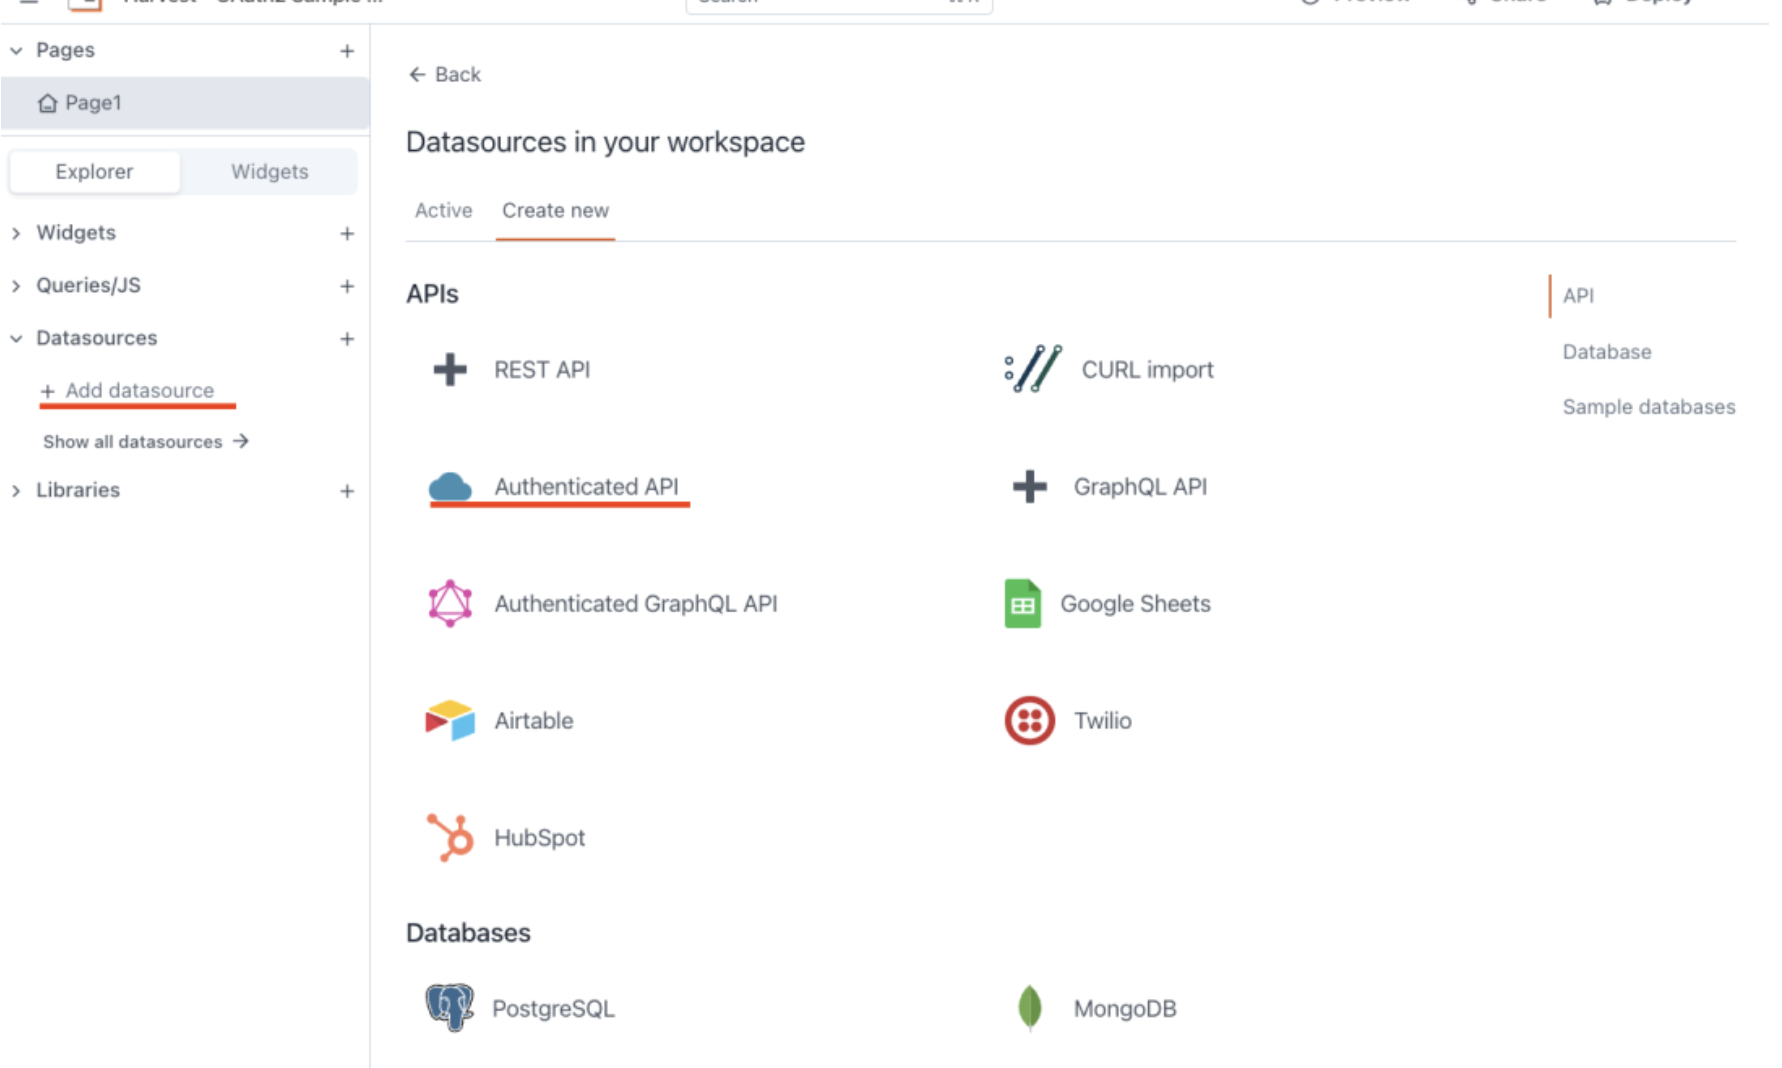
Go ahead and log in to Appsmith and either create a new App or open the App you want to integrate Salesforce, and on the left side menu you will see the Datasources section, click the "+" icon or "Add new Datasource" and select "Authenticated API"
Give the datasource the name you wish, and now in the datasource URL, let's enter your domain Salesforce API's base URL, which in my case is my staging environment as seen below and in the Authentication Type, select "OAuth 2.0", this will sleeve a new set of configurations to define.
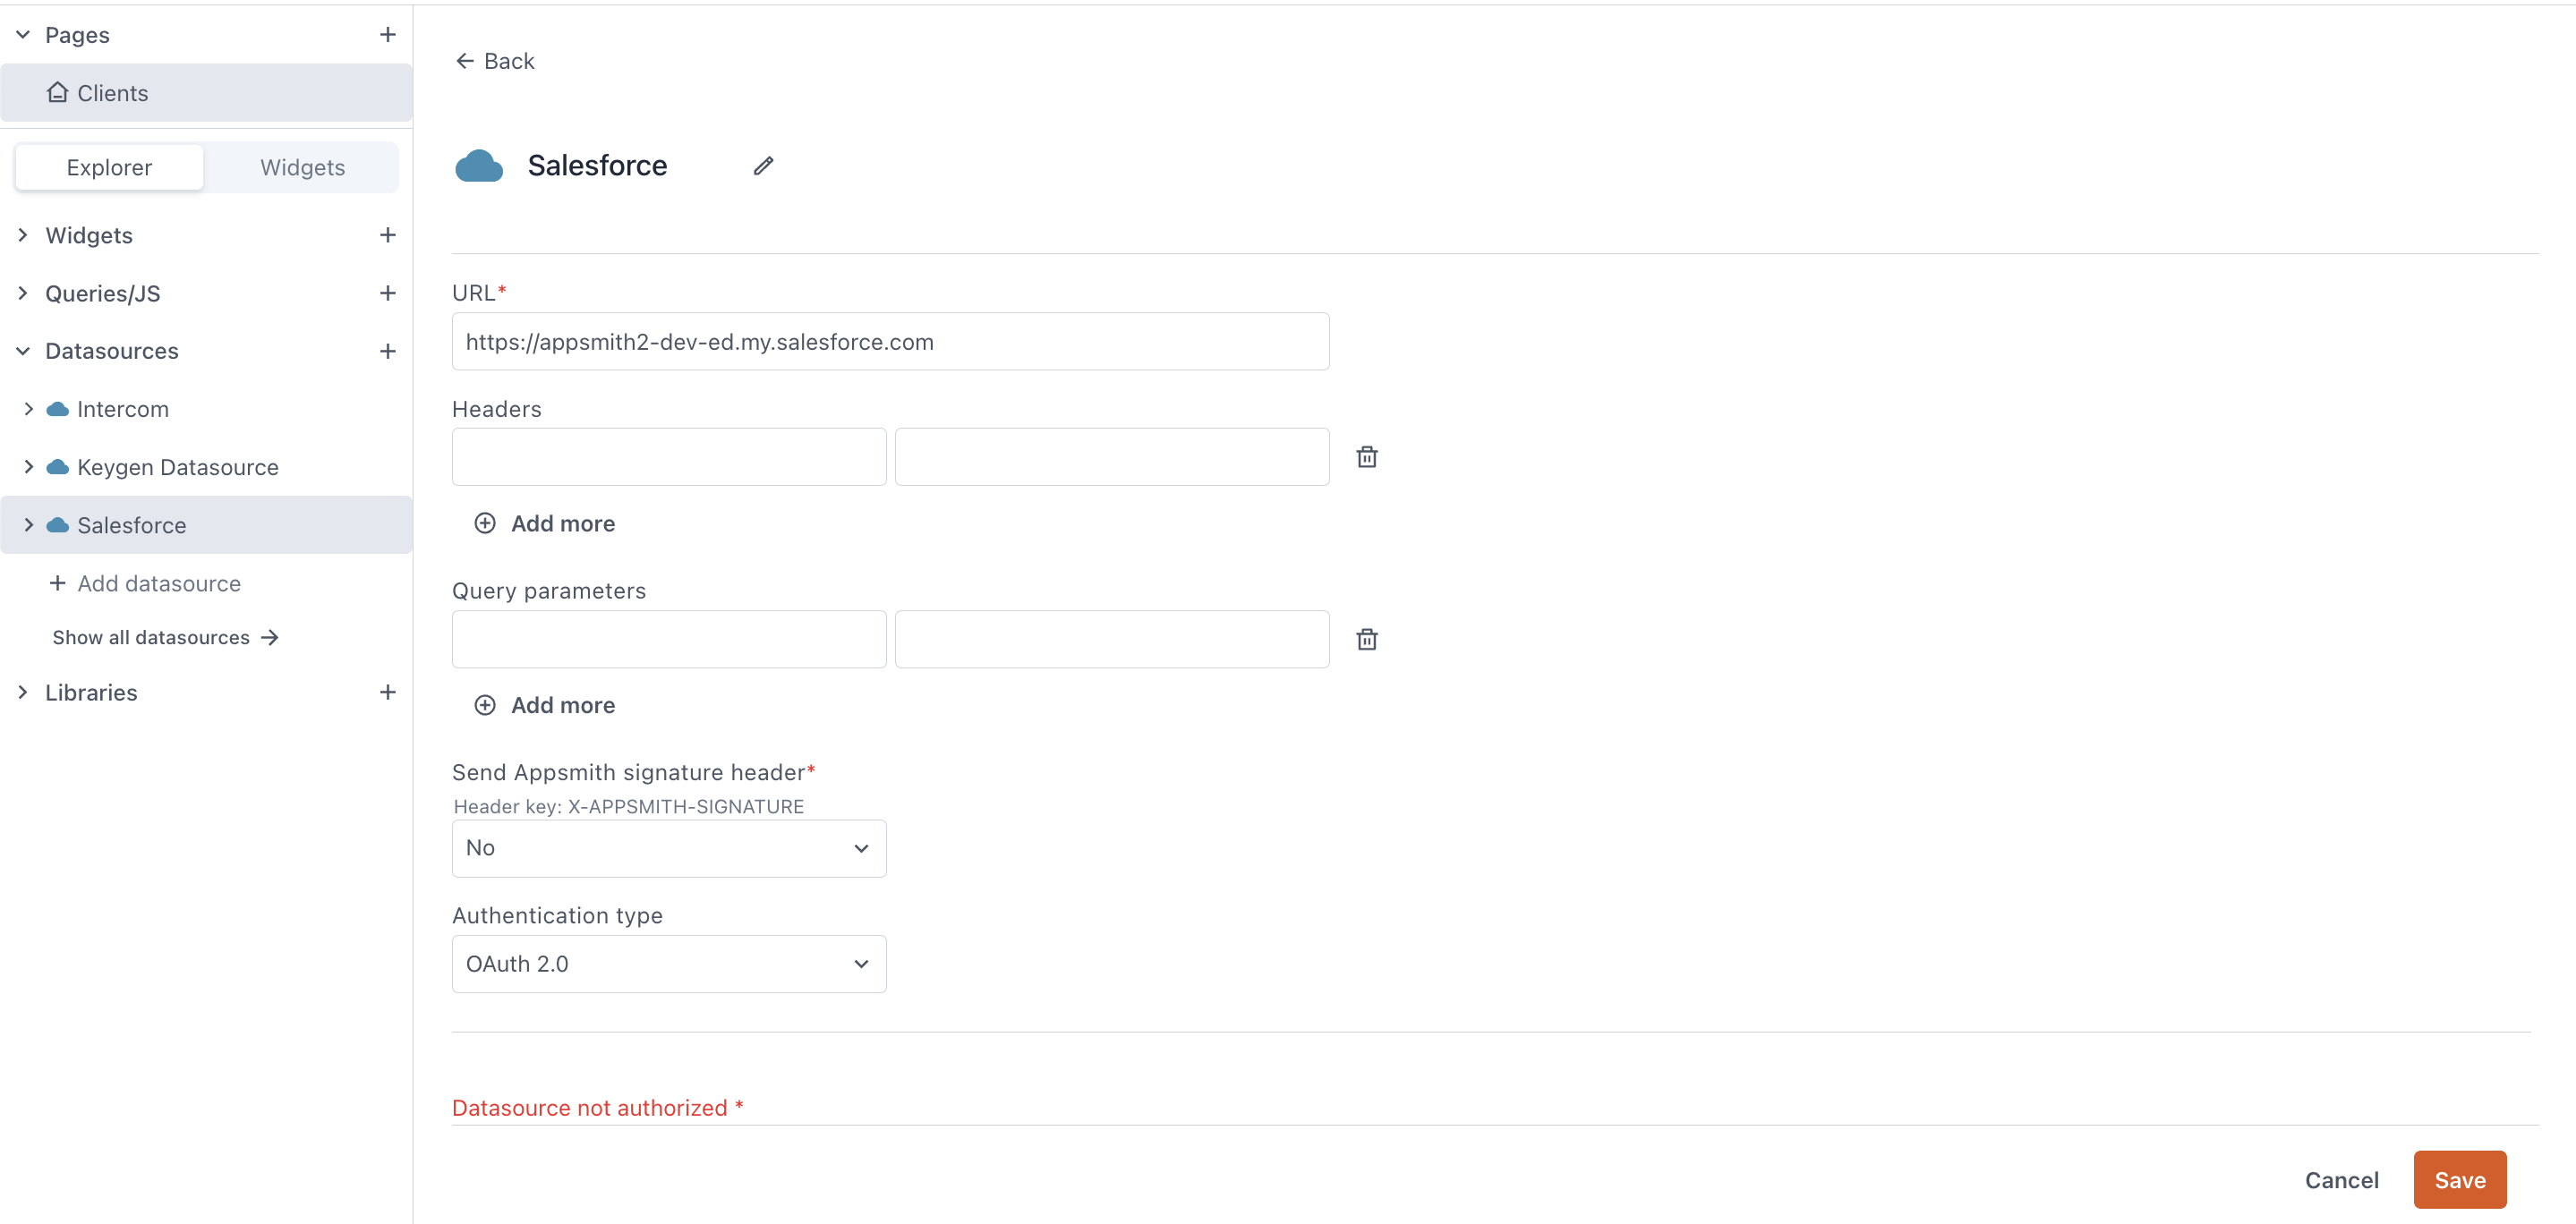
All the information that is configured below in this Authenticated API datasource is based on Salesforce API documentation for OAuth2, which you can find here.
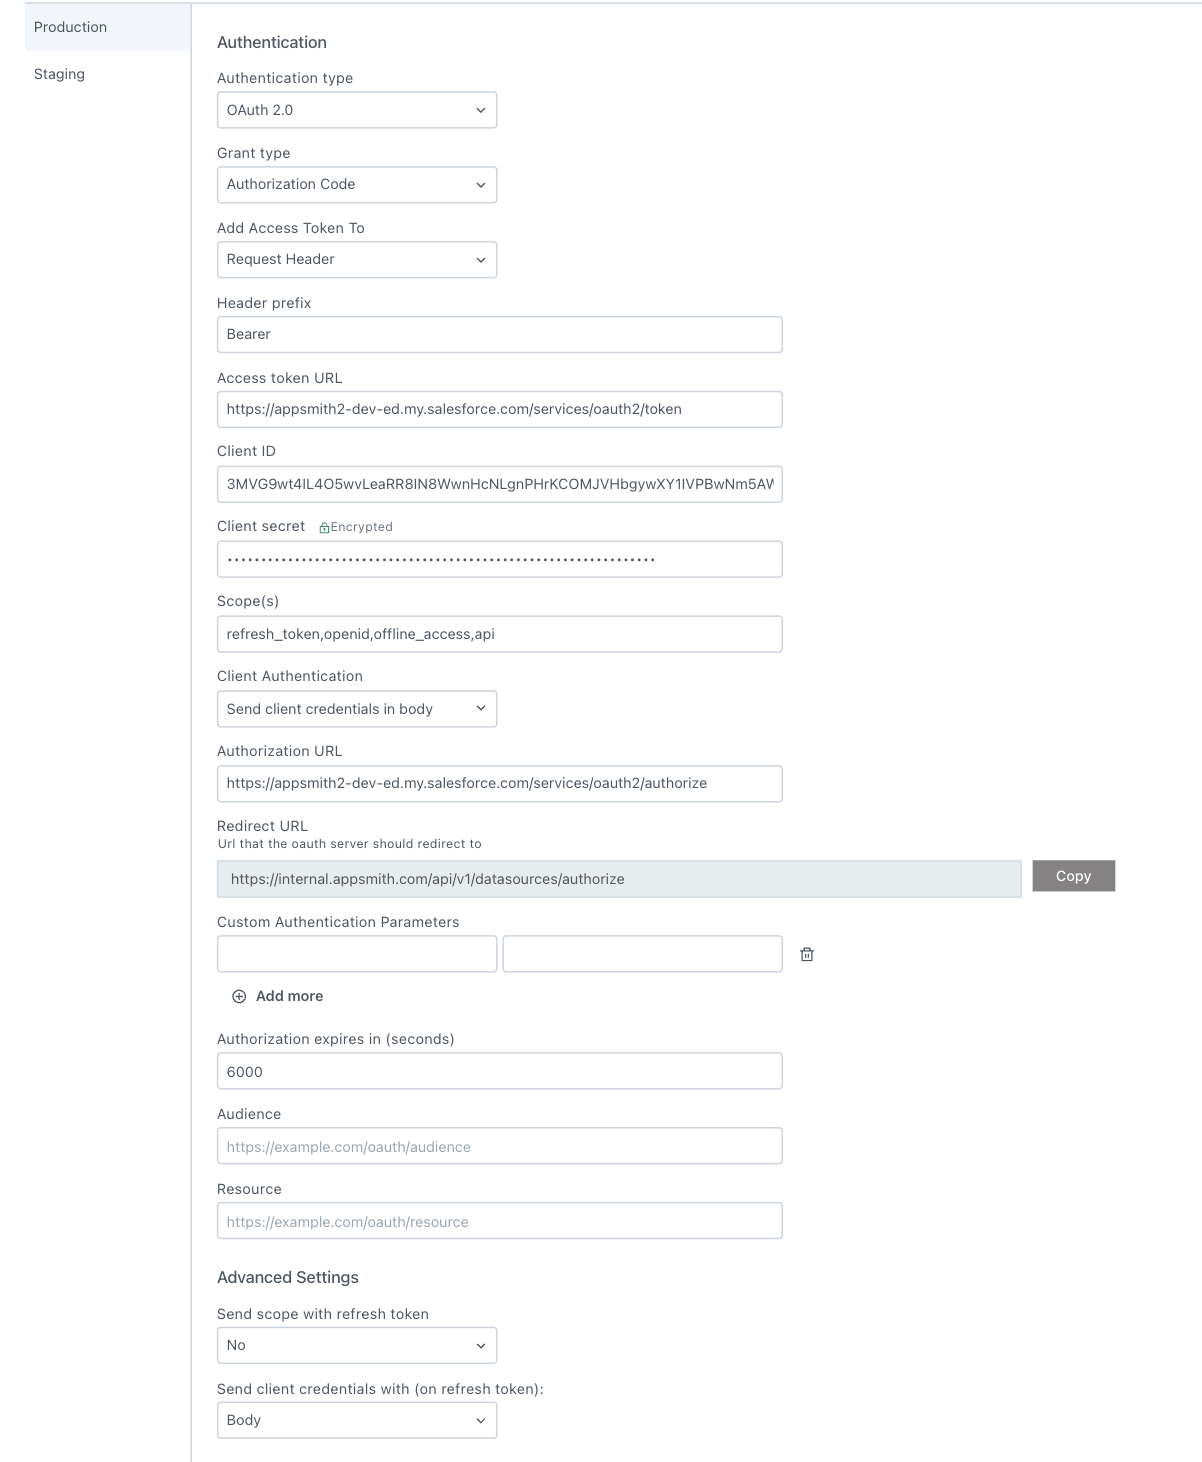
- Grant Type: You have to select "Authorization Code"
- Add Access Token To: select "Request Header"
- Header Prefix: Appsmith will automatically fill it with "Bearer" leave it like that.
- Access Token URL: Based on Salesforce docs it should be <SALESFORCE_DOMAIN_BASE_URL>/services/oauth2/token
- Client ID: Paste the Consumer Key that Salesforce generated in the first step.
- Client Secret: Paste the Consumer Secret that Salesforce generated in the first step.
- Scope(s): When we created the OAuth2 app in Salesforce, we had requested access just to integrate the APIs and enable refresh token.
So you have to type openid, api, offline_access, refresh_token. - Client Authentication: Select "Send client credentials in body".
- Authorization URL: Based on Salesforce's docs it should be <SALESFORCE_DOMAIN_BASE_URL>/services/oauth2/authorize
- Authorization expires in: Set this value as 6000 (10 minutes)
- Advanced Settings: Send scope with refresh token should be set as
No.
And that should be able to make it work. Additionally you can add and pass custom Authentication Parameters, Headers or Query Parameters, if you want to send them for whatever reason back to Salesforce. But with these settings the Auth will work.
Now, scroll down and you will see a button that says "Save and Authorize".
Kudos, you have now successfully integrated Salesforce OAuth2 integration within Appsmith 🎉🎊.
Use the newly created Datasource
Now that we have OAuth2 successfully integrated inside Appsmith, you can go ahead and create a New API, or create a new Query using the left menu "+" icon next to the Queries section and then selecting the "Salesforce query" option.
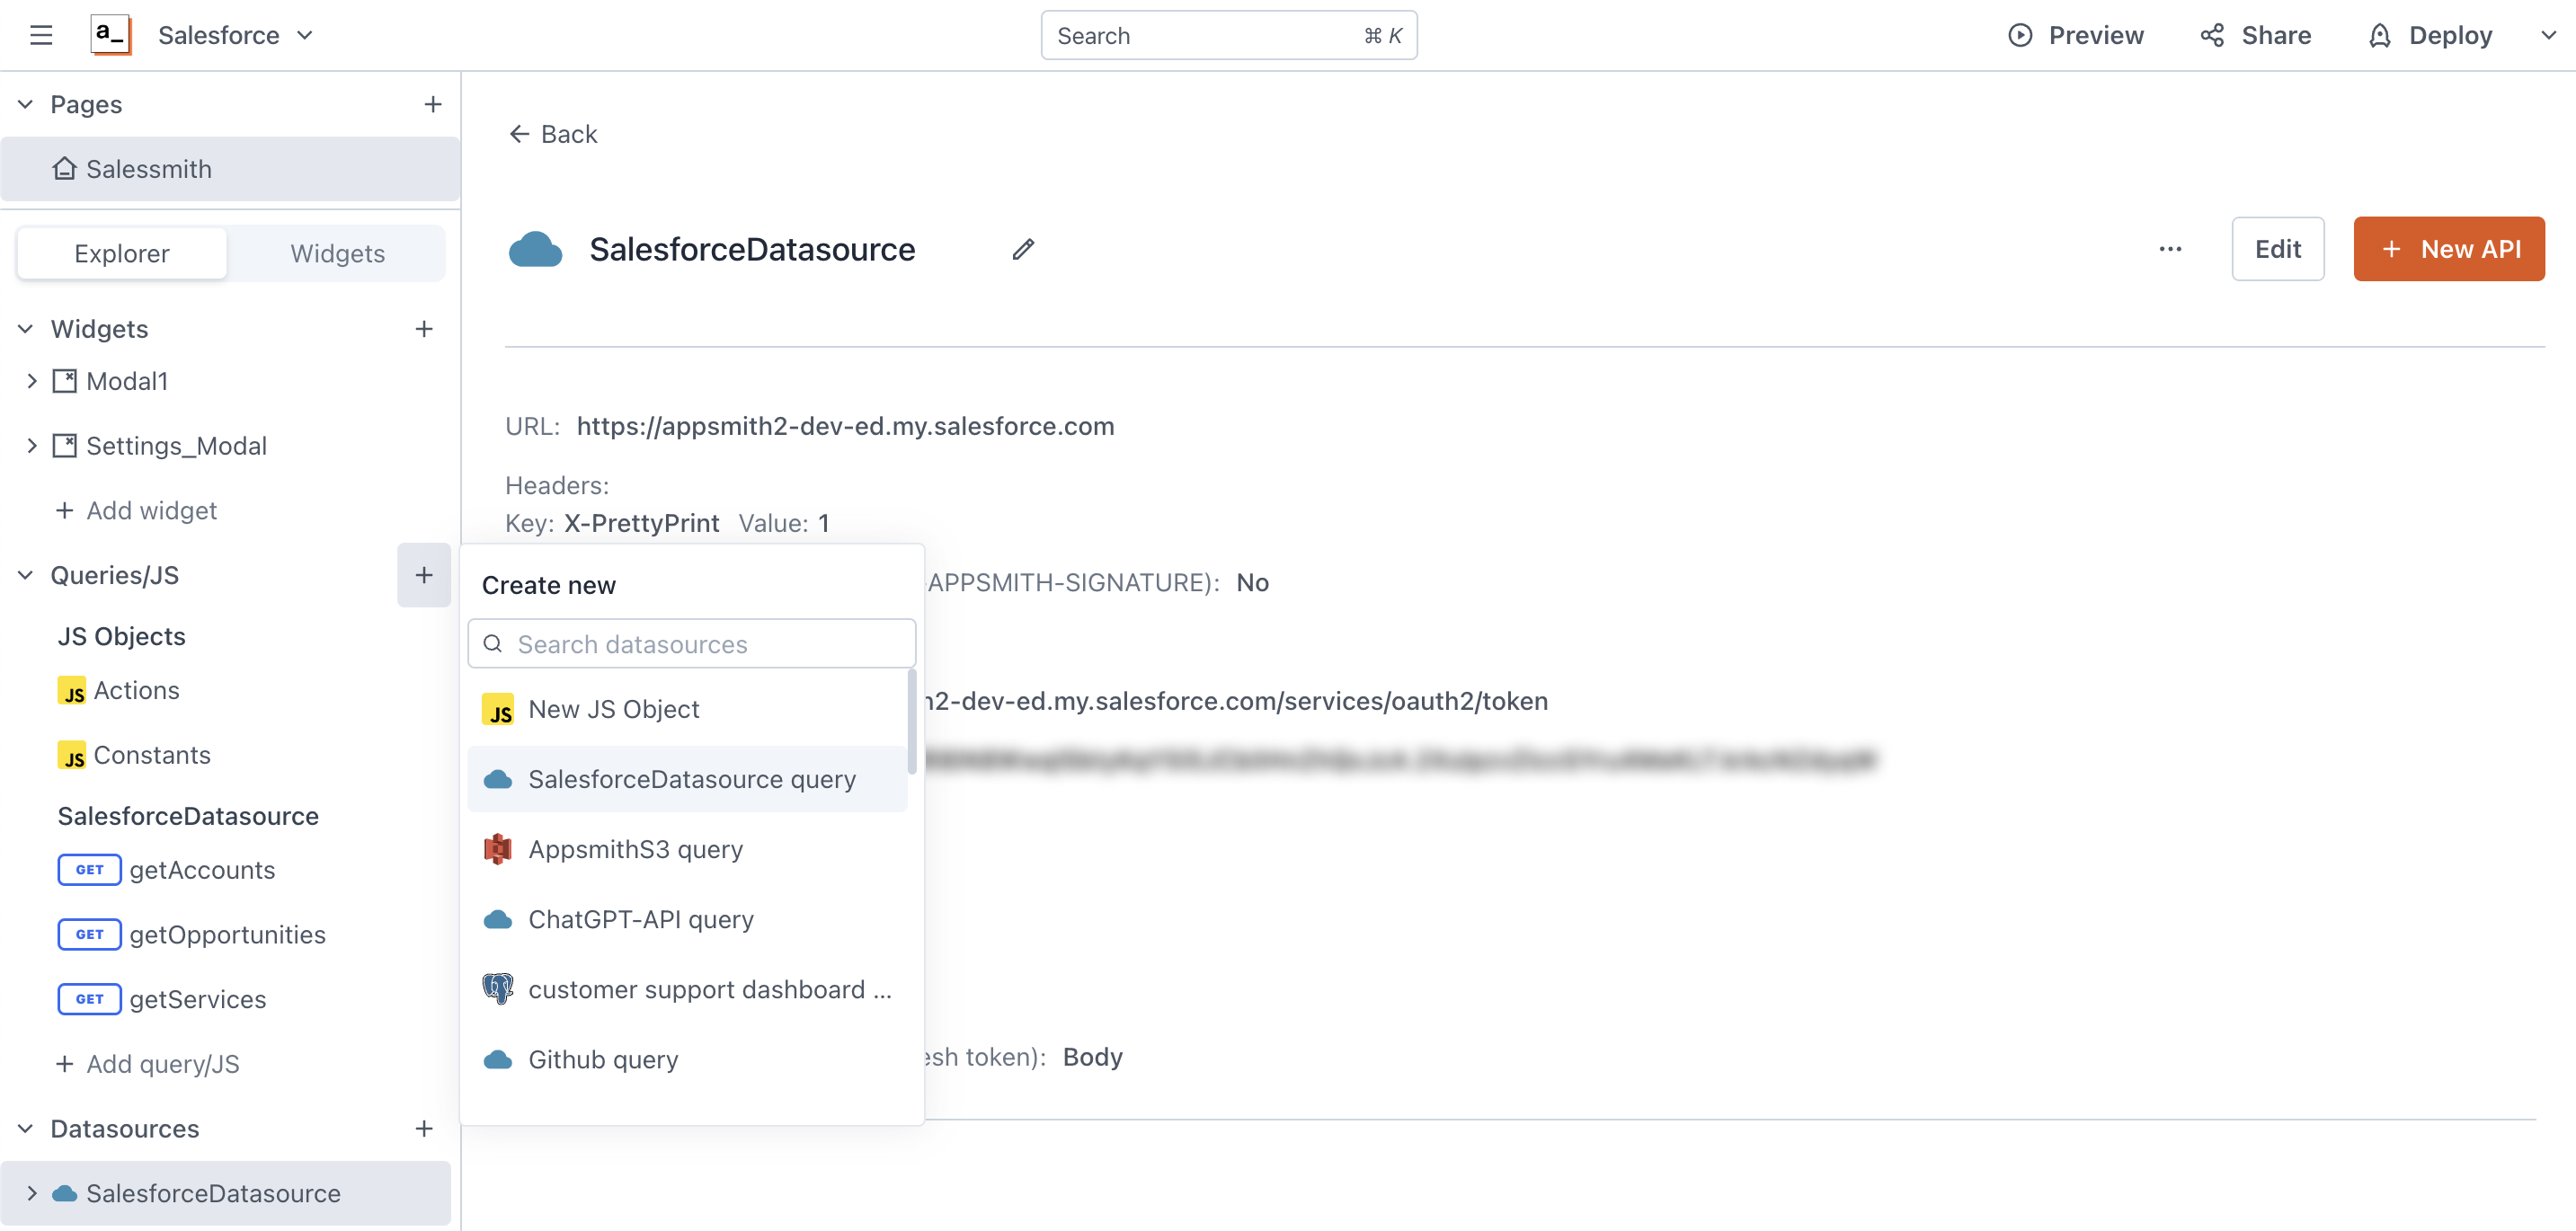
Now Appsmith will present a query builder UI for you to define your request, and it will pre-populate the base URL and configuration based on the one we defined in the datasource. We can reference Salesforce's API docs for the endpoints available to us here.
Lets name the API as getOpportunities and pass the endpoint to retrieve certain fields from the Opportunities object of Salesforce.
I am using an example endpoint here:/services/data/v56.0/query/?q=SELECT id, name, createdDate from Opportunity.
Run the API and you will get a response with an array of records of the Opportunities, as seen below.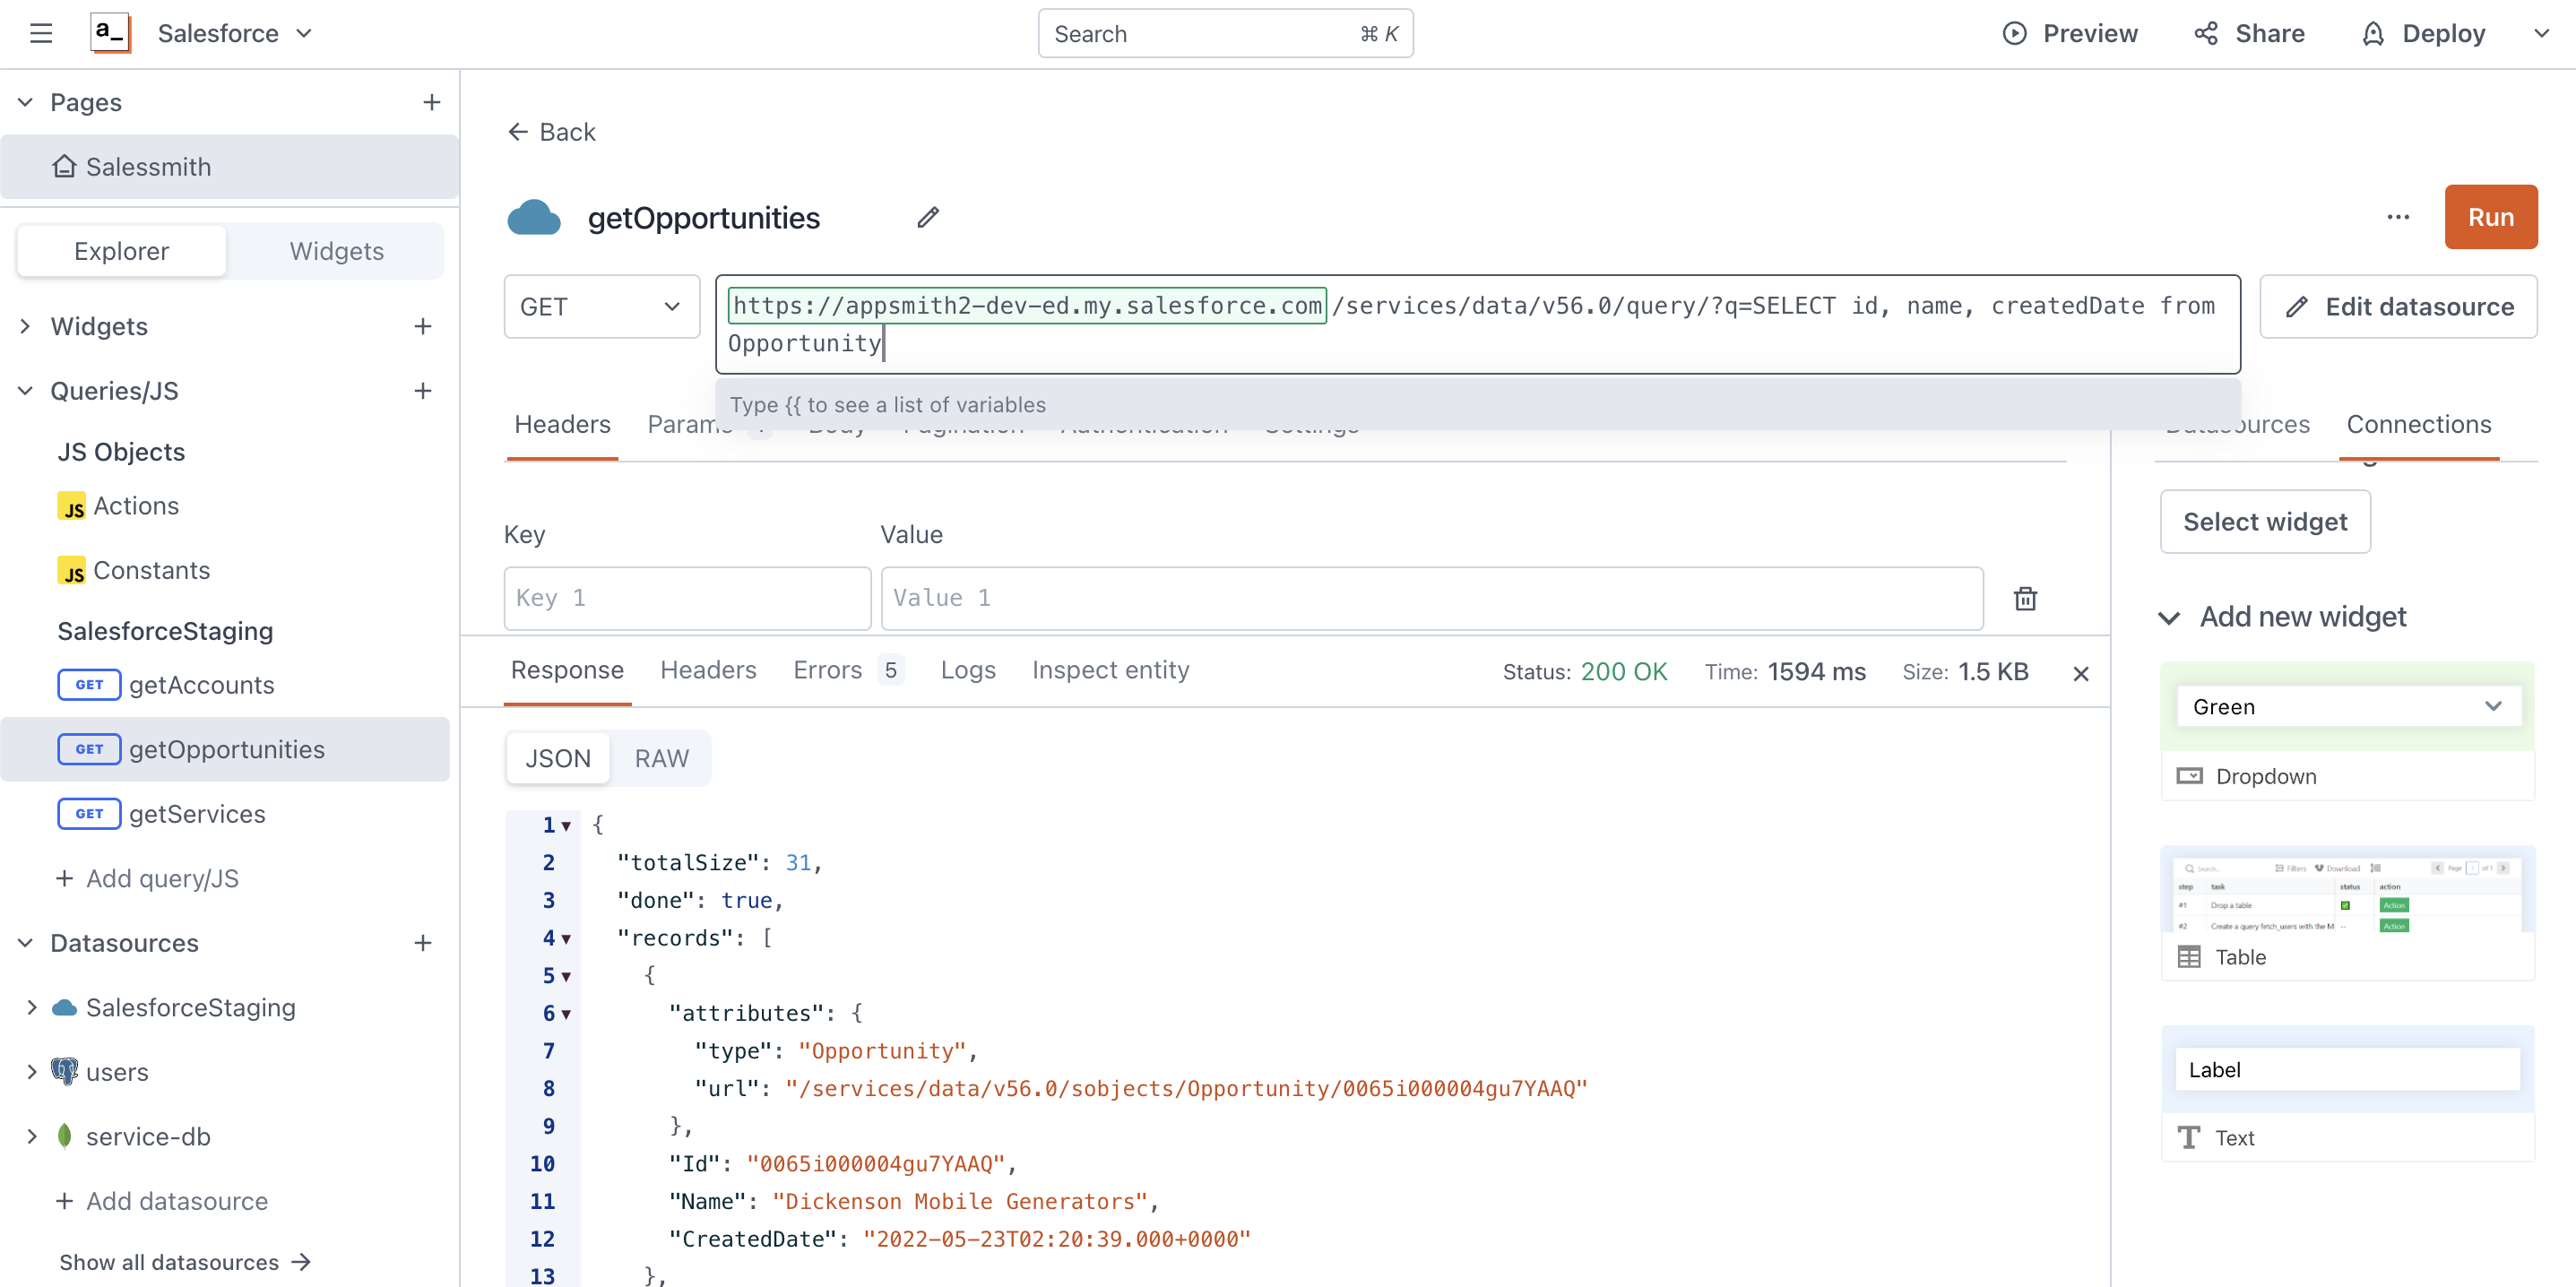
Now, this API correctly authenticates, automatically injects the token on the requests and pulls information from Salesforce with no problems.
So next step would be to bind this information into the UI widgets provided in Appsmith. You can click on the Table widget preview on the right of this page, to quickly connect the records array to Table.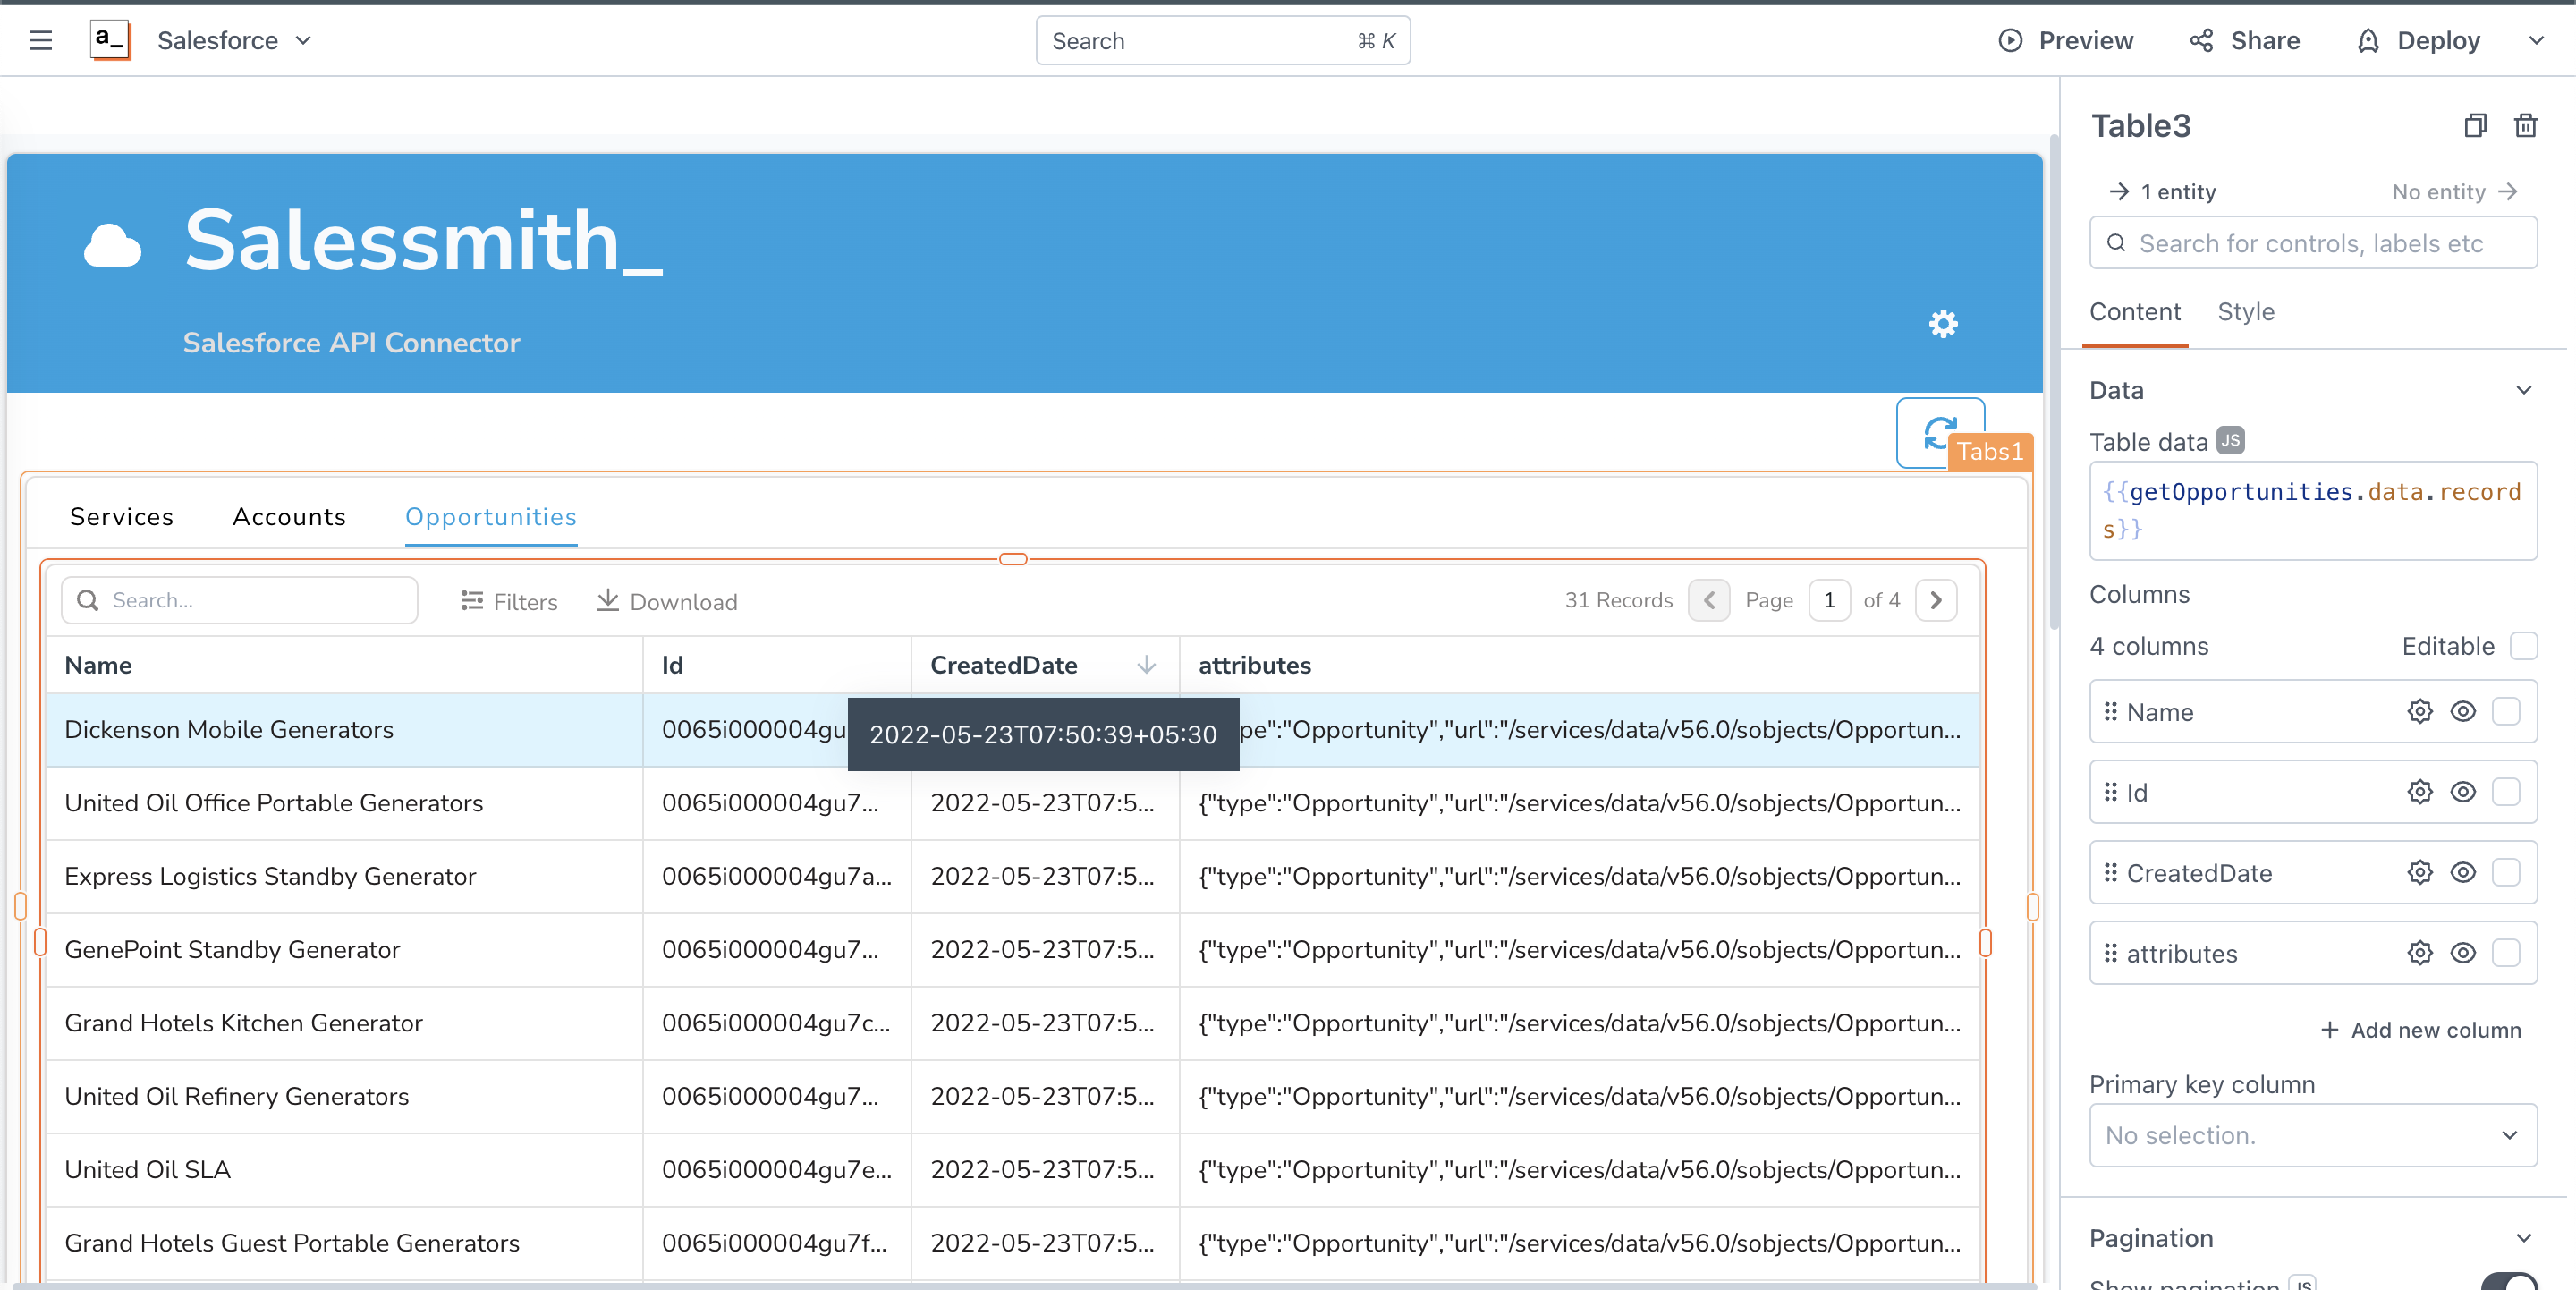
Conclusion
We reviewed how to use Appsmith's OAuth2 and what the process of generating a new app in Salesforce looks like. Now you have what it takes to start bringing all your information from Salesforce into Appsmith, we would be more than happy to see what you are capable of building, and to keep it even simple for you, here you can find our Appsmith's sample forkable app!


![Thumbnail for the [FTW] Building a Calendar Widget Using Fullcalendar.js & the Google Calendar API 🗓️ video](/sites/default/files/styles/card_image/public/video_thumbnails/fSG_-tS0tUZYnK_KGq62_rsVZejErRRnMuhOL8HEl8k.jpg?itok=eqB2GYof)
It seems the refresh token flow does not work. INVALID_SESSION_ID error
Just for someone else who is looking - please disable "Require Proof Key for Code Exchange (PKCE) Extension for Supported Authorization Flows" checkbox in your Connected App's settings
This article has been now updated with an enhancement on Appsmith's side ie with the Authorization expires in field and few changes in the Salesforce Connected App configuration to ensure that the refresh token flow does not fail.